If you’re craving a sweet treat that’s easy to whip up, you’ve come to the right place. No-Bake Cheesecake Jars are the perfect solution for a creamy dessert without the oven hassle. With just a few simple ingredients, you can create delightful layers of cheesecake goodness, topped with fresh berries. Join me as we explore this fun and delicious recipe that’s sure to impress your family and friends!
Ingredients
To make no-bake cheesecake jars, gather these simple ingredients:
– 8 oz cream cheese, softened
– 1/2 cup powdered sugar
– 1 tsp vanilla extract
– 1 cup heavy whipping cream
– 1/2 cup sour cream
– 1 cup graham cracker crumbs
– 4 tbsp unsalted butter, melted
– 1/4 cup granulated sugar
– Fresh berries (strawberries, blueberries, or raspberries) for topping
– Mint leaves for garnish
These ingredients create a creamy and delightful treat. The cream cheese forms the base, while the heavy cream adds lightness. The graham cracker crumbs offer a crunchy layer. Using fresh berries and mint makes it look pretty and adds flavor.
Step-by-Step Instructions
Preparation Steps
1. Beating the cream cheese
Start with 8 oz of softened cream cheese. Place it in a large bowl. Use an electric mixer on medium speed. Beat until it becomes smooth and creamy. This step is key for a rich filling.
2. Mixing in powdered sugar and vanilla
Next, add 1/2 cup of powdered sugar. Pour in 1 tsp of vanilla extract. Mix until well combined. The sugar adds sweetness, while vanilla gives flavor.
3. Whipping the cream
In a separate bowl, pour 1 cup of heavy whipping cream. Use a whisk or mixer to whip it. Aim for stiff peaks. This means it should hold its shape. Gently fold the whipped cream into the cream cheese mixture. Be careful not to deflate it. This keeps your cheesecake light and fluffy.
Layering the Cheesecake
1. Creating the graham cracker base
In another bowl, mix 1 cup of graham cracker crumbs. Add 4 tbsp of melted unsalted butter and 1/4 cup of granulated sugar. Stir until all crumbs are coated. This mixture forms the crunchy base.
2. Assembling the cheesecake layers
Grab your jars. Start by adding 2 tablespoons of the graham cracker mixture at the bottom. Press it down gently with a spoon. Next, spoon in about 1/4 cup of the cheesecake filling. Repeat the layers, alternating between crumbs and filling. You can do 2 or 3 layers depending on jar size.
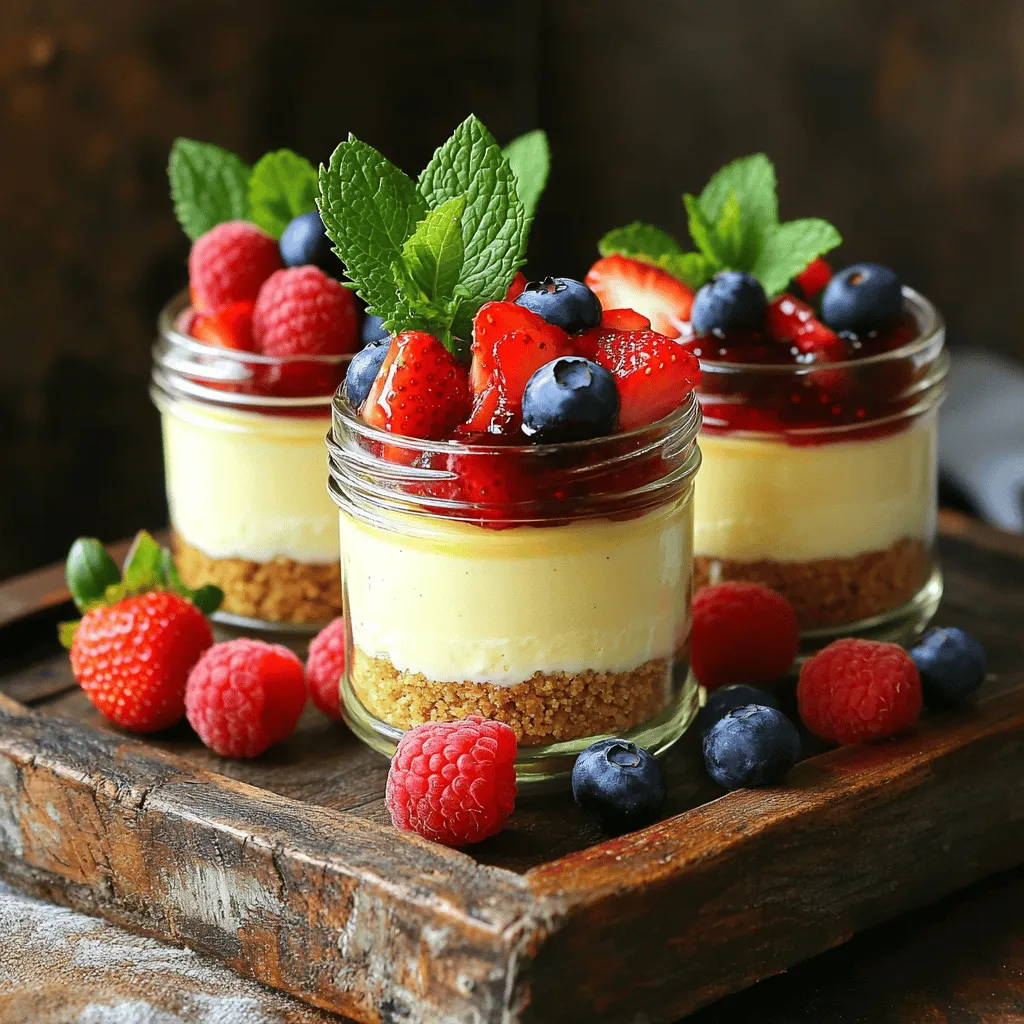
3. Topping with berries and mint
Once your jars are full, top each with fresh berries. Use strawberries, blueberries, or raspberries. Tuck in a few mint leaves for color and freshness.
Chilling Instructions
1. Refrigeration time for best results
Place the jars in the fridge. Let them chill for at least 2 hours. This allows the cheesecake to set and flavors to blend.
2. Serving recommendations
Serve the jars chilled. You can place them on a nice tray. Add more fresh berries and mint for a vibrant look. Enjoy your no-bake cheesecake jars!
Tips & Tricks
Perfecting Texture
To make the best no-bake cheesecake, you need a creamy texture. Start with softened cream cheese. This helps it blend smoothly. Mix it well with powdered sugar and vanilla. If you beat it too fast, you might get air bubbles.
Next, whip the heavy cream until stiff peaks form. This is key for a light texture. When folding the whipped cream into the cream cheese, do it gently. Use a rubber spatula and fold it in slowly. This keeps the air in, making the cheesecake light and fluffy.
Presentation Tips
Garnishing your cheesecake jars makes them look inviting. I love to top each jar with fresh berries. Strawberries, blueberries, and raspberries add color and flavor. You can also add mint leaves for a fresh touch.
When serving, place the jars on a decorative tray. Add some extra berries around the jars. This makes the dish pop and looks great for gatherings. People will love it!
Common Mistakes to Avoid
One big mistake is overmixing the filling. Mixing too long can make it runny. Blend just until smooth.
Another mistake is using stale graham crackers. Fresh crumbs give a better flavor and texture. If your crumbs are old, they won’t stick well. Always use fresh ingredients for the best taste.

Variations
Flavor Modifications
You can change the flavor of your no-bake cheesecake jars easily. One fun option is chocolate no-bake cheesecake jars. Just add cocoa powder to the cream cheese mix. Use about 1/4 cup of cocoa for a rich chocolate taste. Mix it well with the cream cheese and other ingredients. You’ll enjoy a creamy and decadent treat.
Another great choice is fruit-flavored variations. Try lemon or strawberry. For lemon, add the zest of one lemon and a bit of juice. This gives your jars a fresh, zesty flavor. For strawberry, blend fresh strawberries into a puree. Mix this puree into your cheesecake filling to create a fruity twist.
Alternative Toppings
Toppings can change the game. You can use whipped cream to add a light and fluffy texture. Just whip heavy cream with a bit of sugar until it holds peaks. Spoon this on top of your cheesecake jars. You can also add nutty or chocolatey add-ins. Crushed nuts, like almonds or pecans, add crunch. Chocolate shavings or chips bring extra sweetness. These toppings make your jars look pretty and taste amazing.
Dietary Alternatives
If you have dietary needs, there are options. For a gluten-free version, use gluten-free graham crackers. Many brands offer these now. They work just as well in the crust.
For those who want a vegan treat, look for dairy substitutes. Use vegan cream cheese and coconut cream instead of heavy cream. These ingredients give you a creamy texture without dairy. You can enjoy the same delicious taste while meeting your dietary needs.
Storage Info
Best Practices for Refrigeration
Your no-bake cheesecake jars will last in the fridge for about 3 to 5 days. To keep them fresh, cover each jar with a lid or plastic wrap. This prevents air from drying out the cheesecake. If you want to enjoy them later, store them without toppings. Add fresh berries and mint just before serving. This way, they stay vibrant and tasty.
Freezing Instructions
Yes, you can freeze no-bake cheesecake jars! Start by letting them chill in the fridge for at least two hours. After that, cover each jar tightly with plastic wrap and then foil. This helps keep out air and moisture. You can freeze them for up to 2 months.
To thaw, move the jars to the fridge and let them sit overnight. Avoid thawing them at room temperature. This method keeps the texture smooth. After thawing, top with fresh berries for a delicious treat. Enjoy your creamy delight!
FAQs
How long does it take for no-bake cheesecake to set?
It takes about 2 hours for no-bake cheesecake to set in the fridge. This time allows the filling to firm up and develop its creamy texture. If you can, let it chill longer, even overnight. This extra time enhances the flavor.
Can I use low-fat ingredients for this recipe?
Yes, you can use low-fat cream cheese and sour cream. This change will still give you a tasty cheesecake. However, the texture may be less rich. If you want to keep it light, consider using low-fat whipped cream too.
Is it necessary to use fresh berries for topping?
Fresh berries add color and flavor, but they are not a must. You can skip them or use other toppings like chocolate or caramel sauce. If you choose frozen berries, just thaw them and drain excess juice before adding.
How do I know if my cheesecake filling is ready?
Your cheesecake filling should be smooth and thick. When you mix it, there should be no lumps. If it looks creamy and holds its shape, it is ready to use. Be careful not to overmix, as this can make it runny.
What size jars are best for serving?
I recommend using 8 oz jars for serving. This size is perfect for a single serving of cheesecake. If you want smaller portions, 4 oz jars work well too. Just adjust the layer sizes to fit the jars you choose.Add powdered sugar and vanilla, blending well. In a new bowl, whip the heavy cream until it forms stiff peaks. Carefully fold this whipped cream into the cream cheese mix. Then, add sour cream and blend until smooth.
Next, prepare your graham cracker base. Combine crumbs, melted butter, and sugar in a separate bowl. Mix until the crumbs are well coated.
Now, it’s time to layer! Start with two tablespoons of the graham cracker mixture at the bottom of each jar. Press down gently with the back of a spoon. Spoon in about a quarter cup of the cheesecake filling on top. Repeat the layers until your jars are full.
Finally, top each jar with fresh berries and a mint leaf for a pop of color. Chill the jars in the fridge for at least two hours to let them set.Enjoy your creamy, dreamy no-bake cheesecake jars!
You now have a complete guide to making no-bake cheesecake jars. We covered ingredients, preparation, layering, and storage. Remember to chill your jars for the best taste and texture. Experiment with different flavors and toppings to keep it fresh. Avoid common mistakes, like overmixing. Enjoy crafting these sweet treats for yourself or friends. With a few steps, you can impress everyone with a delicious dessert. Happy baking!
.png)


