Looking for a fun and tasty treat for your kids? You’re in the right place! These Sweet Kids-Friendly Peanut Butter Oat Bars are packed with wholesome ingredients like rolled oats and natural peanut butter. Your little ones will love them, and you’ll appreciate how easy they are to make! Join me as we explore simple steps, tips, and tasty variations that make these bars a must-try treat for every family.
Why I Love This Recipe
- Perfect for Little Hands: These peanut butter oat bars are a great size for little fingers to grab and enjoy, making them a perfect snack for kids.
- Nutritious Ingredients: Packed with rolled oats and natural peanut butter, these bars provide a healthy energy boost, ideal for active children.
- Easy to Make: With just a few simple ingredients and minimal prep time, you can whip up a batch of these delicious bars in no time.
- Customizable Options: Feel free to add in your child’s favorite mix-ins, such as chocolate chips or dried fruit, for a personal touch!
Ingredients
List of Essential Ingredients
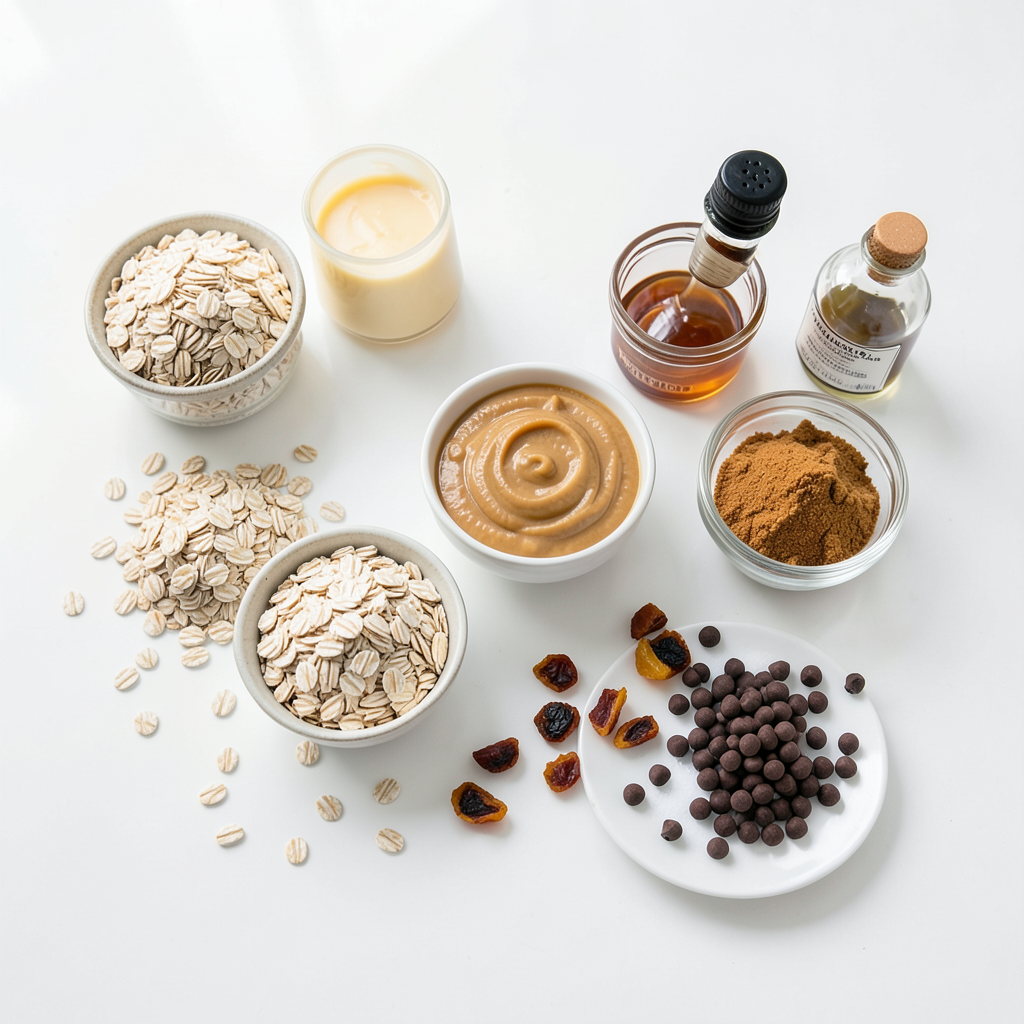
To make sweet kids-friendly peanut butter oat bars, gather these key ingredients:
- 1 cup rolled oats
- 1/2 cup natural peanut butter
- 1/4 cup honey or maple syrup
These ingredients form the base of our bars. Rolled oats provide fiber and texture. Natural peanut butter adds creaminess and protein. Honey or maple syrup gives sweetness and binds everything together.
Optional Add-ins
You can make these bars even more fun with optional add-ins like:
- 1/2 cup mini chocolate chips
- 1/2 cup dried fruit (raisins, cranberries, or apple pieces)
These add-ins let you customize the bars. Mini chocolate chips add a chocolatey touch. Dried fruit packs in flavor and chewiness. Kids love picking their favorites!
Equipment Needed
You will need a few simple tools to make these bars:
- 8x8 inch baking dish
- Parchment paper
- Mixing bowls and spatula
Using an 8x8 inch dish helps create the right size for the bars. Parchment paper makes removal easy. Mixing bowls and a spatula help combine the ingredients smoothly. With these tools ready, you're set to whip up a tasty treat!
Step-by-Step Instructions
Preheating and Preparing the Dish
First, we start by preheating the oven. Set it to 350°F (175°C). This step is key for even baking. Next, take an 8x8 inch baking dish and line it with parchment paper. Make sure to leave some paper hanging over the edges. This helps us lift the bars out later.
Mixing the Ingredients
Now it’s time to mix! In a large bowl, combine the rolled oats, natural peanut butter, honey or maple syrup, and brown sugar. Use a sturdy spoon to mix until it looks well blended. Next, add the vanilla extract and salt. Keep stirring until the mixture feels thick and sticky. If you like, fold in mini chocolate chips or dried fruit now. This adds fun flavors and textures to your bars.
Baking the Oat Bars
Pour the thick mixture into your prepared baking dish. Spread it out evenly using a spatula or the back of a spoon. Press it down firmly so it holds together. Bake in the oven for 20 to 25 minutes. Look for the edges to turn golden brown. The center should feel firm when touched. After baking, let the bars cool in the pan for about 10 minutes. Then, use the parchment paper to lift them out. Allow them to cool completely on a wire rack before cutting into squares or rectangles.
Tips & Tricks
Achieving the Perfect Texture
To make your peanut butter oat bars just right, focus on mixing well. You want to blend the oats, peanut butter, honey, and brown sugar until they stick together. Use a sturdy spoon or spatula. Mix until it feels thick and sticky. Pressing the mixture firmly into the baking dish is key. This step helps the bars stick together as they bake. Use the back of your spoon or spatula to push down hard on the mixture. This makes sure your bars hold their shape.
Ingredients Substitutions for Dietary Needs
If you need gluten-free options, use gluten-free oats. They work just as well and keep the taste great. For nut-free options, try sunflower seed butter. It gives a similar texture without the nuts. You can also use soy nut butter for a nut-free choice. Always check labels to ensure your substitutes fit your dietary needs.
Enhancing Flavor
To make your bars sweeter, add a bit more honey or maple syrup. Start with a tablespoon and taste as you go. You can also add spices like cinnamon or nutmeg for extra flavor. A pinch of these spices can make your bars special. If your kids love chocolate, fold in mini chocolate chips. They add sweetness and a fun treat in each bite. You can also try adding dried fruit like raisins or cranberries for more taste and texture.
Pro Tips
- Use Natural Peanut Butter: Opt for natural peanut butter without added sugars or oils for a healthier option.
- Press Firmly: Make sure to press the mixture firmly into the baking dish to ensure the bars hold together once baked.
- Cool Completely: Allow the bars to cool completely before cutting to prevent them from crumbling.
- Store Properly: Keep the bars in an airtight container at room temperature for up to a week or refrigerate for longer freshness.
Variations
Healthy Additions
You can make your peanut butter oat bars even better. Adding nuts or seeds gives a nice crunch. Try walnuts, almonds, or sunflower seeds. Each adds flavor and nutrition. You can also use nut butter alternatives. Sunflower seed butter works well for kids with nut allergies.
Flavor Variants
Want to change the taste? Cocoa powder adds a rich chocolate flavor. Just mix in one or two tablespoons. Kids love chocolate! You can also try fruity flavors. Mash a ripe banana or add small apple pieces. These give natural sweetness and moisture.
Textural Variants
You can choose how your bars feel. For crunchy bars, bake them a bit longer. This gives a nice bite. For chewy bars, reduce the baking time by a few minutes. Watch for golden edges and a firm center. This way, you can enjoy both crunchy and chewy versions!
Storage Info
Best Practices for Storing Bars
To keep your peanut butter oat bars fresh, use an airtight container. This helps to keep moisture out. You can store the bars at room temperature for up to a week. If it is hot and humid, refrigeration is better. Place them in the fridge to extend their freshness.
Freezing Options
To freeze peanut butter oat bars, first let them cool completely. Then cut them into squares or rectangles. Wrap each piece tightly in plastic wrap. Place the wrapped bars in a freezer bag or container. They can last up to three months in the freezer.
When you want to eat one, take it out and let it thaw at room temperature. You can also microwave it for about 15 seconds. This makes the bars soft again and ready to enjoy.
Shelf Life Information
These bars stay fresh for about a week at room temperature. If stored in the fridge, they last up to two weeks. Look for signs of spoilage like a change in smell or texture. If they feel too dry or hard, it’s time to toss them. Always trust your senses!
FAQs
How long do peanut butter oat bars last?
Peanut butter oat bars last about one week at room temperature. Keep them in an airtight container. If you want them to last longer, store them in the fridge for up to two weeks. For even longer storage, you can freeze them. In the freezer, they can last up to three months. Just make sure to wrap them well to avoid freezer burn!
Can I use creamy or crunchy peanut butter?
You can use either creamy or crunchy peanut butter. Creamy peanut butter gives a smooth texture, while crunchy adds a nice bite. Both options work well in this recipe. Choose based on what your kids like best. You can even mix both types for fun!
What can I substitute for honey or maple syrup?
If you don’t have honey or maple syrup, you can use agave nectar or brown sugar. You could even use corn syrup, but it may change the flavor a bit. Another option is to use mashed bananas to add sweetness. Just remember, the bars may be a bit softer with banana.
Are these bars suitable for school lunches?
Yes, these bars are great for school lunches! They are easy to pack and tasty too. They provide energy and nutrients for kids. Just make sure no one has nut allergies in your child's class. If there are nut allergies, consider using sun butter instead of peanut butter.
You now know how to make delicious peanut butter oat bars. Using simple ingredients like rolled oats and peanut butter, you can create a tasty snack. Don't forget to explore add-ins for flavor and texture. Pay close attention to mixing and baking to get the best results. Storing your bars properly will keep them fresh. Enjoy customizing your recipe to fit your tastes and needs. With these tips, you can be sure your oat bars are always a hit!