Looking for a sweet treat that’s easy to whip up? These Raspberry Almond Shortbread Bars are the perfect choice! With a buttery base topped with tart raspberry preserves and crunchy almonds, they promise a delightful bite. Join me as I walk you through each simple step. You’ll impress friends and family with this quick recipe that’s perfect for any occasion! Let’s get baking!
Why I Love This Recipe
- Delicious Flavor Combination: The pairing of sweet raspberries and nutty almonds creates a delightful taste explosion in every bite.
- Easy to Make: This recipe is straightforward, making it perfect for both novice and experienced bakers to whip up quickly.
- Perfect for Any Occasion: Whether it's a party, a picnic, or a cozy night in, these shortbread bars are a hit with everyone.
- Make Ahead Friendly: These bars can be made in advance and stored, making them a convenient treat for busy days.
Ingredients
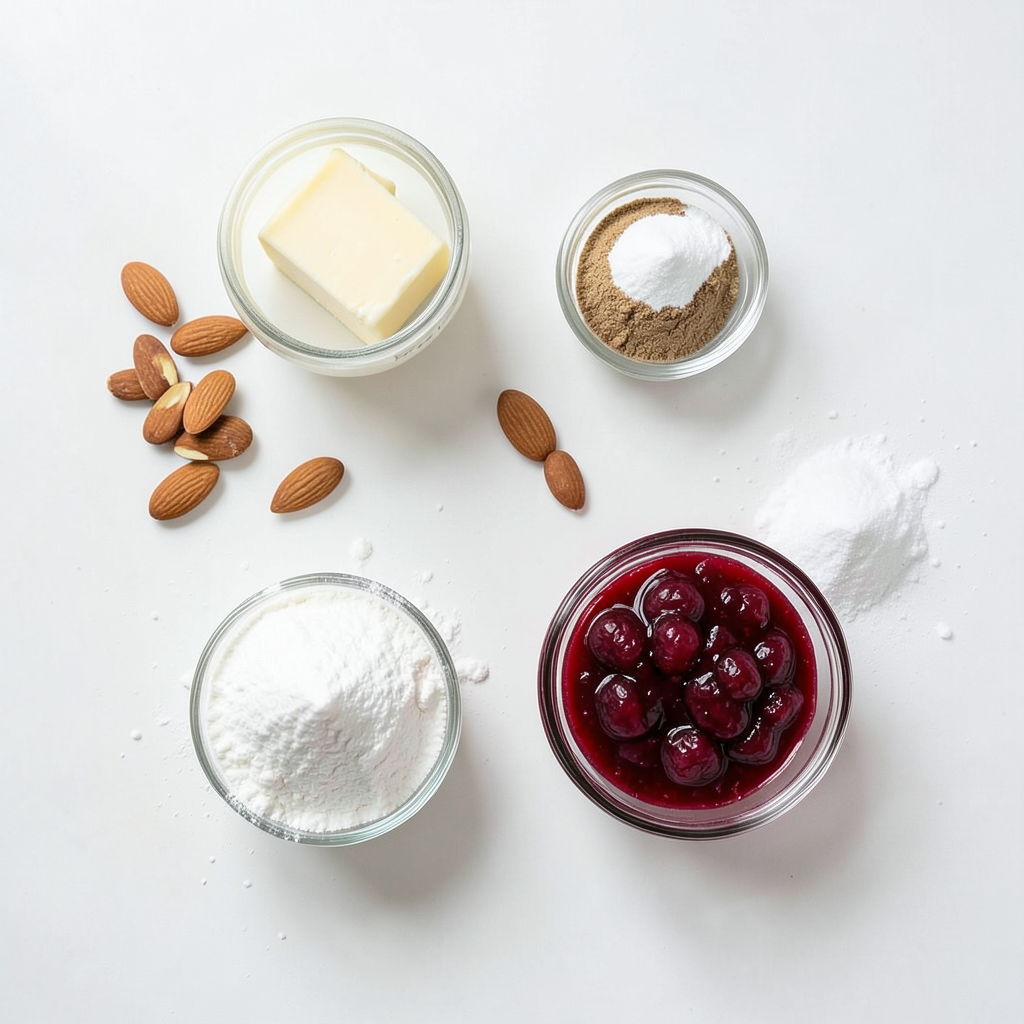
To make Raspberry Almond Shortbread Bars, you need simple and fresh ingredients. Here’s the full list:
- 1 cup unsalted butter, softened
- ¾ cup powdered sugar
- 2 cups all-purpose flour
- 1 teaspoon almond extract
- ¼ teaspoon salt
- 1 cup raspberry preserves
- ½ cup sliced almonds (toasted if desired)
- Zest of 1 lemon
Each ingredient plays a key role. The unsalted butter gives a rich taste. Powdered sugar makes the bars sweet and light. All-purpose flour forms the base for the shortbread. Almond extract adds a lovely nutty flavor. A pinch of salt balances the sweetness. Raspberry preserves add a fruity, tart layer. Sliced almonds give a nice crunch. Lemon zest brightens the overall taste.
Using high-quality ingredients will enhance your bars. Fresh raspberry preserves make a big difference. For the best flavor, consider toasting the almond slices. This adds a warm, nutty aroma. Zesting a fresh lemon also boosts flavor. These ingredients work together to create a delicious treat.
Step-by-Step Instructions
Preparation and Mixing
1. Preheat the oven: Set your oven to 350°F (175°C). Grease a 9x13-inch baking pan or line it with parchment paper. This helps with easy removal later.
2. Creaming the butter and sugar: In a large bowl, mix 1 cup of softened butter and ¾ cup of powdered sugar. Use an electric mixer. Beat until the mixture is light and fluffy. This step creates air pockets, making the bars soft.
Assembling the Bars
3. Pressing the dough: Take about two-thirds of the dough and press it into the bottom of your prepared pan. Make sure it’s even. This forms the base of your bars.
4. Spreading the raspberry preserves: Carefully spread 1 cup of raspberry preserves over the pressed dough. Leave a small border around the edges. This adds sweetness and a fruity burst.
5. Crumbling the remaining dough: Crumble the rest of the dough over the raspberry layer. Ensure some of the raspberry filling peeks through. This gives a nice look and texture.
Baking Process
6. Baking time and temperature: Place the pan in the oven. Bake for 25-30 minutes. Look for lightly golden edges and a set center.
7. Cooling instructions: After baking, remove the pan from the oven. Let it cool for at least 15 minutes. Lift the bars out using the parchment paper. Transfer to a wire rack to cool completely. This cooling step helps the bars firm up and makes cutting easier.
Tips & Tricks
Perfecting the Texture
To get the right consistency, use softened butter. This helps the dough mix well. Start by creaming the butter and powdered sugar until it is light and fluffy. Next, add flour, almond extract, and salt. Mix just until the dough forms. It may look crumbly, but it should hold together when pressed. Mixing too much makes the bars tough.
Enhancing Flavor
Adding lemon zest brightens the taste. It gives a fresh and tangy kick. You can also use fresh or flavored raspberry preserves. This choice can change the flavor and make it unique. Try different brands or homemade preserves for a fun twist.
Presentation Tips
Dust the bars with powdered sugar before serving. This makes them look fancy and inviting. When serving, cut them into neat squares or bars. You can place them on a nice platter. Consider adding a few fresh raspberries or mint leaves for color. These small touches can impress your guests!
Pro Tips
- Use Room Temperature Butter: Make sure your butter is softened to room temperature for easier creaming with the powdered sugar, resulting in a lighter and fluffier dough.
- Experiment with Preserves: Feel free to swap out the raspberry preserves for other flavors like strawberry or apricot for a unique twist on this classic recipe.
- Toasting Almonds: Toasting the almond slices enhances their flavor and adds a delightful crunch. Just keep an eye on them to prevent burning!
- Chill Before Cutting: Allow the bars to cool completely before cutting to ensure clean edges. For even easier slicing, you can chill them in the refrigerator for a bit.
Variations
Flavor Combinations
You can mix things up with different fruit preserves. Try using strawberry or apricot preserves for a twist. Each fruit adds its own unique flavor, making every batch special. If you love chocolate, add some chocolate chips. They pair well with the almond and raspberry flavors. Just fold in half a cup of chocolate chips before pressing the dough. This will add a rich, sweet surprise in every bite.
Dietary Adjustments
For gluten-free options, use a gluten-free flour blend instead of all-purpose flour. Make sure it has a good binding agent like xanthan gum. This will help your bars hold together. If you want to make them vegan, swap the butter for plant-based margarine. You can also use maple syrup in place of powdered sugar for sweetness. These changes keep the bars delicious while fitting different diets.
Storage Info
Best Practices for Storage
To keep your Raspberry Almond Shortbread Bars fresh, store them at room temperature. Place them in an airtight container. This keeps them soft and tasty for up to three days. If you want to keep them longer, refrigeration is a good choice. In the fridge, they can last for about a week. Just make sure they are in a sealed container to avoid drying out.
Freezing Instructions
Freezing these bars is super easy and great for later. First, let the bars cool completely. Then, cut them into squares or bars. Wrap each piece in plastic wrap. After that, place them in a freezer-safe bag or container. They can stay in the freezer for up to three months.
When you want to enjoy them, take the bars out and thaw them. Place them in the fridge overnight for the best results. If you’re in a hurry, you can leave them at room temperature for a few hours. Enjoy your sweet treat anytime!
FAQs
Common Questions
Can I use frozen raspberries? Yes, you can use frozen raspberries for these bars. Thaw them first and drain extra juice. This keeps the bars from getting too soggy.
How long do the bars last? These bars last about one week at room temperature. If you chill them in the fridge, they can last up to two weeks.
Can I make these bars in advance? Absolutely! You can make the bars a day or two ahead. Just store them in an airtight container to keep them fresh.
Troubleshooting
Why did my bars crumble? If your bars crumble, the dough may have been overmixed. Mix just until combined for better texture.
How can I fix overbaking? If you overbake the bars, they may dry out. To fix this, serve them with a scoop of ice cream or a dollop of whipped cream.
Serving Suggestions
Best accompaniments These bars pair well with fresh fruit or a light dusting of powdered sugar. Serve with a side of whipped cream for extra sweetness.
Pairing with beverages Enjoy these bars with tea, coffee, or a refreshing lemonade. The flavors blend beautifully, making each bite delightful.
In this blog post, we covered essential ingredients and steps for making delicious raspberry bars. You learned about mixing, baking, and storing them. We also shared tips for improving flavor and texture. Remember, you can adapt the recipe to suit your taste and dietary needs.
Enjoy experimenting with variations like different fruit preserves or gluten-free options. With the right touches, these bars can become your new favorite treat. Trust the process, and happy baking!