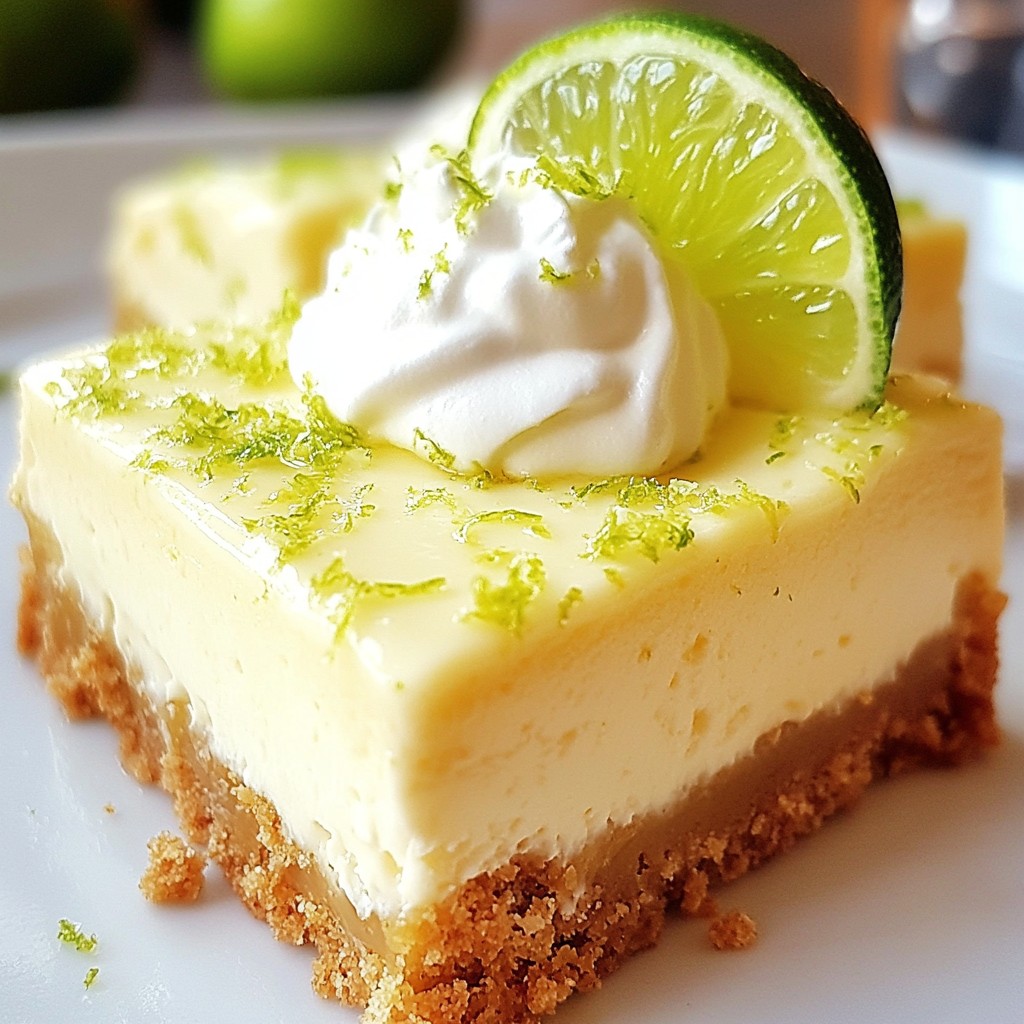
Are you ready to indulge in a sweet treat that’s both simple and delightful? Key Lime Cheesecake Bars are the perfect dessert to impress your friends and family. With a creamy filling and a crunchy crust, these bars are a flavor dream. Follow my easy step-by-step guide to create the perfect dessert for any occasion. Let's dive in and make these delicious bars together!
Why I Love This Recipe
- Bright and Tangy Flavor: The combination of fresh key lime juice and zest gives these cheesecake bars a refreshing citrus flavor that's perfect for any occasion.
- Creamy Texture: The cream cheese filling is incredibly smooth and rich, making every bite a delightful experience.
- Easy to Make: With simple ingredients and straightforward steps, these bars are a breeze to prepare, making them perfect for both novice and experienced bakers.
- Beautiful Presentation: Topped with whipped cream and lime wedges, these bars look as good as they taste, making them an impressive dessert for gatherings.
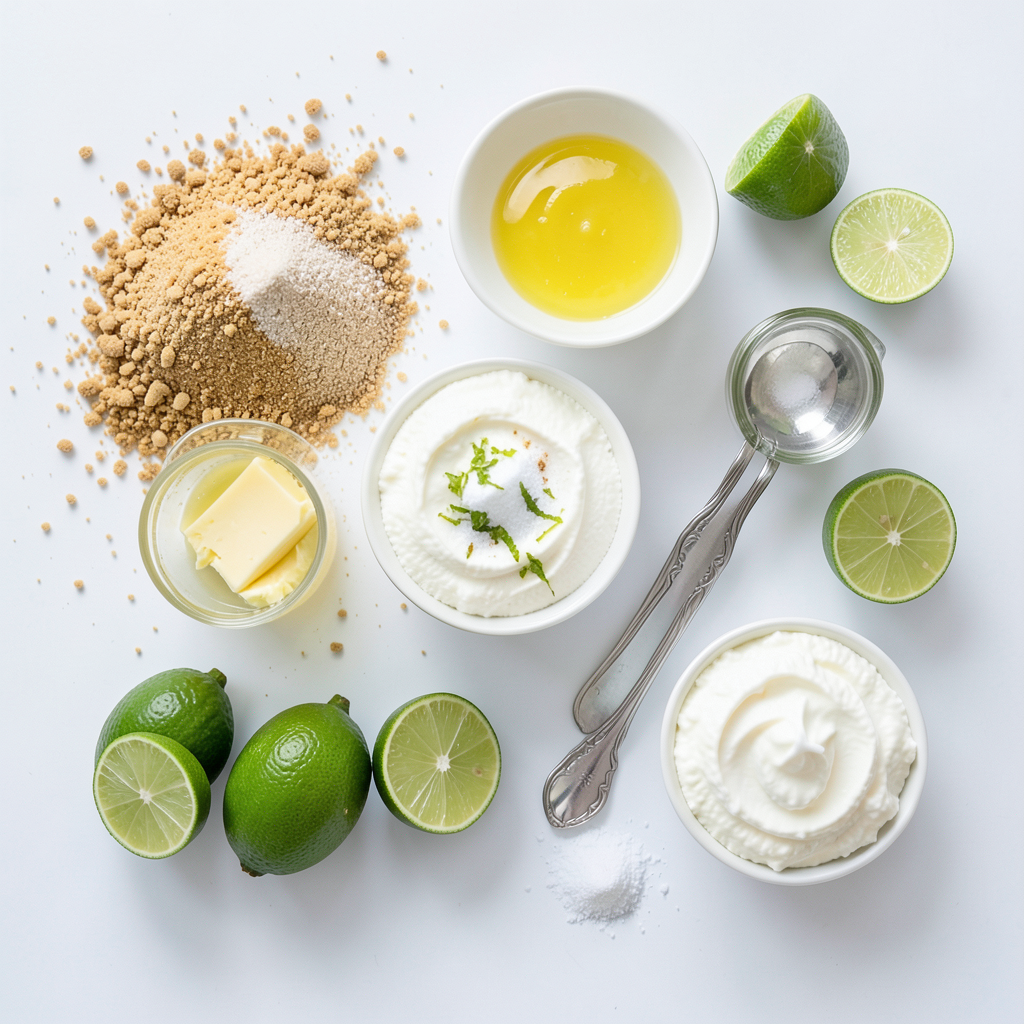
Ingredients
List of Essential Ingredients
For the crust, you need:
- 1 ½ cups graham cracker crumbs
- ⅓ cup granulated sugar
- ½ cup unsalted butter, melted
For the cheesecake filling, gather:
- 16 oz cream cheese, softened
- 1 cup granulated sugar
- 3 large eggs
- ½ cup fresh key lime juice
- 2 teaspoons lime zest
- 1 teaspoon vanilla extract
- Pinch of salt
For the final touches, prepare:
- Whipped cream (for topping)
- Lime wedges (for garnish)
These ingredients create a creamy and tangy treat. The crust gives a crunchy texture, while the filling offers a smooth, rich flavor. The lime juice and zest bring a bright, refreshing taste, perfect for any occasion. Whipped cream and lime wedges elevate the presentation, making the bars look as good as they taste.
Step-by-Step Instructions
Preparation of the Crust
First, you need to mix the graham cracker crumbs, sugar, and melted butter. Use a medium bowl for this. Combine them well until you see a sandy texture. Next, press this mixture firmly into the bottom of your prepared 8x8-inch baking pan. Make sure it’s even. This will be your crust.
Now, bake the crust in a preheated oven at 350°F (175°C) for 8–10 minutes. You want it to be lightly golden. Once done, take it out and let it cool while you prepare the cheesecake filling.
Making the Cheesecake Filling
In a large mixing bowl, beat the softened cream cheese with 1 cup of sugar. Mix it until it’s smooth and creamy. This step is key for a silky texture. Then, add the eggs one by one, mixing well after each addition.
Next, stir in the fresh key lime juice, lime zest, vanilla extract, and a pinch of salt. Mix until everything is well combined. This is where the magic happens, as the flavors blend beautifully. Now, pour the cheesecake filling over the cooled crust. Spread it out evenly to cover the crust completely.
Baking Process
Bake the cheesecake in the oven for 25–30 minutes. You will know it’s done when the edges are set and the center has a slight jiggle. Don’t worry; it will firm up as it cools.
Once it’s out of the oven, let the cheesecake cool completely in the pan at room temperature. After that, refrigerate it for at least 4 hours, or overnight if you can wait. This chilling time helps the flavors meld and gives it the best texture.
Tips & Tricks
Achieving the Perfect Texture
To get a creamy cheesecake, follow a few key steps:
- Use room temperature ingredients: Let your cream cheese, eggs, and other ingredients sit out for about 30 minutes before mixing. This helps them blend smoothly.
- Beat well: When mixing the cream cheese and sugar, beat until the mixture is very smooth. This ensures no lumps in your filling.
- Don’t overmix: Once you add the eggs, mix just until combined. Overmixing can add air, causing cracks in your cheesecake.
These practices help you create a cheesecake that is rich and creamy.
Serving Suggestions
Serving your Key Lime Cheesecake Bars can be fun and simple:
- Presentation tips: Cut the bars into even squares. Dust the tops with powdered sugar for a nice touch.
- Recommended pairings: A dollop of whipped cream adds a creamy finish. Lime wedges on the side will enhance the flavor. Serve with a cold drink like iced tea or lemonade for a refreshing combo.
These tips will help you impress your guests and make your dessert shine!
Pro Tips
- Use Fresh Key Limes: Freshly squeezed key lime juice enhances the flavor significantly compared to bottled juice, providing an authentic tangy taste.
- Chill Thoroughly: Allowing the cheesecake to chill overnight not only improves the texture but also allows the flavors to meld beautifully.
- Prevent Cracks: To avoid cracks on the surface, avoid overmixing the filling and bake at a lower temperature if necessary, ensuring a gentle cook.
- Presentation Matters: Dust the bars with powdered sugar and add lime wedges for an elegant look that enhances the dessert's appeal.
Variations
Flavor Modifications
You can change the taste of Key Lime Cheesecake Bars easily. A fun swap is using lemon or orange juice. These fruits give a fresh twist and work well in desserts. You can also mix in some chocolate. A drizzle of chocolate sauce on top adds a sweet contrast to the tangy lime flavor. You might even try crumbled cookies or nuts for extra crunch.
Healthy Alternatives
If you want a lighter version, use low-fat cream cheese. It cuts the fat while keeping the creamy texture. You can also choose alternative sweeteners. Stevia or agave can replace granulated sugar. This way, you will enjoy a guilt-free treat.
For the crust, there are gluten-free options too. Almond flour or coconut flour works great. Just mix them with some melted butter and a bit of sugar for a nice base. These changes make the bars friendly for different diets without losing taste.
Storage Info
Best Practices for Storing Leftovers
To keep your Key Lime Cheesecake Bars fresh, follow these tips:
- Refrigeration: Store the bars in an airtight container. They should stay fresh for up to five days. Make sure to place a piece of parchment paper between layers to avoid sticking.
- Freezing: For long-term storage, freeze the cheesecake bars. Cut them into squares and wrap each piece in plastic wrap. Then, place them in a freezer-safe bag or container. They can last up to three months in the freezer.
Shelf Life
- Fridge Life: Key Lime Cheesecake Bars last for about five days in the fridge when stored correctly. Keep an eye on them to enjoy their best taste and texture.
- Signs of Spoilage: If the bars start to smell off or develop an unusual color, they may no longer be good. If you see any mold or if they feel slimy, it’s best to throw them away. Always trust your senses when it comes to food safety.
FAQs
Common Questions About Key Lime Cheesecake Bars
Can I use regular limes instead of key limes? Yes, you can use regular limes. They will change the taste a bit. Key limes are smaller and have a unique flavor. If you only have regular limes, go ahead and use them. The bars will still be yummy!
What’s the best way to cut cheesecake bars? To cut these bars, use a sharp knife. First, chill the bars well. Remove them from the pan using the parchment paper. Then, wipe the knife with a damp cloth between cuts. This keeps the edges clean and neat.
Can I make these bars a day in advance? Yes, you can make these bars a day ahead. In fact, they taste better after chilling overnight. Just cover them well in the fridge. This helps the flavors mingle and sets the texture perfectly. Enjoy them fresh the next day!
You learned how to make delicious Key Lime Cheesecake Bars. We covered key ingredients for the crust and filling, along with baking tips. You now know how to get that perfect, creamy texture and the best ways to serve.
As you try this recipe, remember you can adjust flavors or make healthier choices. Storing leftovers properly will keep your cheesecake fresh. Enjoy every bite of your creation and share it with friends. Happy baking!