Skip to content
DisclaimerTerms Of UseGDPR PolicyCookie Policy

momdishmagic

  • Home
  • Drinks
  • Appetizers
  • Dinner
  • Dessert
  • About
  • Contact
  • Privacy Policy
DisclaimerTerms Of UseGDPR PolicyCookie Policy

Emma

- 2 ripe avocados - 1/2 cup unsweetened cocoa powder - 1/2 cup maple syrup or honey - 1/4 cup almond milk or milk of choice - 1 teaspoon vanilla extract - A pinch of sea salt The base of this avocado chocolate mousse is simple yet powerful. Ripe avocados give it a smooth texture and rich flavor. Choose avocados that yield slightly when you press them. This tells you they are ready. The cocoa powder adds a deep, chocolatey taste without extra sugar. You can use unsweetened cocoa to keep it healthy. Maple syrup or honey sweetens it naturally. Both options work well, but maple syrup is my favorite for a unique flavor. Almond milk keeps the mousse creamy without dairy. You can use any milk you like. The vanilla extract adds warmth and a lovely aroma. A pinch of sea salt enhances all the flavors, making them pop. - Whipped coconut cream - Dark chocolate shavings - Fresh berries Toppings make this dessert even more special. Whipped coconut cream is light and fluffy. It adds a touch of sweetness. Dark chocolate shavings enhance the chocolate flavor and look beautiful. Fresh berries add color and a burst of freshness. You can mix and match these toppings for a fun twist. For the full recipe, check out the complete instructions to create this smooth and creamy delight! - Step 1: Combine ingredients in food processor. Start by placing the ripe avocados, cocoa powder, maple syrup, almond milk, vanilla extract, and a pinch of sea salt into your food processor. This mix creates a rich base. - Step 2: Blend until smooth and creamy. Turn on the food processor and blend the ingredients. You want a silky texture. Stop and scrape down the sides often to make sure everything mixes well. - Step 3: Adjust sweetness and blend again. Taste your mousse. If it needs more sweetness, add a bit more maple syrup or honey. Blend again until it is perfectly smooth and sweet. - Step 4: Transfer to serving bowls. Once the mousse is ready, scoop it into small bowls or dessert glasses. This makes it easy to serve and enjoy. - Step 5: Refrigerate to set. Place the bowls in the fridge. Let them chill for at least 30 minutes. This helps the mousse firm up a bit and enhances its flavor. - Step 6: Add toppings before serving. Just before you serve, add some fun toppings. Whipped coconut cream, dark chocolate shavings, or fresh berries make it look great and taste even better. Each bite will be a smooth and creamy delight! For the full recipe, refer to the earlier section. Enjoy your delicious avocado chocolate mousse! To make your avocado chocolate mousse smooth, you need a good blender. A food processor works well too. Start by blending the avocados and cocoa powder first. This helps create a base that is creamy. After you blend, check the texture. If it’s not smooth, blend a bit longer. While blending, pause to scrape down the sides. This step is key. Sometimes, bits of avocado stick to the sides. Scraping helps mix everything well. You want a silky-smooth consistency. Taste your mousse after blending. This is your chance to adjust flavors. If it needs more sweetness, add a little maple syrup or honey. Blend again to mix well. Want a richer chocolate flavor? Add more cocoa powder. Start with a tablespoon. Blend again, then taste. Keep adjusting until it’s just right. This mousse should be a perfect balance of sweet and rich. For the full recipe, refer to the beginning of this section. {{image_2}} You can easily boost the taste of your avocado chocolate mousse. One great way is by adding nut butter. A spoonful of almond or peanut butter gives it a rich, nutty flavor. This addition makes the mousse even creamier. You’ll love how it changes the taste! Another fun option is to infuse your mousse with mint or espresso. Just a drop of mint extract offers a refreshing twist. If you prefer coffee, a shot of espresso makes it bold and exciting. Both choices add unique flavors without overpowering the chocolate. If you want a vegan mousse, it’s simple! Just use maple syrup instead of honey. All ingredients in this recipe are already plant-based. You can enjoy this dessert without any worries. For a gluten-free option, you’re in luck! This mousse contains no flour or grains. So, it is naturally gluten-free. You can enjoy it without any changes. For the full recipe, check the section above! To keep your avocado chocolate mousse fresh, store it in the fridge. Use an airtight container. This helps prevent oxidation, which can change the mousse's color and taste. Make sure to cover the top with plastic wrap for extra protection. If you want to freeze it, spoon the mousse into freezer-safe containers. Leave some space at the top, as it may expand when frozen. Thaw it in the fridge before serving. The mousse lasts about 3 to 5 days in the fridge. Check for changes in color or smell. If it turns brown or smells off, it's best to throw it out. For frozen mousse, it can last up to 3 months. However, for the best taste, eat it within a month. Always check for ice crystals or a grainy texture when thawing, as these are signs of spoilage. If you can't find avocados, you can use silken tofu. It has a similar creamy texture. You might also try ripe bananas. They add sweetness and smoothness, but the taste will differ slightly. Lastly, you could use nut butters like cashew or almond for a different twist. To keep this mousse dairy-free, use almond milk or coconut milk. Both work well. Avoid any dairy-based sweeteners. Maple syrup or agave syrup are great choices. They keep your mousse rich and creamy without dairy. Yes, you can make this mousse ahead of time. Just store it in the fridge for up to 2 days. It tastes even better when chilled. Make sure to cover it with plastic wrap to keep it fresh. Absolutely! This mousse is packed with healthy fats from avocados. It also has no refined sugar if you use maple syrup. The cocoa powder offers antioxidants. Overall, it is a tasty and healthy dessert option. Serve this mousse in small bowls or dessert glasses. You can add delicious toppings like whipped coconut cream, dark chocolate shavings, or fresh berries. These add flavor and make it look pretty. For the full recipe, check the section above. This blog covered how to make creamy avocado chocolate mousse. You learned about key ingredients and how to blend them. I shared tips for the right texture and how to adjust flavor. You can customize your mousse with toppings and variations. It’s easy to store and keeps well. This dessert is not just tasty; it's also healthy. Enjoy creating your mousse and impressing friends with this simple treat!

Avocado Chocolate Mousse Smooth and Creamy Delight

If you’re in search of a dessert that’s both indulgent and healthy, look no further! My Avocado Chocolate Mousse delivers

- Pasta Options: You can use 12 oz of wide whole wheat noodles or gluten-free pasta. - Aromatics: Use 1 medium onion, finely chopped, and 3 cloves of minced garlic for great flavor. - Mushroom Varieties: Choose 16 oz of mixed mushrooms like button, shiitake, and cremini. - Creamy Elements: You’ll need 1 cup of coconut milk or any unsweetened plant-based cream. - Soy sauce: Use 1 tablespoon of soy sauce or tamari for a gluten-free option. - Herbs and spices: Add 1 teaspoon of smoked paprika and 1 teaspoon of dried thyme. - Salt and pepper: Adjust these to taste for the perfect seasoning. - Fresh parsley: Chop some fresh parsley for a bright garnish. - Optional toppings for serving: Consider adding toasted nuts or nutritional yeast for extra flavor. This dish is rich in flavor and keeps you full. The mix of mushrooms adds depth, while the creamy sauce makes every bite special. If you want to make this meal, check out the Full Recipe for all the details! Start by boiling a large pot of water. Add a good pinch of salt. This step is key for flavor. Once boiling, add your pasta. Cook for about 8-10 minutes for wide noodles. Stir occasionally to prevent sticking. You want it al dente, which means firm to the bite. Drain the pasta and set it aside. In a large skillet, heat one tablespoon of olive oil over medium heat. Add the chopped onion and stir. Cook until it turns translucent, which takes about 5 minutes. Then, add the minced garlic. Cook for another 1-2 minutes until it smells great. This mix adds a strong base for your dish. Next, add your sliced mushrooms to the skillet. Cook them for about 7-8 minutes. Stir often until they turn golden brown and release their moisture. This step enhances their flavor. Now, stir in soy sauce, smoked paprika, and dried thyme. Cook for another 2 minutes to blend the flavors. Pour in the vegetable broth and bring it to a gentle simmer. Then, add the coconut milk and heat through for about 3-4 minutes. To thicken the sauce, mix one tablespoon of cornstarch with two tablespoons of water. Add this mix to the skillet. Stir quickly, and the sauce will thicken in about 2-3 minutes. Don’t forget to season with salt and pepper to taste. Now it’s time to bring everything together. Add the cooked pasta to the mushroom sauce. Gently mix it so every noodle gets dressed in that creamy goodness. Allow it to heat through for another minute. When ready to serve, plate the stroganoff hot. Garnish with fresh chopped parsley for a colorful touch. This dish is not just tasty; it looks good too! For the full recipe, check the earlier section. To make your stroganoff shine, avoid a watery sauce. Start by cooking the mushrooms over medium heat until they brown. This helps release moisture. The goal is to let their juices evaporate. The result is a rich and creamy sauce. Next, achieve the best flavor balance. Use fresh ingredients. A mix of button, shiitake, and cremini mushrooms gives depth. Add smoked paprika and thyme for a warm, earthy taste. Taste as you go. Adjust seasoning with salt and pepper to match your palate. For sautéing, a large non-stick skillet works best. It makes cooking easier and helps prevent sticking. A good skillet heats evenly and allows you to brown the mushrooms well. Essential utensils for this recipe include a wooden spoon for stirring and a whisk for mixing the cornstarch. A large pot is also needed for boiling the pasta. Having these tools ready will make cooking smooth and fun. One common mistake is overcooking the pasta. Follow the package instructions closely. Aim for al dente, as the pasta will continue to cook when mixed with the sauce. Another mistake is under-seasoning the sauce. Flavor is key to a great stroganoff. Don’t be shy with the salt and pepper. Taste often to ensure the sauce is rich and tasty. {{image_2}} You can try different mushrooms for your vegan mushroom stroganoff. Button mushrooms are common, but shiitake and cremini add unique flavors. For a meaty texture, consider using oyster mushrooms. They have a chewy bite that mimics meat. You can also mix various types to create depth in flavor. If you want more protein, try adding tempeh or seitan. These options give a hearty feel to the dish. If you need a gluten-free option, many pasta varieties are available. Look for gluten-free noodles made from rice or lentils. They work well in this recipe and cook nicely. For thickening, use cornstarch or arrowroot powder instead of regular flour. Mix it with water to create a slurry before adding it to your sauce. This will help keep your stroganoff creamy and thick. Adding veggies boosts nutrition and flavor. Consider spinach, kale, or peas for color and health benefits. Broccoli or bell peppers can also add crunch and sweetness. When adding veggies, adjust the cooking time. If you add quick-cooking vegetables like spinach, toss them in during the last minute. For firmer veggies like carrots, add them earlier to ensure they cook through. Check out the Full Recipe to see how these variations can fit into your dish! Store your vegan mushroom stroganoff in an airtight container. Glass or plastic containers work well. Make sure to let it cool before sealing. This helps keep it fresh. You can keep it in the fridge for up to five days. If you want to store it longer, freeze it. It can last in the freezer for about three months. To reheat, use a skillet on low heat. Stir gently to avoid burning. You can also use a microwave. If using a microwave, heat in short bursts. Check and stir often to keep it moist. If the sauce looks thick, add a splash of vegetable broth or water. This helps refresh the sauce consistency. In the fridge, your stroganoff stays fresh for about five days. Signs that it has spoiled include a sour smell or strange texture. If it looks off or you see mold, toss it out. Always trust your nose and eyes! Vegan Mushroom Stroganoff is a creamy, savory dish that replaces meat with delicious mushrooms. It features wide noodles coated in a rich sauce made from coconut milk, vegetable broth, and spices. The dish is hearty and satisfying, perfect for any meal. You will taste the umami from the mushrooms, which adds depth to each bite. Plus, it’s easy to make and great for gatherings or weeknight dinners. Yes, you can use various types of pasta for this dish. Consider these options: - Whole wheat noodles for added fiber. - Gluten-free pasta if needed. - Zucchini noodles for a low-carb choice. Each option brings a unique texture and taste to the meal. The total time for Vegan Mushroom Stroganoff is about 30 minutes. Here is the breakdown: - Prep time: 10 minutes. - Cook time: 20 minutes. This recipe serves four people, making it great for a family or meal prep. Yes, Vegan Mushroom Stroganoff is a healthier choice than traditional stroganoff. It has fewer calories and less fat. Mushrooms are high in vitamins and minerals. You can make it even healthier by: - Reducing the amount of coconut milk. - Adding more vegetables like spinach or bell peppers. These changes can boost the nutrition while still keeping the taste delicious. In this blog post, we covered how to make a delicious vegan mushroom stroganoff. We explored essential ingredients like pasta, mushrooms, and creamy elements. The step-by-step instructions helped you prepare the dish easily. We also shared tips, variations, and storage information to enhance your cooking experience. By following these guidelines, you can create a flavorful meal that satisfies your cravings. Enjoy experimenting with different ingredients and make this dish your own!

Vegan Mushroom Stroganoff Savory and Satisfying Meal

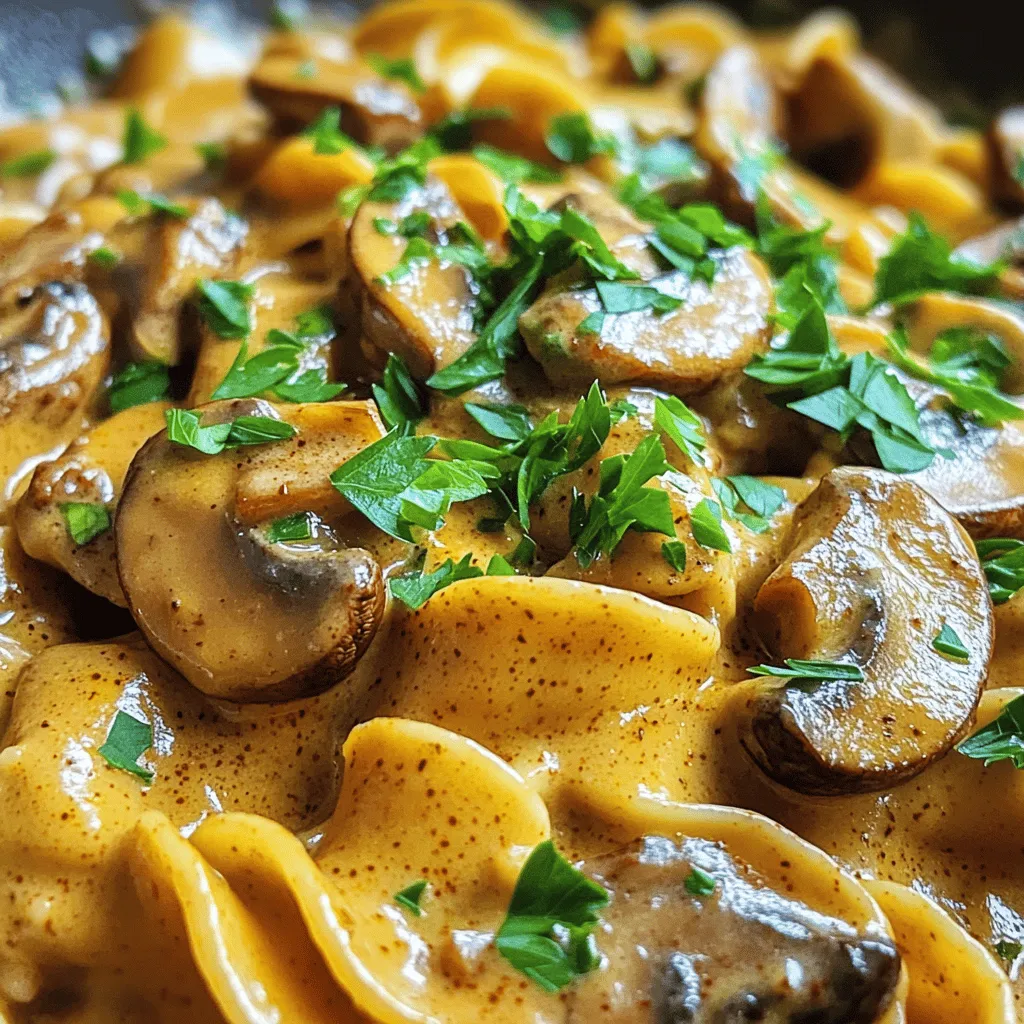
Are you ready to savor a hearty, plant-based meal? This Vegan Mushroom Stroganoff is creamy, packed with flavor, and perfect

For this dish, you need just a few key ingredients. Here’s what you will use: - 8 oz linguine pasta - 1 lb large shrimp, peeled and deveined - 4 tablespoons unsalted butter - 4 cloves garlic, minced - 1 teaspoon red pepper flakes (more if you prefer spicy) - 1 tablespoon lemon juice - 1/4 cup parsley, chopped - Salt and black pepper, to taste - Grated Parmesan cheese, for serving (optional) These ingredients create a rich and tasty meal. The shrimp adds protein, while the garlic and butter give depth to the flavor. You can add some extra touches to make it even better. Consider these options: - Cherry tomatoes for sweetness - Spinach for a boost of green - Capers for a touch of brine - Fresh basil for a fragrant note These ingredients can enhance the dish. They add layers of taste and color to your plate, making it look and taste gourmet. You can easily swap ingredients to fit your needs. Here are some ideas: - Use gluten-free pasta if you want it gluten-free. - Swap shrimp for chicken or tofu for a different protein. - Replace butter with olive oil for a dairy-free option. - Use lemon zest if you want a stronger lemon flavor. These substitutions keep the meal flexible. You can enjoy it no matter your diet or preferences. For the full recipe, refer to the provided details. First, fill a large pot with water and add salt. Bring the water to a boil. Once boiling, add 8 oz of linguine pasta. Cook the pasta according to the package directions until it is al dente. This usually takes about 8-10 minutes. After cooking, drain the pasta in a colander. Save 1/2 cup of the pasta water for later. While the pasta cooks, heat a large skillet over medium heat. Add 4 tablespoons of unsalted butter to the skillet. Let it melt completely. Once melted, add 4 minced garlic cloves and 1 teaspoon of red pepper flakes. Stir them for 1-2 minutes. You want the garlic to smell great but not burn. Keep an eye on it! Now, add 1 lb of peeled and deveined shrimp to the skillet. Cook for 2-3 minutes on each side. The shrimp will turn pink when done. Next, pour in the reserved pasta water and 1 tablespoon of lemon juice. Stir well to mix everything. Finally, add the cooked linguine and 1/4 cup of chopped parsley. Toss gently until the pasta is coated in the garlic butter sauce. Season with salt and black pepper to taste. Serve right away and enjoy this easy and delicious meal! For the full recipe, check out the details above. To get the best flavor in your Garlic Butter Shrimp Pasta, use fresh ingredients. Fresh garlic gives a nice kick. Choose high-quality shrimp for the best taste. I like to use unsalted butter; it lets the flavors shine. A splash of lemon juice brings brightness to the dish. Don't skip the red pepper flakes; they add a nice warmth. Cooking shrimp takes just a few minutes. Heat your skillet to medium before you add the shrimp. Make sure the shrimp are pink and opaque. This means they are ready to eat. Avoid overcooking them; they can get tough. Remember, they will continue to cook a bit after you take them off the heat. Serve Garlic Butter Shrimp Pasta hot for the best taste. Pair it with a simple green salad. A light vinaigrette works well. If you like bread, garlic bread is a great choice. For drinks, a chilled white wine or sparkling water is refreshing. You can also sprinkle some grated Parmesan cheese on top for extra flavor. For the full recipe, check the section above. {{image_2}} You can make your garlic butter shrimp pasta spicy. Just add more red pepper flakes. Start with the recipe and add one more teaspoon. This will give your dish a nice kick. If you love heat, feel free to add more. You can also use fresh chili peppers for extra flavor. Slice them thin and toss them in with the garlic. This adds depth and a fresh taste. Adding vegetables is a great way to make this dish healthier. You can mix in bell peppers, spinach, or zucchini. Cut the vegetables into small pieces so they cook fast. Sauté them right after the garlic but before adding shrimp. This lets the veggies absorb the garlic flavor. It also adds color and crunch. Enjoy a well-rounded meal with more nutrients. You can switch up the pasta to fit your taste. Linguine works great, but other types are good too. Try spaghetti or fettuccine for a different texture. If you want a low-carb option, use zucchini noodles or spaghetti squash. These choices keep the dish light and fresh. Just cook them briefly in boiling water for the best bite. For more ideas, check the full recipe! Store leftover garlic butter shrimp pasta in an airtight container. Let it cool first. Make sure to keep it in the fridge. It will stay good for 3 days. If you want to keep it longer, consider freezing it. When you are ready to eat, reheat the pasta gently. Use a skillet over medium heat. Add a splash of water or broth to keep it moist. Stir often until heated through. You can also use a microwave. Heat it in short bursts, stirring in between. If you want to freeze the pasta, use a freezer-safe container. Divide it into portions for easy meals later. Label each container with the date. It will last up to 2 months in the freezer. Thaw it overnight in the fridge before reheating. Enjoy your meal with ease! For the full recipe, check out the details above. Yes, you can make Garlic Butter Shrimp Pasta ahead of time. Cook the pasta and shrimp separately. Store them in the fridge in airtight containers. When ready to eat, heat a skillet. Add the shrimp and pasta with some butter and a splash of water. Stir until hot. This method keeps the dish fresh and tasty. The best shrimp for this recipe is large shrimp. Look for shrimp that are raw, peeled, and deveined. Fresh shrimp gives the best flavor, but frozen works too. Just remember to thaw it fully before cooking. You can use wild-caught shrimp for better taste and quality. To make Garlic Butter Shrimp Pasta gluten-free, replace regular pasta with gluten-free pasta. Many brands offer great options that taste good. Always check labels for gluten-free certification. This swap ensures you enjoy the dish without any gluten worries. Garlic butter shrimp pasta is simple yet tasty. We covered key ingredients, cooking steps, and helpful tips. You can play with flavors by adding spices or veggies. Storing leftovers is easy, and reheating is quick. In closing, this dish offers many ways to enjoy shrimp and pasta. Have fun experimenting with your own twists. Enjoy making this meal again and again!

Garlic Butter Shrimp Pasta Easy and Delicious Meal

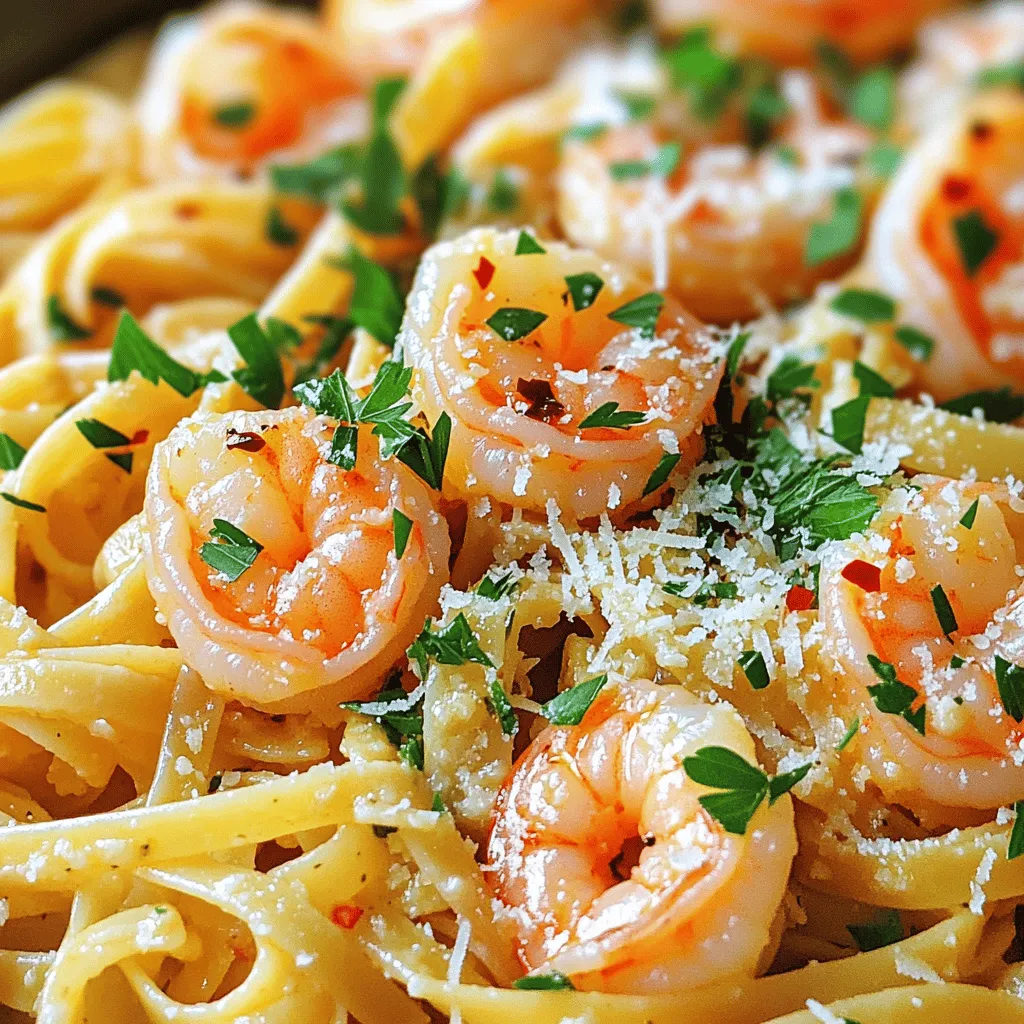
Are you ready to impress your taste buds with a quick and easy meal? Garlic Butter Shrimp Pasta is a

Newer posts
← Previous Page1 … Page5 Page6

dsad

© 2025 momdishmagic • Built with GeneratePress

Our Policies

  • Copyright Policy
  • Cookie Policy
  • GDPR Policy
  • Privacy Policy
  • Disclaimer
  • Terms Of Use

More Information

  • Home
  • About
  • Contact
  • Appetizers
  • Dessert
  • Dinner
  • Drinks
©2025, momdishmagic About Back To Top