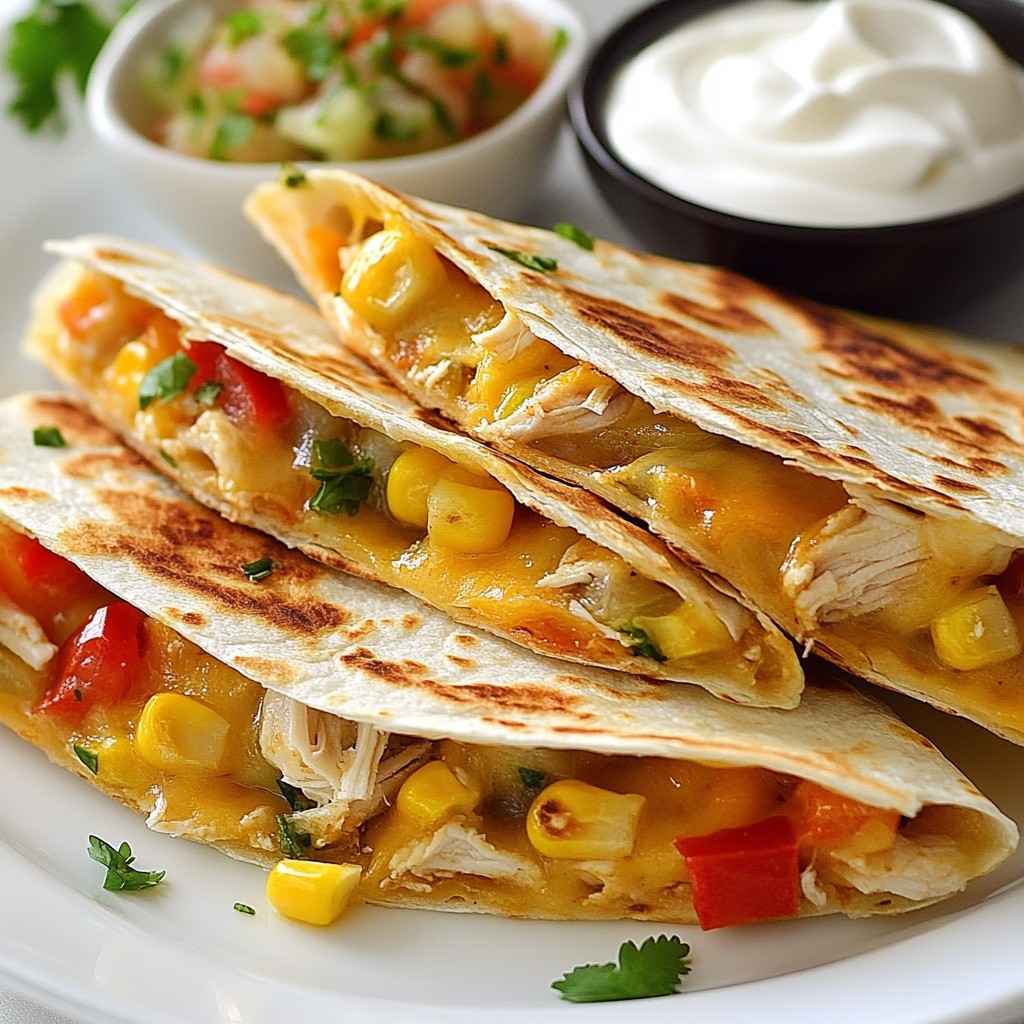
Are you looking for a tasty meal that kids can't resist? In this post, I’ll share my easy recipe for savory chicken and cheese quesadillas. These make a perfect lunch or dinner and are so fun to customize! I’ll walk you through the simple steps and share tips to make them just right. Get ready to spark joy at the dinner table with these kid-friendly delights!
Why I Love This Recipe
- Quick and Easy: This recipe takes only 20 minutes from start to finish, making it perfect for busy weeknights.
- Customizable: You can easily swap out ingredients based on what you have on hand or personal preferences, such as different cheeses or veggies.
- Kid-Friendly: These quesadillas are a hit with kids, making mealtime fun and enjoyable, especially when served with dipping sauces.
- Cheesy Goodness: The combination of cheddar and mozzarella creates a deliciously gooey texture that everyone will love.
Ingredients
Main Ingredients for Chicken and Cheese Quesadillas
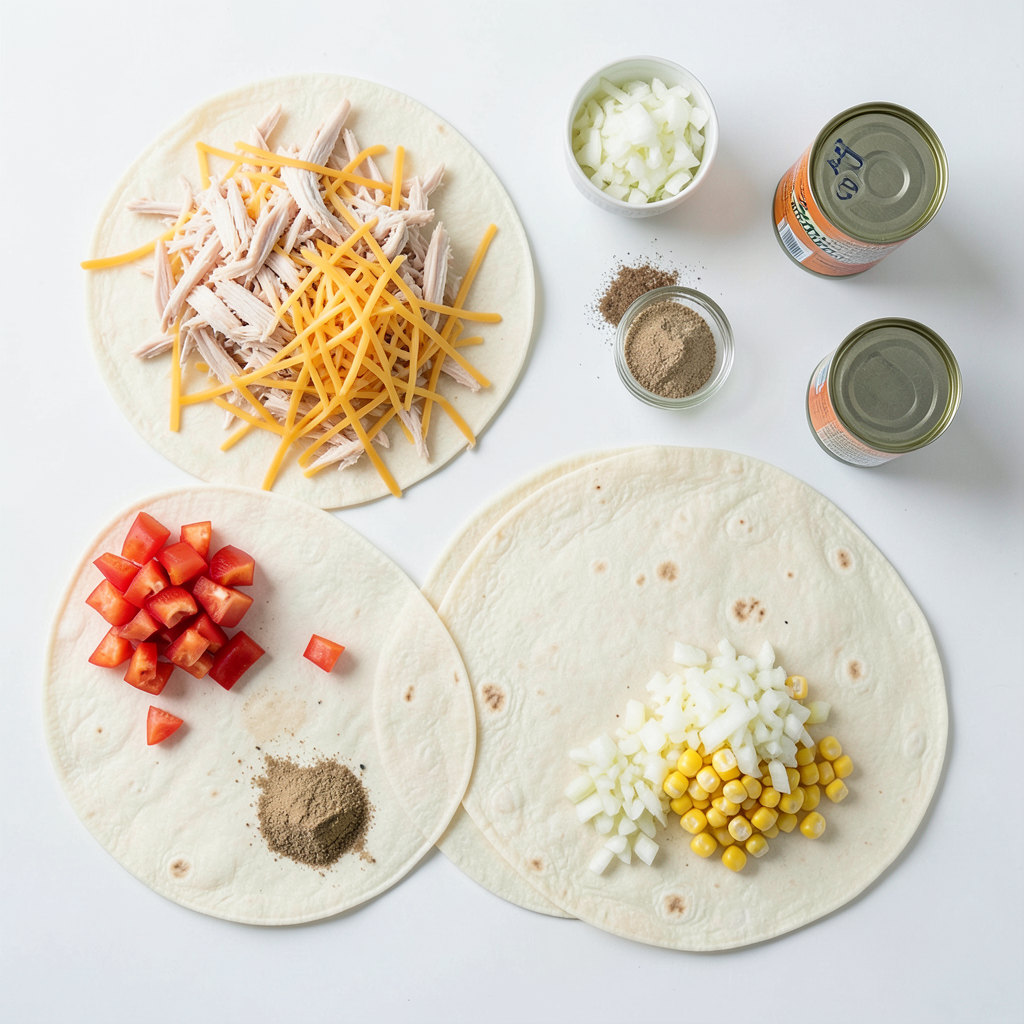
- 2 cups cooked chicken breast, shredded
- 1 cup cheddar cheese, shredded
- 1 cup mozzarella cheese, shredded
- 4 large flour tortillas
- 1/2 cup bell peppers, diced (any color)
- 1/2 cup corn (canned or frozen)
- 1/4 cup onion, finely chopped
These ingredients make the quesadillas creamy and tasty. The mix of cheeses adds a rich flavor. Shredded chicken keeps it simple, while bell peppers and corn bring crunch.
Optional Ingredients for Customization
- Black beans
- Avocado, diced
- Spinach, chopped
- Jalapeños, sliced
You can add black beans for more protein. Diced avocado gives creaminess. Spinach adds color and nutrition. If your kids like spice, jalapeños can add a kick.
Recommended Seasonings
- 1 teaspoon garlic powder
- 1 teaspoon cumin
- Salt and pepper, to taste
Garlic powder boosts flavor without being strong. Cumin adds warmth and depth. Always taste and adjust salt and pepper for your kids' preference.
Step-by-Step Instructions
Preparing the Filling
Start by gathering all your ingredients. In a large bowl, mix together:
- 2 cups cooked chicken breast, shredded
- 1 cup cheddar cheese, shredded
- 1 cup mozzarella cheese, shredded
- 1/2 cup diced bell peppers
- 1/2 cup corn
- 1/4 cup finely chopped onion
Add 1 teaspoon of garlic powder, 1 teaspoon of cumin, and a pinch of salt and pepper. Stir until everything combines well. This filling is tasty and colorful, making it fun for kids.
Cooking the Quesadillas
Heat 1 tablespoon of olive oil in a non-stick skillet over medium heat. Next, place one flour tortilla in the skillet. Spread half of the chicken mixture on one side. Fold the tortilla over the filling. Cook for about 2-3 minutes until the bottom turns golden brown. Flip the quesadilla carefully and cook the other side for another 2-3 minutes. The cheese should melt, making it gooey and delicious. Remove it from the skillet and let it rest for a minute. Slice into wedges. Repeat the steps with the remaining tortillas and filling, adding more oil as needed.
Tips for Cooking Perfect Quesadillas
To make great quesadillas, use medium heat. This helps the cheese melt without burning the tortilla. Keep an eye on the quesadillas while cooking. If they cook too long, they can become too crispy. You want a nice golden color, not burnt. Let your quesadillas cool for a minute before cutting them. This helps the cheese set and keeps everything inside. Serve with sour cream and salsa for dipping. Kids love to dip!
Tips & Tricks
How to Make Quesadillas Kid-Friendly
To make quesadillas fun for kids, involve them in the cooking. Let them choose toppings. Try diced tomatoes, black beans, or even spinach. Kids enjoy being part of the process. Use colorful veggies to make the dish appealing. You can also cut quesadillas into fun shapes using cookie cutters. This adds excitement to each bite. Remember, the more they help, the more they will want to eat!
Cooking Equipment Suggestions
For cooking quesadillas, use a non-stick skillet or a griddle. These surfaces help prevent sticking and ensure even cooking. A spatula is handy for flipping the quesadillas. If you have a quesadilla maker, it can speed up the process. For easy serving, use a cutting board and a sharp knife. This makes slicing the quesadillas into wedges simple and safe.
Best Practices for Storing and Reheating Quesadillas
Store leftover quesadillas in an airtight container in the fridge. They last up to three days. To reheat, use a skillet over medium heat for best results. This keeps the quesadilla crispy. You can also use the microwave, but it may make them soft. If using the microwave, place a paper towel under them. This helps absorb moisture. Enjoy your tasty chicken and cheese quesadillas anytime!
Pro Tips
- Use Fresh Ingredients: Opt for fresh bell peppers and onions to enhance the flavor and texture of your quesadillas.
- Control the Heat: Adjust the skillet temperature to ensure the tortillas don’t burn while the cheese melts perfectly.
- Experiment with Cheese: Try mixing different cheeses like pepper jack or gouda for a unique twist on flavor.
- Make Ahead: Prepare the filling in advance and store it in the refrigerator for a quick meal option during busy days.
Variations
Vegetarian Version with More Veggies
For a vegetarian twist, swap chicken for more veggies. Use ingredients like black beans, zucchini, or mushrooms. These additions add flavor and nutrition. You can also mix in spinach or kale for extra greens. This version keeps it colorful and fun for kids.
Spicy Chicken Quesadilla Options
If your family enjoys some heat, try adding jalapeños or chili powder. You can also use spicy shredded chicken. For a milder spice, mix in pepper jack cheese. This gives a nice kick while still being tasty for kids. Adjust the spice level to fit your family's taste.
Using Different Cheese Combinations
Cheese is key to a great quesadilla. You can mix and match your favorite cheeses. Try gouda or fontina for a rich flavor. A blend of mozzarella and cheddar works well too. Each cheese gives a unique taste and texture. Experiment to find the mix that everyone loves!
Serving Suggestions
Best Dips and Sides to Pair
I love serving these quesadillas with sour cream and salsa. The cool sour cream balances the warm, cheesy quesadillas. Salsa adds a zesty kick that kids enjoy. You can also try guacamole for a creamy twist. For a refreshing side, serve with veggie sticks. Carrot and cucumber sticks add crunch and bright colors.
Fun Plating Ideas for Kids
Kids eat with their eyes first. Arrange the quesadilla wedges in a fun shape, like a star or a smiley face. Use a colorful platter to make it pop. You can also add some cherry tomatoes or olives for eyes. This fun presentation makes mealtime exciting. Kids will love the creativity on their plate!
Meal Prep Suggestions for Busy Days
Make your life easier by prepping ahead. You can assemble the quesadillas and store them in the fridge. Wrap them in plastic wrap for freshness. When you’re ready to eat, just cook them in the skillet. This saves time on busy days. You can also freeze them for quick meals later. Just reheat in a skillet or microwave.
FAQs
What Type of Chicken Works Best?
For the best quesadillas, use cooked chicken breast. I recommend shredded chicken. You can use leftover rotisserie chicken for ease. It adds flavor and saves time. Avoid using dark meat as it can be greasier. Shredded chicken blends well with cheese and veggies.
Can I Freeze Leftover Quesadillas?
Yes, you can freeze leftover quesadillas! Wrap each one tightly in plastic wrap. Then, place them in a freezer bag. They can last up to three months. To reheat, just thaw in the fridge overnight. Then, warm them in a skillet or microwave until hot.
How Do I Make Quesadillas Crispier?
To make your quesadillas crispier, use more olive oil in the skillet. Heat the oil well before adding the tortilla. You can also cook on medium-high heat for a shorter time. Make sure to flip them carefully to avoid spills. Adding a bit of cornmeal to the skillet helps too!
You learned about the best ingredients and steps for making chicken and cheese quesadillas. Customizing them is easy with optional veggies and spices. Tips for kids and reheating help ensure great meals. Try variations like vegetarian or spicy options to mix things up. Don’t forget the fun dips and meal prep ideas to simplify your day. Enjoy crafting these tasty dishes. With practice, you’ll serve up perfect quesadillas every time!