Craving a tasty treat that’s also simple to make? Let me introduce you to Peanut Butter Banana Ice Cream! This creamy and dreamy dessert combines only two main ingredients for a delight you can whip up in no time. Whether you’re looking for a snack or a sweet ending to your meal, this recipe will not disappoint. Join me as we dive into the steps, tips, and fun variations for your new favorite ice cream!
Why I Love This Recipe
- Deliciously Creamy: This recipe results in a wonderfully smooth and creamy texture that mimics traditional ice cream, making it a perfect guilt-free treat.
- Natural Sweetness: The ripe bananas provide natural sweetness, allowing you to enjoy dessert without added sugars, especially if you skip the optional sweeteners.
- Nutty Flavor: The combination of peanut butter adds a rich, nutty flavor that pairs perfectly with bananas, creating a satisfying and indulgent taste.
- Customizable Toppings: You can easily customize this recipe with your favorite toppings, such as chopped nuts or chocolate chips, to add extra texture and flavor.
Ingredients
List of Essential Ingredients
To make peanut butter banana ice cream, you need the following items:
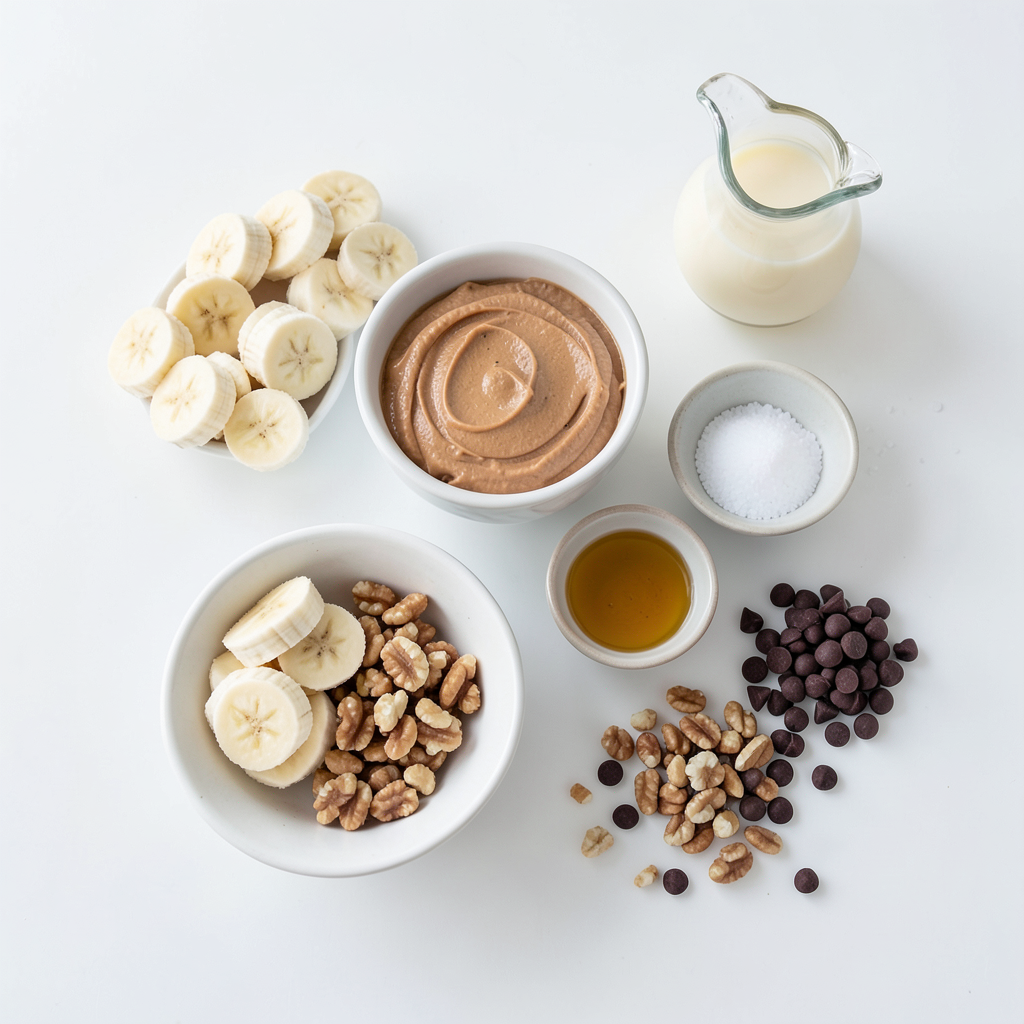
- 4 ripe bananas, sliced and frozen
- 1/2 cup natural peanut butter
- 1 tablespoon honey or maple syrup (optional, for added sweetness)
- 1 teaspoon vanilla extract
- 1/4 cup almond milk (or any milk of your choice)
- A pinch of sea salt
- Chopped nuts or chocolate chips for topping (optional)
These ingredients blend together to create a creamy and dreamy treat. The ripe bananas give a sweet base, while the peanut butter adds a rich flavor.
Recommended Brands for Peanut Butter
When choosing peanut butter, look for natural brands. I love using brands like Smucker's or Justin's. They have no added sugar or oils. This choice keeps the flavor pure and simple. You want to taste the peanuts, not extra junk.
Substitutions for Dairy-Free Options
If you want a dairy-free version, use almond milk or oat milk. Both options work great in this recipe. If you want nut-free, try using coconut milk. It adds a nice creaminess without the nuts. You can still enjoy this treat, no matter your dietary needs!
Step-by-Step Instructions
Freezing the Bananas
Start with ripe bananas. Their sweetness makes the ice cream taste great. Slice the bananas and lay them on a baking sheet. Make sure they don’t touch. This helps them freeze evenly. Place the baking sheet in the freezer for at least two hours. They should be solid when you check.
Blending the Ingredients
Once the bananas are frozen, it’s time to blend. Take the frozen slices and put them in a food processor. Blend them until they become creamy. This may take a little bit of time. You might need to stop and scrape down the sides. When they are creamy, add the peanut butter, honey or maple syrup, vanilla extract, almond milk, and a pinch of sea salt. Blend again until everything is smooth and mixed well.
Freezing for Texture
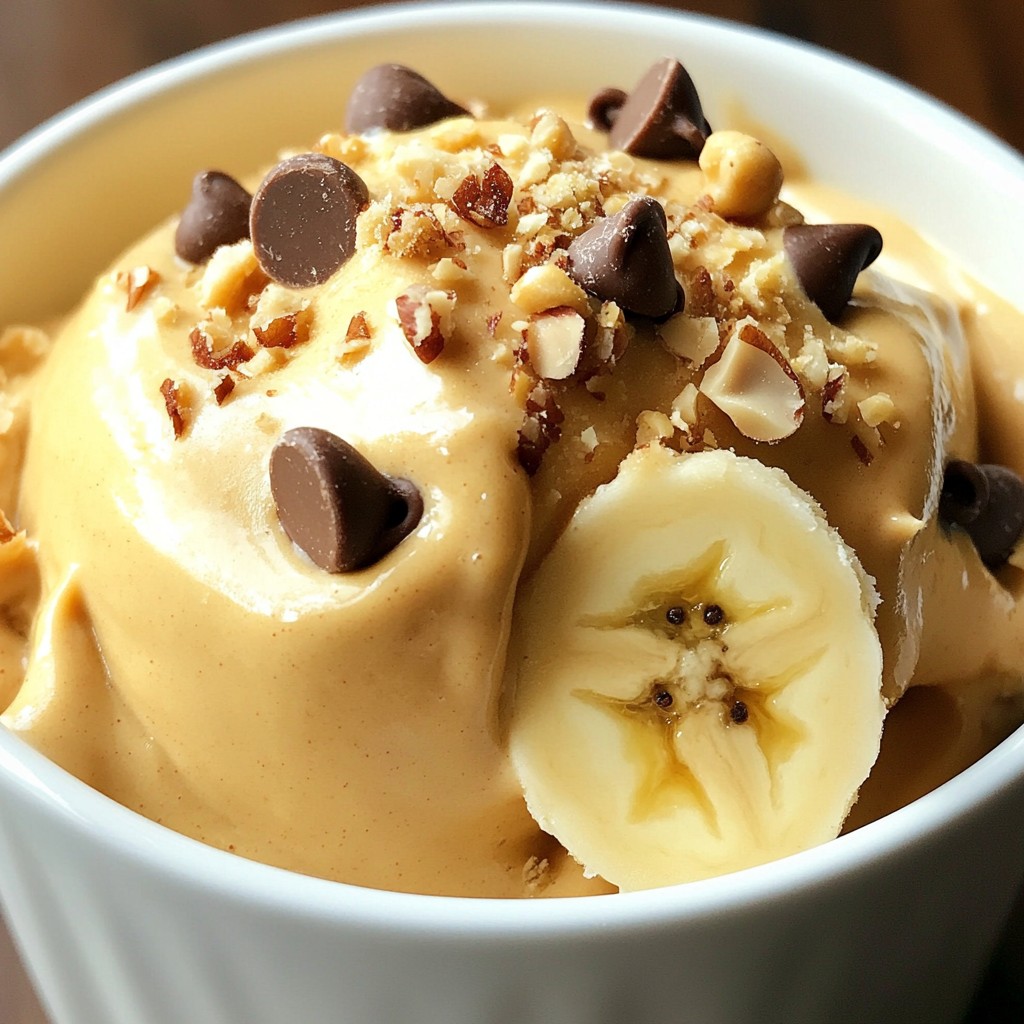
Next, transfer the mixture to a container. Use a spatula to smooth the top. Cover the container and freeze it for one to two hours. This step makes the ice cream firmer. When it’s ready, scoop it into bowls. You can top it with chopped nuts or chocolate chips if you want.
Tips & Tricks
How to Achieve the Creamiest Texture
To get the best texture, start with ripe bananas. They should be sweet and soft. Make sure to freeze the banana slices in one layer. This helps them freeze well. When you blend, be patient. It may take a few minutes before they turn creamy. Scrape the sides of the food processor often to mix well. The key to creaminess is blending until smooth.
Sweetness Level Adjustments
Taste the ice cream as you mix. If you want it sweeter, add a bit of honey or maple syrup. Start with a small amount, then blend again. You can always add more if you need to. Remember, the bananas are sweet, too. Adjust the sweetness to your liking but keep it balanced.
Serving Suggestions
Serve the ice cream in bowls for a fun treat. Top it with chopped nuts for crunch. You can also add chocolate chips for a sweet twist. If you’re feeling fancy, drizzle some honey on top. This makes it look pretty and adds extra flavor. Enjoy your creamy peanut butter banana ice cream with family or friends!
Pro Tips
- Choose Ripe Bananas: The riper the bananas, the sweeter and creamier your mixture will be. Look for bananas with lots of brown spots for optimal flavor.
- Adjusting Sweetness: Before freezing, taste your mixture and adjust the sweetness to your liking. You can always add more honey or maple syrup if needed.
- Blending Technique: If your mixture is too thick and not blending well, add a splash more almond milk to help it blend smoothly.
- Serving Suggestions: For an extra special treat, serve with a drizzle of chocolate sauce or a sprinkle of cinnamon on top!
Variations
Adding Flavor Enhancements
You can add more flavors to your ice cream. Try adding a dash of cinnamon for warmth. A tablespoon of cocoa powder gives a chocolate twist. You can also use flavored peanut butter, like cinnamon or chocolate. This adds a fun twist and makes each bite unique.
Nut-Free Alternatives
If you want a nut-free version, swap peanut butter with sunflower seed butter. This keeps a creamy texture but removes nuts. You can also use tahini for a different taste. These options still provide a rich flavor without the allergens.
Including Mix-Ins (Nuts, Chocolate Chips)
Mix-ins add fun and crunch to your ice cream. You can stir in chopped nuts for a tasty bite. Try walnuts, almonds, or pecans. Chocolate chips also work well. They bring a sweet burst in every scoop. Add these after blending for the best texture.
Storage Info
Best Practices for Freezing Ice Cream
To keep your peanut butter banana ice cream fresh, store it in an airtight container. This step prevents ice crystals from forming. Make sure to smooth the top with a spatula before sealing. If you want an extra layer of protection, cover the surface with plastic wrap. This helps keep the air out.
Shelf Life in the Freezer
When stored correctly, this ice cream can last up to two weeks in the freezer. After that, it may lose its creamy texture and flavor. Always check for any signs of freezer burn before serving. If it looks or smells off, it's best to toss it out.
Thawing and Serving Tips
When you're ready to enjoy your ice cream, take it out of the freezer. Let it sit at room temperature for 5 to 10 minutes. This makes scooping easier. If it feels too hard, you can also warm the outside of the container slightly under warm water. Serve it in bowls and add your favorite toppings, like nuts or chocolate chips. Enjoy every bite!
FAQs
Can I make this ice cream without a food processor?
Yes, you can! If you don’t have a food processor, use a blender. A high-speed blender works well. Just make sure to blend the bananas in small batches. You may need to stop and scrape the sides often. This helps to get a smooth and creamy texture.
How do I make it sweeter?
To add sweetness, you can use honey or maple syrup. Just one tablespoon will do. If you want it sweeter, add a bit more. You could also mash some extra ripe bananas into the mix. They add natural sweetness and taste great.
Is this recipe vegan-friendly?
Yes, this recipe is vegan-friendly if you use maple syrup instead of honey. The other ingredients are all plant-based. You can also use almond milk or any non-dairy milk. This makes it a great treat for everyone!
In this blog post, we explored how to make homemade ice cream using simple ingredients. We discussed essential ingredients, brands, and even dairy-free substitutions. You learned step-by-step instructions for freezing bananas, blending, and achieving the right texture. Tips included sweetness adjustments and serving ideas. Variations offer fun twists, like flavor enhancements and mix-ins. Lastly, we shared storage tips to keep your ice cream fresh. Making ice cream at home is easy and fun, and you can customize it just how you like!
.png)


