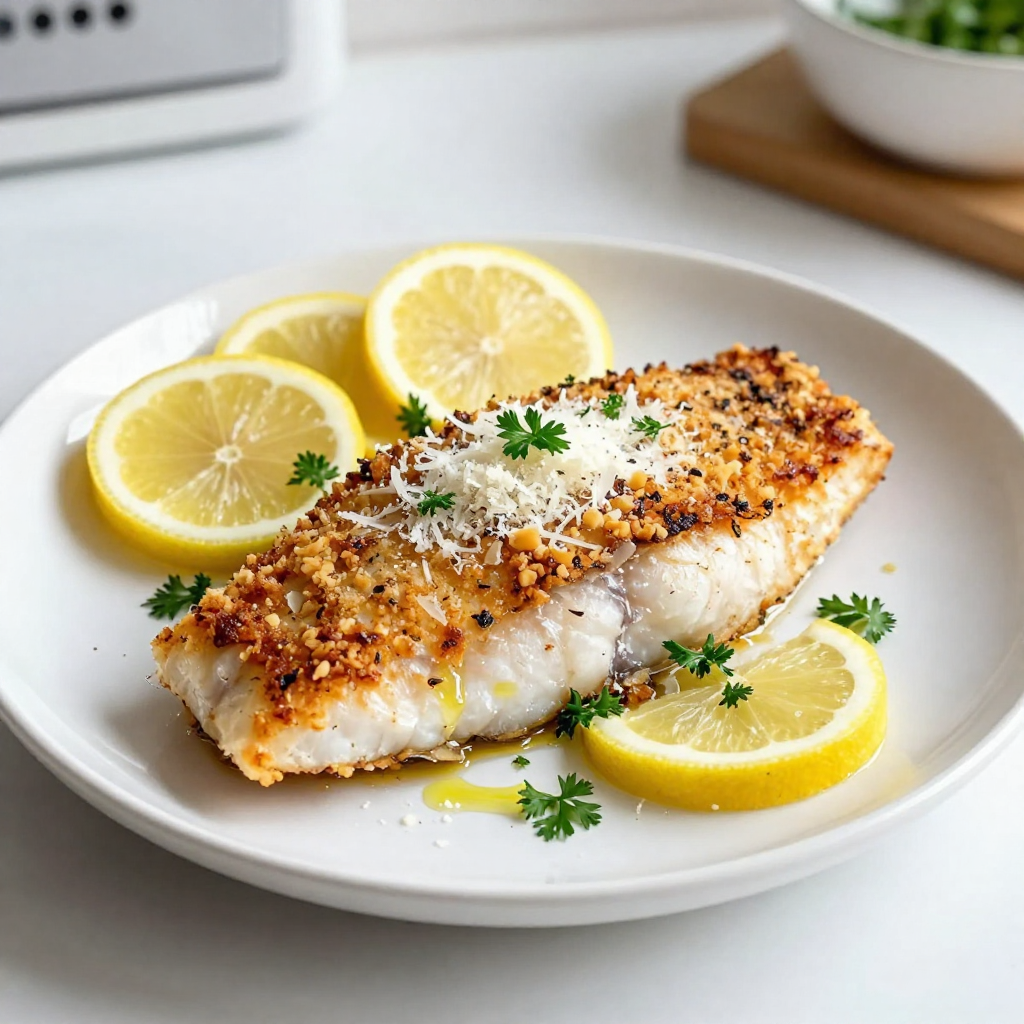
If you're looking for a quick and tasty meal, Parmesan Herb Crusted Tilapia is a winner! This simple recipe combines mild tilapia with a crunchy, cheesy crust that's hard to resist. Perfect for busy weeknights or special gatherings, it's packed with flavor and nutrition. Follow my step-by-step guide, and you'll impress everyone at the dinner table. Let's dive into making this dish that brings smiles all around!
Why I Love This Recipe
- Delicious Flavor: The combination of Parmesan cheese and fresh herbs creates a mouthwatering crust that elevates the tilapia to a gourmet level.
- Quick and Easy: This recipe is perfect for busy weeknights, taking only 30 minutes from prep to plate.
- Healthy Choice: Tilapia is a lean source of protein, making this dish a nutritious option without sacrificing taste.
- Versatile Presentation: Serve it alongside sautéed spinach or roasted vegetables for a colorful and appealing meal.
Ingredients
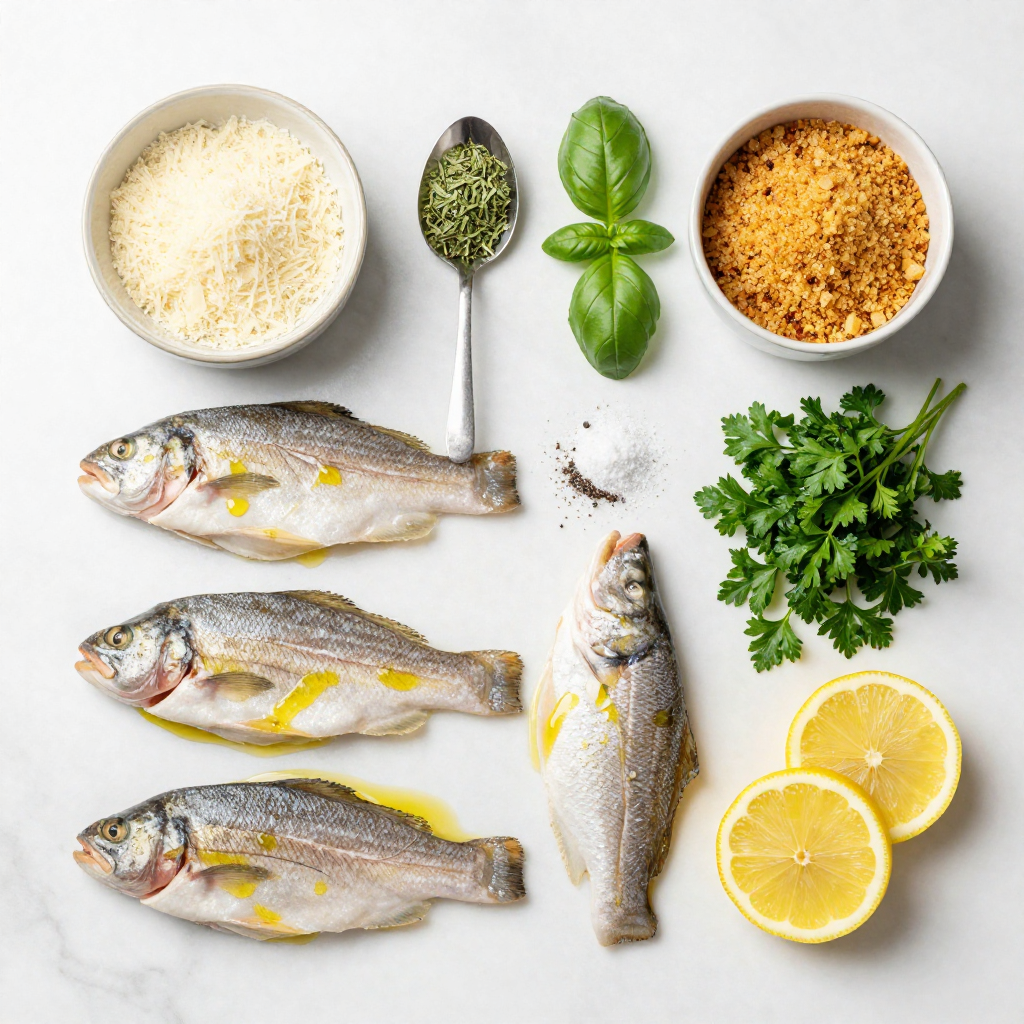
Here are the key ingredients needed for your Parmesan Herb Crusted Tilapia:
- 4 tilapia fillets
- 1 cup grated Parmesan cheese
- 1/2 cup breadcrumbs (preferably panko)
- 1 teaspoon dried oregano
- 1 teaspoon dried basil
- 1 teaspoon garlic powder
- 1/2 teaspoon salt
- 1/4 teaspoon black pepper
- 1/4 cup fresh parsley, chopped
- 2 tablespoons olive oil
- 1 lemon, sliced for garnish
Each ingredient plays a role in creating a tasty crust. The tilapia provides a mild, flaky base. The Parmesan cheese adds a rich flavor. Breadcrumbs give the crust a nice crunch. The herbs and spices elevate the dish with aromatic notes. Fresh parsley adds color and freshness, while olive oil helps everything stick together. Finally, the lemon slices add a zesty touch when serving.
Step-by-Step Instructions
Preparing the Oven and Ingredients
- Preheat your oven to 400°F (200°C).
- In a mixing bowl, combine the grated Parmesan cheese, breadcrumbs, dried oregano, dried basil, garlic powder, salt, black pepper, and chopped parsley. Mix well to ensure the herbs and spices are evenly distributed.
Starting with the oven at the right heat is key. This helps the fish cook evenly and develop a nice crust. While the oven heats, prepare the dry mix. Combining these ingredients brings out great flavor.
Coating the Tilapia
- Drizzle olive oil on the fillets.
- Press the Parmesan herb mixture onto the fillets.
Now, place the tilapia fillets on a baking sheet lined with parchment paper. Drizzle the olive oil over each fillet. This helps the crust stick and adds flavor. Next, press the Parmesan herb mixture onto the top of each fillet. Make sure to cover every inch for the best taste.
Baking the Tilapia
- Bake for 15-20 minutes or until the fish flakes easily.
- Look for a golden brown crust to know when it's ready.
Bake the tilapia in the preheated oven for about 15 to 20 minutes. The fish should flake easily with a fork when done. The crust should turn a beautiful golden brown. After baking, let it rest for a couple of minutes. This helps keep the juices in, making the fish tender and tasty. Garnish with fresh lemon slices for a zesty touch.
Tips & Tricks
Perfecting the Crust
To make the best crust, you need an even coating. Start by mixing the cheese and breadcrumbs well. This ensures every bite is flavorful. When you coat the fillets, press down firmly. This helps the crust stick while baking. Use a parchment-lined baking sheet for easy cleanup. Bake at 400°F (200°C) until the crust turns golden brown. This usually takes about 15 to 20 minutes.
Serving Suggestions
This dish pairs well with sautéed spinach or roasted veggies. The colors make your plate look bright and inviting. For a zesty touch, add lemon slices on top. A drizzle of olive oil can enhance the flavors and add shine.
Storing Leftovers
If you have leftovers, store them in an airtight container. Place them in the fridge for up to three days. To reheat, use the oven for best results. Set the oven to 350°F (175°C) and heat for about 10 minutes. This keeps the crust crispy and the fish moist.
Pro Tips
- Choose Fresh Fish: Opt for fresh tilapia fillets for the best flavor and texture. Check for a mild smell and firm flesh when selecting.
- Panko for Crunch: Using panko breadcrumbs instead of regular breadcrumbs adds an extra crunch to the crust, making each bite delightful.
- Herb Variations: Feel free to experiment with different herbs such as thyme or rosemary to give a unique twist to the flavor profile of your crust.
- Rest Before Serving: Allow the tilapia to rest for a few minutes after baking. This helps the juices redistribute, keeping the fish moist and flavorful.
Variations
Alternative Coating Options
You can switch up the cheese for new flavors. Try using mozzarella or gouda. Both melt well and taste great.
You can also play with spices. Add a pinch of cayenne for heat. Or mix in some smoked paprika for a smoky twist.
Cooking Methods
Air frying is a great choice for a crispy crust. Set your air fryer to 375°F (190°C). Cook for about 10-12 minutes.
Baking is simple too. Just follow the oven method I shared.
Grilling tilapia gives it a nice char. Heat your grill to medium-high. Cook for about 3-4 minutes per side.
Ingredient Swaps
If you need gluten-free, use crushed cornflakes instead of breadcrumbs. They add crunch and work well.
For a dairy-free option, swap Parmesan for nutritional yeast. It gives a cheesy taste without the dairy.
Nutritional Information
Detailed Nutritional Breakdown
Each serving of Parmesan Herb Crusted Tilapia has about 330 calories. This dish provides a great balance of nutrients. Here’s a quick look at its macronutrient content:
- Protein: 28 grams
- Fat: 15 grams
- Carbohydrates: 20 grams
This meal is a great source of protein, making it filling. The fat mainly comes from olive oil and cheese, which adds flavor.
Health Benefits of Ingredients
Tilapia is a lean fish. It is low in calories and high in protein. Eating tilapia helps build muscles and keeps you full. It also has omega-3 fatty acids, which are good for your heart.
The herbs and spices in this recipe have health perks too. Oregano and basil can boost your immune system. Garlic powder helps improve heart health. Fresh parsley adds vitamins and minerals. Together, these ingredients make your dish not only tasty but also healthy!
Portion Control Tips
For serving sizes, aim for one fillet per person. This keeps your meal balanced. Pair the tilapia with sides like sautéed spinach or roasted veggies. These sides add color and nutrients to your plate.
A good balance is key. If you add a starchy side, like rice or potatoes, make sure to keep the portions small. This way, you enjoy a complete meal without overdoing it.
FAQs
How can I tell if tilapia is cooked?
You can tell if tilapia is cooked by checking its color and texture. Look for a white, opaque color. The fish should flake easily with a fork. If it still looks translucent, it needs more time. Generally, bake it for 15-20 minutes at 400°F. Always check the thickest part of the fillet for doneness.
Can I freeze leftover Parmesan Herb Crusted Tilapia?
Yes, you can freeze leftover Parmesan Herb Crusted Tilapia. First, let it cool completely. Wrap each fillet tightly in plastic wrap or aluminum foil. Place them in an airtight container or freezer bag. This way, it can last up to three months. When ready, thaw it in the fridge overnight before reheating.
What are the best side dishes to serve with this recipe?
Great side dishes for Parmesan Herb Crusted Tilapia include:
- Sautéed spinach
- Roasted vegetables
- Garlic mashed potatoes
- Quinoa salad
- Steamed broccoli
These sides add color and flavor to your meal. They also balance the taste of the fish.
Is it possible to make this dish ahead of time?
Yes, you can make this dish ahead of time. Prepare the tilapia with the herb crust, then store it in the fridge for up to 24 hours. When ready to cook, just bake it without any need to thaw. This saves time and keeps the fish fresh.
This blog post shared a simple and tasty way to make Parmesan Herb Crusted Tilapia. You learned about the ingredients needed and how to prepare this dish step-by-step. We covered tips for a perfect crust and options for variations. Remember, you can adjust ingredients to fit your taste or dietary needs. Enjoy this healthy meal and make it your own. Happy cooking!
.png)