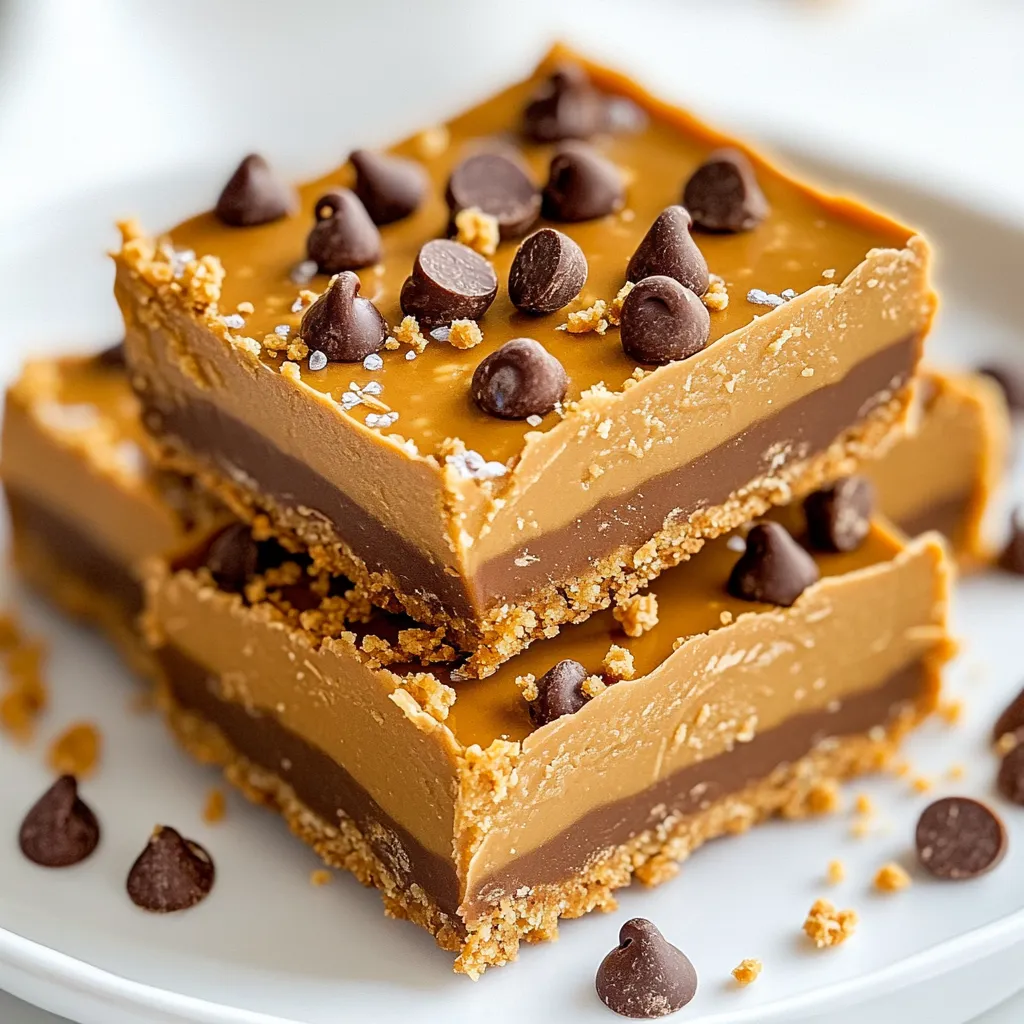
If you’re craving an easy and tasty treat, these No-Bake Peanut Butter Bars are perfect! You only need a few simple ingredients like creamy peanut butter, honey, and oats. No baking means you can whip them up quickly, making them ideal for snacks or gatherings. Stay tuned to discover step-by-step instructions, helpful tips, and delicious variations for these bars that everyone will love!
Why I Love This Recipe
- Easy to Make: This no-bake recipe requires minimal effort and time, making it perfect for busy days.
- Healthy Ingredients: With natural peanut butter and oats, these bars are a nutritious snack option that satisfies cravings.
- Customizable: You can easily swap ingredients like honey for maple syrup or add nuts for extra crunch.
- Deliciously Indulgent: The combination of peanut butter and chocolate is a classic crowd-pleaser that never disappoints.
Ingredients
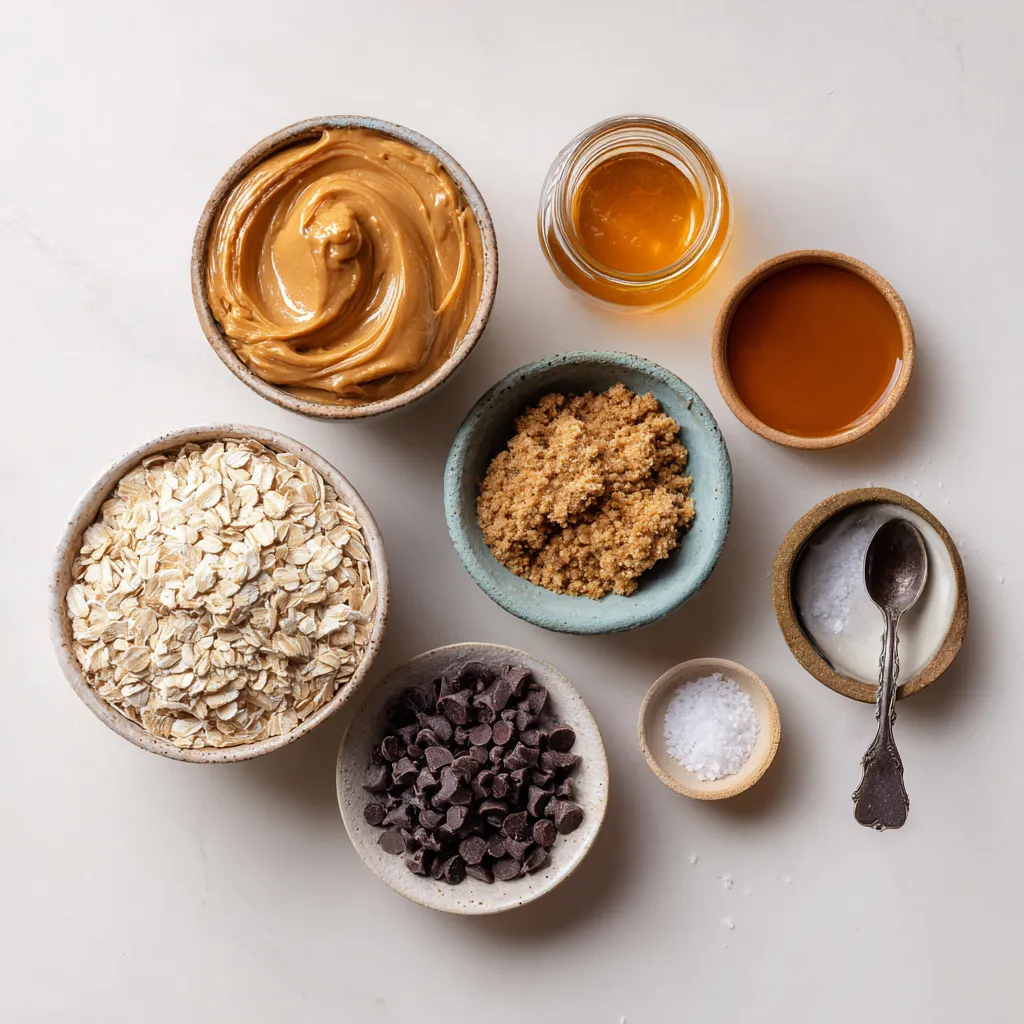
Complete Ingredient List
– 1 cup natural peanut butter (creamy or crunchy)
– 1/2 cup honey or maple syrup
– 1 cup rolled oats
– 1/2 cup graham cracker crumbs
– 1/4 cup chocolate chips (plus additional for topping)
– 1/4 teaspoon salt
– 1 teaspoon vanilla extract
To make no-bake peanut butter bars, gather your ingredients. Each one plays a key role in taste and texture. The peanut butter gives a rich, nutty base. Honey or maple syrup adds sweetness. Rolled oats provide bulk. Graham cracker crumbs lend a nice crunch. Chocolate chips add a sweet surprise. Salt enhances all the flavors. Vanilla extract rounds it all out.
Ingredient Substitutions
– Alternative sweeteners: agave syrup
– Gluten-free options: use gluten-free graham cracker crumbs
– Nut butter variations: almond butter or cashew butter
If you’re out of honey, try agave syrup for a different sweetness. For gluten-free bars, buy gluten-free graham cracker crumbs. This keeps everyone happy. You can swap peanut butter for almond or cashew butter too. Each nut butter brings a unique flavor to the bars. Experiment with what you have on hand!
Step-by-Step Instructions
Preparation Steps
– Step 1: Combine and melt peanut butter and honey
In a medium saucepan, heat 1 cup of natural peanut butter and 1/2 cup of honey over low heat. Stir until the mixture is smooth. Remove it from heat and let it cool a bit.
– Step 2: Mix dry ingredients
In a large bowl, combine 1 cup of rolled oats, 1/2 cup of graham cracker crumbs, 1/4 teaspoon of salt, and 1 teaspoon of vanilla extract. Mix these dry ingredients well.
– Step 3: Combine wet and dry ingredients
Pour the warm peanut butter mixture over the dry ingredients. Mix until everything is well combined. Stir in 1/4 cup of chocolate chips, saving a few for later.
Pan Preparation
– Step 4: Line baking pan with parchment paper
Take an 8×8 inch baking pan and line it with parchment paper. Leave some overhang. This will help you lift the bars out later.
– Step 5: Transfer and press mixture into the pan
Transfer the mixture into the lined pan. Use a spatula or your hands to press it down firmly and evenly.
Finishing Touches
– Step 6: Sprinkle chocolate chips on top
Sprinkle the extra chocolate chips on top of the pressed mixture. Press them in gently with the spatula.
– Step 7: Refrigeration process for setting
Place the pan in the refrigerator for at least 2 hours. This helps the bars set properly. Once set, lift them out using the parchment paper and cut into squares.
Enjoy the ease of this no-bake treat!
Tips & Tricks
Perfecting Texture
To achieve the right consistency for your no-bake peanut butter bars, you need to mix well. Combine the melted peanut butter and honey thoroughly. This blend gives the bars a smooth and creamy texture. If the mixture feels too thick, you can add a little more honey or peanut butter.
Adjust chilling time if needed. If you want softer bars, chill for only one hour. For firmer bars, two hours is best. Always check the texture before cutting.
Presentation Tips
For gatherings, serve these bars on a nice platter. Cut them into squares or rectangles for easy sharing. You can also wrap each bar in parchment paper, tied with kitchen twine. This adds a rustic touch and makes great gifts.
Consider using colorful plates to make the treats stand out. Adding fresh fruit or nuts around the bars creates an inviting display.
Common Mistakes to Avoid
Avoid over-mixing the ingredients. This can make the bars too dense. Mix just until everything is combined.
Press the mixture firmly into the pan. If you don’t press enough, the bars may crumble. Use a spatula or your hands to make sure the mixture is packed tightly. This step is key for the best results.
Pro Tips
- Use Natural Peanut Butter: Opt for natural peanut butter without added sugars or oils for a healthier option and a more authentic peanut flavor.
- Chill for Best Texture: Allow the bars to chill in the refrigerator for at least 2 hours to ensure they set properly and have a firmer texture when cut.
- Customize with Mix-ins: Feel free to add other mix-ins like chopped nuts, dried fruit, or seeds to enhance flavor and texture.
- Store Properly: Keep the bars in an airtight container in the refrigerator for up to a week, or freeze them for longer storage.
Variations
Flavor Additions
You can make these no-bake peanut butter bars even better. Try adding nuts or seeds for a nice crunch. Chopped almonds or sunflower seeds work well. You can also mix in dried fruits like raisins or cranberries. Shredded coconut flakes add a tropical twist too. Each addition brings its own flavor and texture.
Different Toppings
Switching up the toppings can change the whole taste. Use dark chocolate, white chocolate, or even a nut butter drizzle. You can also swap chocolate chips for butterscotch chips for a sweet surprise. These little changes can make every batch feel special and new.
Dietary Adjustments
If you want a vegan version, use plant-based sweeteners like agave syrup. You can also find nut-free options if you need them. For a keto-friendly treat, use low-carb substitutes, such as sugar-free chocolate chips. These tweaks allow everyone to enjoy these tasty bars without worry.
Storage Info
Best Storage Practices
To keep your no-bake peanut butter bars fresh, store them in the refrigerator. Place them in an airtight container. This helps avoid drying out and keeps them tasty. If you don’t have a container, you can use a covered baking dish. Just make sure the cover fits well.
Freezing Instructions
You can freeze these bars for later. Cut them into pieces before freezing. Wrap each piece in plastic wrap, then place them in a freezer bag. This way, they stay fresh and easy to grab. To enjoy, take them out and thaw in the fridge overnight. This keeps the texture smooth and tasty.
Shelf Life
In the refrigerator, these bars last about one week. Keep an eye out for signs they have gone bad. If they smell off or look discolored, it’s best to toss them. Enjoy your bars fresh for the best flavor!
FAQs
Can I use natural peanut butter?
Yes, you can use natural peanut butter. It adds a rich, creamy flavor. There are two main types: creamy and crunchy. Both work well in this recipe. Just make sure it has no added sugar or oils. These ingredients can change the taste and texture of your bars.
How do I make these bars gluten-free?
To make these bars gluten-free, use gluten-free graham cracker crumbs. Follow these steps:
1. Substitute regular graham cracker crumbs with gluten-free ones.
2. Check labels on other ingredients, like oats, to ensure they are gluten-free.
3. Follow the rest of the recipe as is.
This simple swap keeps the bars safe for gluten-free diets.
What is the best way to cut the bars?
To cut the bars without crumbling, follow these tips:
– Use a sharp knife for clean cuts.
– Warm the knife slightly before cutting for an easier slice.
– Cut the bars while they are cold from the fridge. This helps them hold their shape better.
– If they do start to crumble, just press them back together gently.
These steps will help keep your bars looking neat and tasty.
In this article, we explored making no-bake peanut butter bars, from gathering the right ingredients to tips for perfecting texture. You learned about ingredient substitutions, presentation ideas, and storage options. Remember, the key is to mix well and choose the right toppings. With practice, your bars will impress anyone. Enjoy making them for yourself or as a gift. These treats are simple, fun, and tast
.png)


