Are you ready to wow your taste buds this summer? This No Bake Lemon Icebox Pie is a refreshing treat that’s easy to whip up. With zesty lemon and a creamy filling, it’s perfect for hot days. You won’t even need to turn on the oven! Read on to discover the simple ingredients, quick steps, and fun tips to make this delightful dessert shine. Let’s dive in!
Why I Love This Recipe
- Refreshing Flavor: This pie delivers a bright, tangy lemon flavor that is incredibly refreshing, especially on warm days.
- No Baking Required: Enjoy the ease of making this dessert without turning on the oven, making it perfect for hot summer months.
- Simple Ingredients: With just a handful of common ingredients, this recipe is both accessible and budget-friendly.
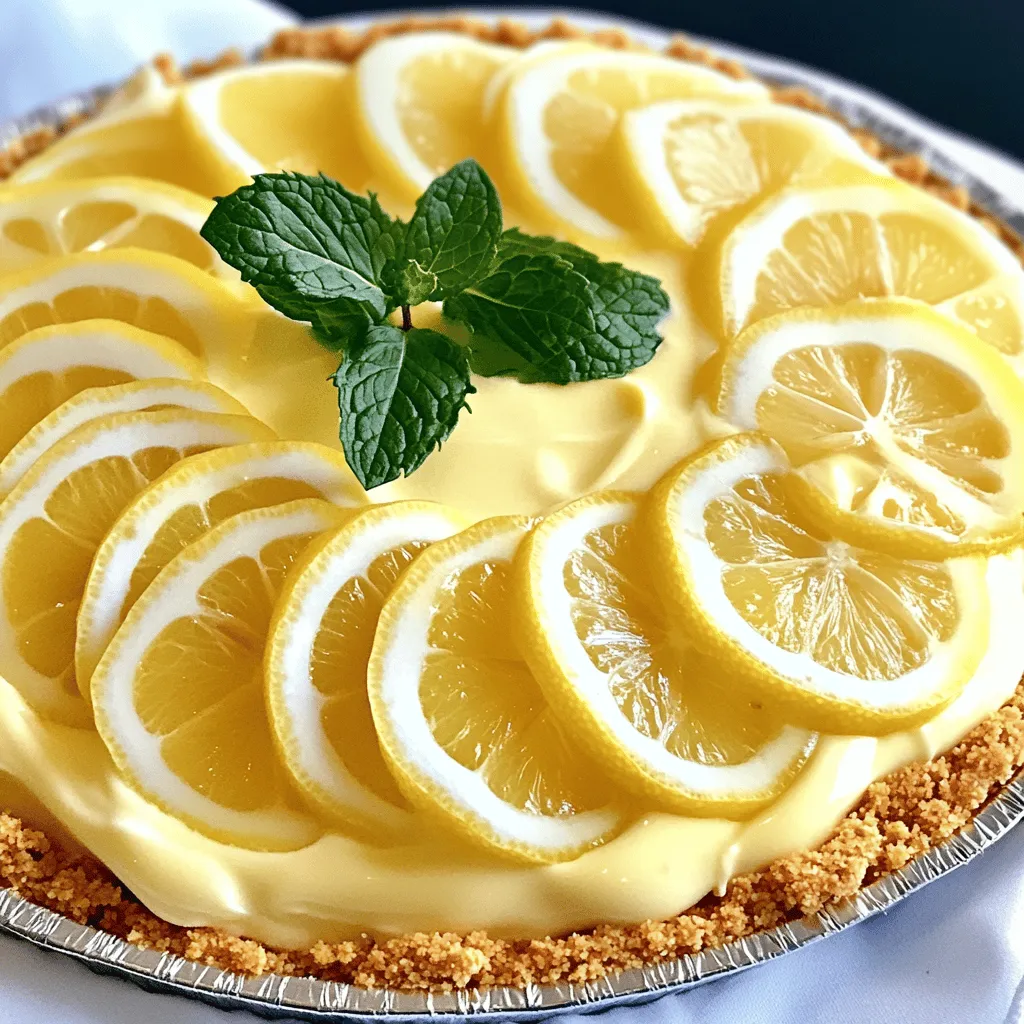
- Impressive Presentation: The beautiful lemon filling and fresh garnish make this pie a stunning centerpiece for any gathering.
Ingredients
Here is what you need to make a No Bake Lemon Icebox Pie. The fresh flavors and creamy texture will wow everyone.
– 1 ½ cups graham cracker crumbs
– ½ cup unsalted butter, melted
– 1 cup sweetened condensed milk
– ½ cup fresh lemon juice (about 2-3 lemons)
– Zest of 2 lemons
– 1 cup heavy whipping cream
– ½ cup powdered sugar
– 1 teaspoon vanilla extract
– Lemon slices and mint leaves for garnish
These ingredients create a pie that is both tangy and sweet. The graham cracker crust gives a nice crunch. The filling is creamy and refreshing. Using fresh lemon juice and zest adds bright flavor. When you whip the cream, it makes the filling light and airy.
Make sure to gather all these items before you start. You will love how easy it is to put this pie together.

Step-by-Step Instructions
Prepare the Crust
Start by mixing the graham cracker crumbs and melted butter in a medium bowl. You want the crumbs to be fully coated in butter. This step is key for a tasty crust! Next, press the mixture firmly into the bottom and up the sides of a 9-inch pie pan. Make sure it’s even and compact. Now, refrigerate the crust for about 30 minutes. This helps it set and hold its shape.
Make the Filling
In another bowl, whisk together the sweetened condensed milk, fresh lemon juice, and lemon zest. Keep whisking until the mixture is smooth and well combined. The lemon juice adds a bright, zesty flavor that will shine through in the pie.
Whip the Cream
Now, take a separate bowl and beat the heavy whipping cream, powdered sugar, and vanilla extract with an electric mixer. Mix until you see soft peaks form. This step creates a light, airy cream that balances the dense filling.
Combine Ingredients
Gently fold the whipped cream into the lemon mixture. Use a spatula and be careful not to deflate the whipped cream. You want it to stay fluffy so your pie remains light and refreshing.
Assemble the Pie
Pour the lemon filling into the prepared graham cracker crust. Use a spatula to smooth out the top. It should look nice and even. Make sure to get every bit of that delicious filling into the crust!
Chill and Serve
Cover the pie with plastic wrap and refrigerate it for at least 4 hours. For the best flavor, let it sit overnight. When you’re ready to serve, slice the pie and enjoy it chilled. Garnish with lemon slices and fresh mint leaves for a beautiful presentation.
Pro Tips
- Chill the Bowl: Before whipping the cream, chill your mixing bowl and beaters in the fridge for about 15 minutes. This helps the cream whip up faster and achieve a better volume.
- Fresh Lemon Juice: Use fresh lemon juice for the best flavor. Bottled lemon juice may contain preservatives that can alter the taste of your pie.
- Graham Cracker Crust: For a more flavorful crust, try adding a teaspoon of cinnamon or a tablespoon of sugar to the graham cracker mixture.
- Overnight Chill: For the best texture and flavor, allow the pie to chill overnight. This gives the filling time to fully set and enhance the lemon flavor.
Tips & Tricks
Perfecting the Crust
For a great crust, graham cracker crumbs work well. But you can try other options. Use crushed vanilla wafers for a sweeter taste. For a nutty flavor, consider using almond flour mixed with butter. Even chocolate cookie crumbs can add a unique twist. Just make sure to press the crust firmly into the pan. This helps it hold its shape when you slice the pie.
Ensuring the Right Consistency
Whipping cream needs attention to get the right texture. Start with cold cream for the best results. Use a chilled bowl and beaters. This keeps the cream from warming up too fast. Beat until soft peaks form, which means the cream can hold its shape but is still smooth. Don’t overbeat, or it can turn grainy. Gently fold this whipped cream into the lemon mixture.
Flavor Enhancements
Want to amp up the flavor? Add a bit of lime zest along with the lemon zest. This adds a nice punch to the filling. You could also mix in some fresh herbs like basil for a surprising twist. For a sweeter taste, add a splash of vanilla or a hint of ginger. Each small change can create a whole new experience in your pie.
Variations
Different Citrus Options
You can switch things up by using lime or orange juice. Lime adds a zesty kick. It gives the pie a fresh, tangy flavor. Orange juice offers a sweeter taste, perfect for those who prefer a milder zest. You can mix and match these juices. This will create a unique twist on your pie. You might even find a new favorite!
Alternative Sweeteners
If you want to replace sweetened condensed milk, try using coconut milk. This option keeps the pie creamy and rich. You can also use maple syrup or honey for a natural touch. Just remember, these sweeteners can change the flavor a bit. Adjust the amount to taste and keep it balanced. Experimenting with different sweeteners can lead to delicious surprises!
Dairy-Free Options
For a dairy-free pie, use coconut cream instead of heavy whipping cream. It whips up beautifully and gives a lovely coconut flavor. You can also try almond milk or cashew cream as alternatives. These options allow everyone to enjoy this refreshing dessert. Just make sure to check the consistency and adjust as needed. This way, you keep the pie creamy and delicious!Enjoy creating your own variations!
Storage Info
Storing Leftovers
To keep your No Bake Lemon Icebox Pie fresh, store leftovers in the fridge. Use a tight lid or wrap it well with plastic wrap. This helps keep the pie’s creamy filling and crust from drying out. Make sure to refrigerate it right after serving. If you leave it out, the pie can spoil quickly.
Freezing the Pie
You can freeze this pie if you want to save it for later. First, let the pie chill in the fridge for at least four hours. Then, cover it with plastic wrap or aluminum foil. Place it in the freezer. When you’re ready to eat it, thaw the pie in the fridge overnight. This way, it stays creamy and tasty.
Shelf Life
In the fridge, the pie lasts for about three to four days. After that, it may lose its flavor and texture. To enjoy it at its best, make sure to eat it within this time frame. If you freeze it, you can keep it for up to two months without losing quality.
FAQs
Can I make No Bake Lemon Icebox Pie ahead of time?
Yes, you can make No Bake Lemon Icebox Pie ahead of time. This pie tastes even better after chilling overnight. It allows the flavors to meld together nicely. Just cover it well with plastic wrap and keep it in the fridge. This makes it a perfect dessert for parties or gatherings.
How long does it take for the pie to set?
The pie needs at least four hours to set in the fridge. For the best results, I recommend chilling it overnight. This time helps the filling firm up and creates a nice texture. After it’s set, you can slice and serve it cold.
Can I use bottled lemon juice instead of fresh?
While fresh lemon juice gives the best taste, you can use bottled lemon juice. Make sure it’s pure lemon juice without added sugars or flavors. The flavor might be a bit different, but it will still work in the recipe. Fresh lemons add a bright, zesty flavor that enhances the pie.
Is it possible to make this gluten-free?
Yes, you can easily make this pie gluten-free. Simply replace graham cracker crumbs with gluten-free options. Look for gluten-free graham cracker crumbs or use ground nuts like almonds. This will keep the pie tasty while adhering to gluten-free diets. Enjoy your gluten-free treat!
This blog post covered how to make a delicious No Bake Lemon Icebox Pie. We discussed the key ingredients, step-by-step instructions, and tips to enhance flavor and texture. You learned how to prepare the crust, fill it with a creamy lemon mixture, and chill the pie for the perfect dessert.
In conclusion, this pie is easy, refreshing, and flexible. You can customize it to suit your taste and dietary needs. Try it out, and enjoy a sweet treat that is sure to impress!
.png)


