
Are you ready for a sweet, minty treat? My Mint Oreo Icebox Cake is the perfect dessert for hot days. With layers of creamy goodness and crunchy Mint Oreos, this cake is easy to make and even easier to enjoy. Whether you're hosting a gathering or just treating yourself, this delight is sure to impress. Let’s dive into the simple steps to create this refreshing dessert!
Why I Love This Recipe
- Refreshing Flavor: The combination of mint and chocolate in this icebox cake is incredibly refreshing, making it perfect for warm weather or any occasion where you want a cool treat.
- Easy to Make: This recipe requires minimal effort with no baking involved, making it accessible for all skill levels.
- Perfect for Sharing: With 12 servings, this cake is ideal for parties, gatherings, or family desserts, ensuring everyone gets a taste of this delightful treat.
- Creamy Texture: The fluffy cream cheese and whipped cream filling creates a luscious texture that pairs beautifully with the crunchy Oreos.
Ingredients
Key Ingredients
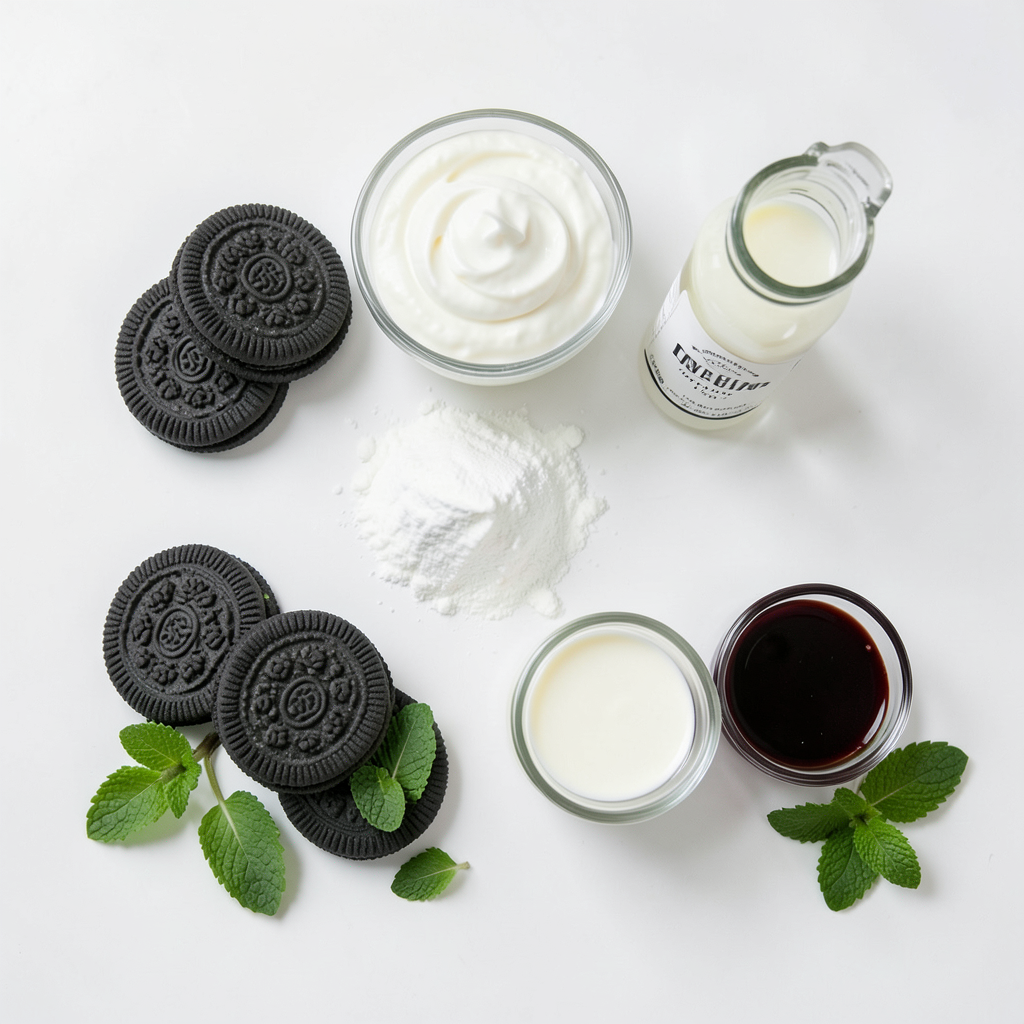
- 1 package of Mint Oreo cookies
- 2 cups heavy whipping cream
- 8 oz cream cheese, softened
- 1/4 cup milk
- 1/2 cup powdered sugar
- 1 teaspoon vanilla extract
The main star of this cake is the Mint Oreo cookies. They give a nice minty taste and chocolate crunch. The heavy whipping cream adds lightness and fluffiness. Cream cheese mixed with milk makes a rich filling that pairs perfectly with the Oreos. Don't forget the powdered sugar and vanilla, which add sweetness and flavor!
Optional Ingredients
- Chocolate syrup for drizzling
- Fresh mint leaves for garnish
While not needed, chocolate syrup adds a sweet touch on top. Fresh mint leaves make a lovely garnish. They add a pop of color and hint of fresh flavor.
Equipment Needed
- Mixing bowls
- Electric mixer
- Rectangular baking dish
You will need some basic tools. Mixing bowls are essential for combining ingredients. An electric mixer speeds up whipping the cream. A rectangular baking dish is perfect for layering the cake. Having the right tools makes the process easier and more fun!
Step-by-Step Instructions
Preparing the Cream Mixture
To make the cream mixture, start by beating the heavy whipping cream.
- Use a large mixing bowl.
- Beat with an electric mixer on high speed.
- Watch for soft peaks to form.
Next, add the powdered sugar and vanilla extract slowly.
- Keep beating until you see stiff peaks.
- Set this mixture aside for later use.
Now, in another bowl, mix the softened cream cheese with milk.
- Stir until the mixture is smooth and well-blended.
- This will help create a creamy filling.
Finally, gently fold the whipped cream into the cream cheese mixture.
- Use a spatula to combine them fully.
- Aim for a light and fluffy filling.
Assembling the Cake
Now, let's assemble the cake. Start by dipping each Mint Oreo in milk.
- Dip for about 2 seconds.
- This softens the cookie, making it easy to layer.
Next, place the dipped Oreos in a single layer.
- Use a rectangular baking dish for this.
- Line the bottom with Oreos closely together.
Spread a layer of the cream mixture over the Oreos.
- Smooth it out evenly with a spatula.
- This adds creaminess to every bite.
Repeat this process.
- Layer dipped Mint Oreos and cream mixture.
- Keep going until you run out of Oreos.
- Finish with a final layer of cream on top.
Finishing Touches
Now for the finishing touches. Drizzle chocolate syrup over the top layer.
- This adds sweetness and looks great too.
- You can also garnish with fresh mint leaves if you like.
Cover the dish with plastic wrap.
- Refrigerate for at least 4 hours.
- For best results, chill overnight.
This time lets the flavors mix and the cake set.
- Once set, slice into squares and serve chilled.
- Enjoy your cool treat!
Tips & Tricks
Tips for Perfect Layers
To get the best layers in your Mint Oreo Icebox Cake, you need to dip the Oreos in milk just right. I recommend dipping each cookie for about two seconds. This gives them enough moisture without becoming soggy. You want them to hold their shape when you stack them.
For the whipped cream, use cold heavy whipping cream. Beat it on high speed until soft peaks form. Add powdered sugar and vanilla. Keep beating until you see stiff peaks. This means the cream will hold its shape well when layered.
Troubleshooting Common Issues
Sometimes, the cream may not be stiff enough. If this happens, make sure your bowl and beaters are very cold. You can even chill them in the fridge first. Beat longer until you see stiff peaks.
If your Oreos break during assembly, be gentle while dipping them. Instead of soaking them, just dip quickly. If they still break, try using a layer of cream to hold them together.
Serving Suggestions
Pair your Mint Oreo Icebox Cake with a nice dessert wine or coffee. The rich flavors go well together.
For presentation, consider slicing the cake into squares and placing them on a nice platter. Garnish with fresh mint leaves for a pop of color. You can also drizzle extra chocolate syrup on top for added flair.
Pro Tips
- Chill Your Ingredients: Make sure your heavy cream and cream cheese are well-chilled before whipping and mixing to achieve the best volume and texture.
- Layering Technique: For best results, dip the Mint Oreos briefly in milk to avoid them becoming too soggy, which can make the layers fall apart.
- Perfect Chocolate Drizzle: Warm the chocolate syrup slightly before drizzling it on top; this will help it spread evenly and create a beautiful finish.
- Let It Set: Allowing the cake to chill overnight enhances the flavor and makes slicing easier, giving you cleaner edges and a more cohesive texture.
Variations
Flavor Variations
You can make your Mint Oreo Icebox Cake even better! Try adding a few drops of peppermint extract. This gives a fresh kick to the mint flavor. Just a little goes a long way. You can also swap out Mint Oreos for other flavors. Think of peanut butter or birthday cake Oreos. Each choice gives a new twist to your cake.
Healthier Tweaks
Want a lighter version? Use low-fat cream cheese. It still tastes great and cuts some calories. You can also explore dairy-free options. Look for coconut cream or almond milk cream cheese. These swaps keep the cake creamy while fitting into a dairy-free diet.
Special Occasion Ideas
Planning a party? Decorate your cake with festive toppings! Use crushed candies or sprinkles for a colorful touch. You can even add fresh berries for a pop of color. If you have a big crowd, feel free to double the recipe. This way, everyone can enjoy a slice of this delight!
Storage Info
Refrigeration Guidelines
You can store the Mint Oreo Icebox Cake in the fridge for up to 5 days. Make sure to cover it well with plastic wrap. This keeps it fresh and tasty. The cool temperature helps the flavors stay strong.
Freezing Instructions
Yes, you can freeze this cake! To freeze, cut it into squares first. Wrap each piece tightly in plastic wrap. Then, place them in a freezer-safe container. This way, you can enjoy a slice anytime. To thaw, move it to the fridge for a few hours or overnight.
Best Practices for Storing
Use an airtight container to store the cake. If you don't have one, cover it tightly with plastic wrap. This keeps the cake moist and prevents it from absorbing other food smells. Be sure not to leave it out at room temperature for too long. Enjoy your Mint Oreo Icebox Cake fresh and delicious!
FAQs
Can I make Mint Oreo Icebox Cake ahead of time?
Yes, you can make Mint Oreo Icebox Cake ahead of time. In fact, preparing it a day in advance enhances the flavor. This cake tastes best after chilling. Just follow these suggestions:
- Assemble the cake and cover it tightly with plastic wrap.
- Refrigerate it for up to 2 days before serving.
- Keep in mind that the longer it sits, the softer the Oreos become.
What can I substitute for cream cheese?
If you need a cream cheese substitute, several options work well. Here are some alternatives:
- Greek yogurt adds creaminess and a bit of tang.
- Mascarpone cheese gives a rich flavor and smooth texture.
- For a dairy-free option, try cashew cream or silken tofu blended until smooth.
How long does the cake need to set?
The cake needs to chill for at least 4 hours. Chilling helps the flavors blend and the cake firm up. For best results, let it set overnight. This allows the Mint Oreos to soften just right for a deliciously cool treat.
This blog post covered everything needed to make a Mint Oreo Icebox Cake. We explored key ingredients like Mint Oreos and cream, along with optional toppings. I shared tips on perfect layers and how to troubleshoot common issues. You learned variations, storage info, and answers to popular questions.
Overall, this dessert is a fun treat for any occasion. With these steps, you can impress friends and family easily. Enjoy creating and sharing your tasty masterpiece!
.png)


