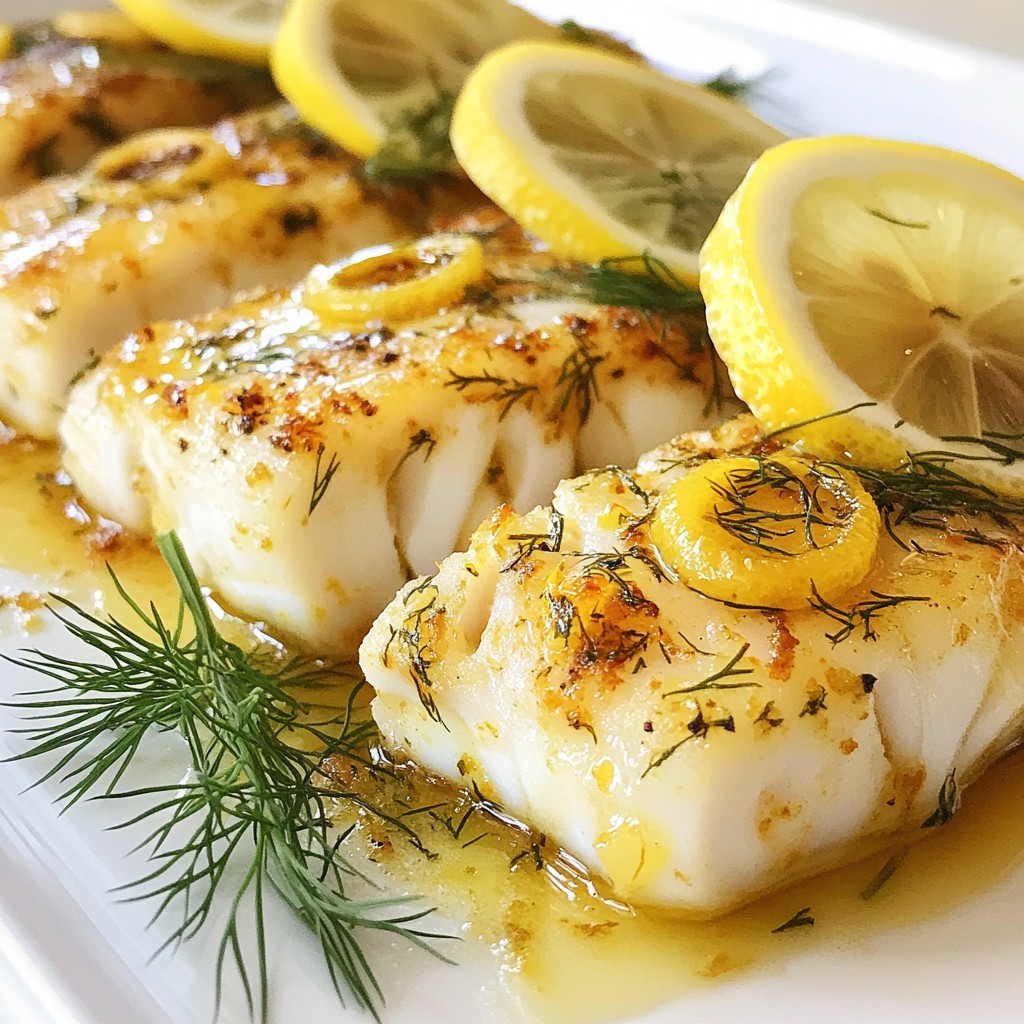
Looking for a fresh and tasty dish? Try my Lemon Dill Baked Cod! This recipe bursts with flavor and is simple to make. Whether you're a cooking beginner or a seasoned pro, you'll love how easy it is to prepare. With just a few ingredients and some simple steps, you can impress your family and friends with this healthy meal. Dive into this article for all the tips and tricks to nail this dish!
Why I Love This Recipe
- Fresh and Bright Flavor: The combination of lemon and dill brings a refreshing zing that perfectly complements the mild flavor of the cod.
- Quick and Easy: With a total prep and cooking time of just 25 minutes, this dish is perfect for busy weeknights.
- Healthy and Nutritious: Cod is a lean source of protein, and this recipe is low in calories, making it a healthy choice for any meal.
- Beautiful Presentation: The bright lemon slices and fresh dill sprigs not only add flavor but also make the dish visually appealing.
Ingredients
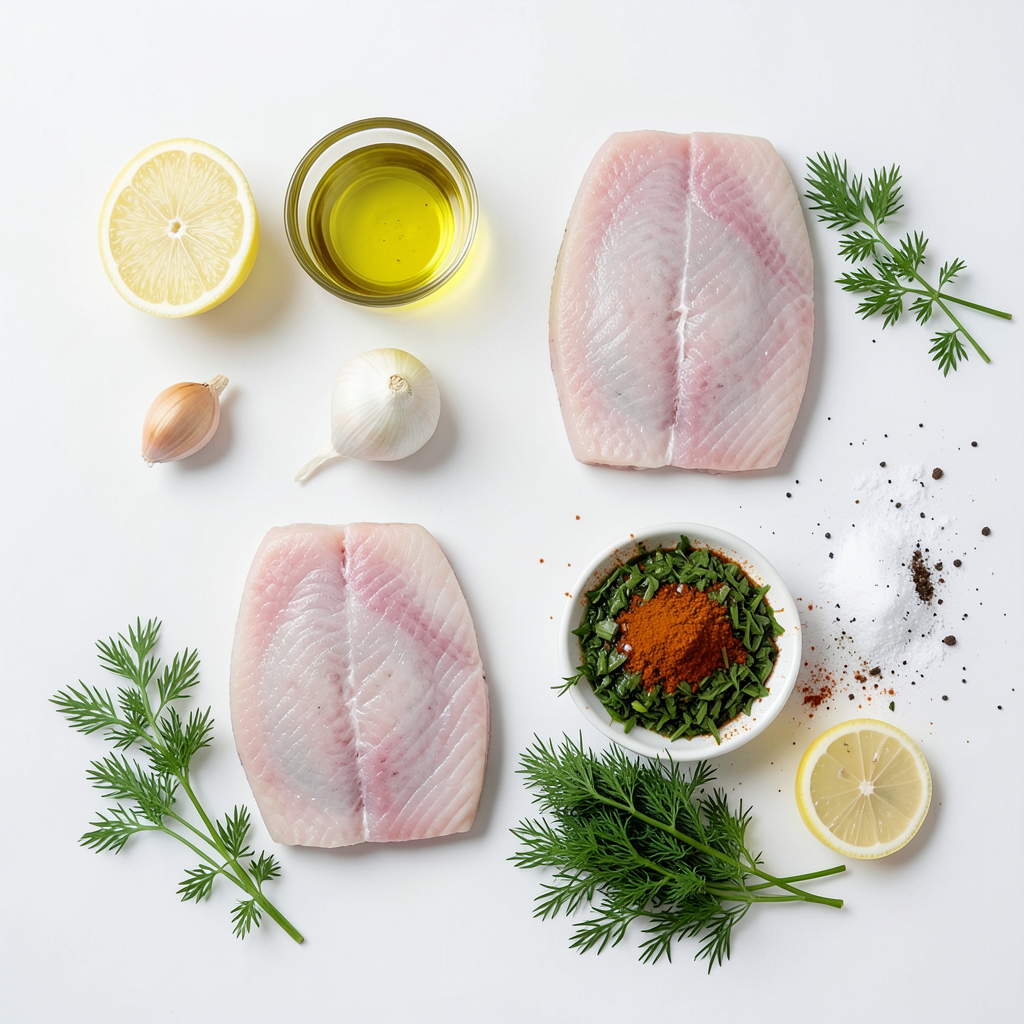
Detailed Ingredient List
For this Lemon Dill Baked Cod, you need:
- 4 cod fillets (6 oz each)
- 3 tablespoons olive oil
- Zest and juice of 1 large lemon
- 2 cloves garlic, minced
- 1 tablespoon fresh dill, chopped (or 1 teaspoon dried dill)
- 1 teaspoon paprika
- Salt and pepper to taste
- Lemon slices for garnish
- Fresh dill sprigs for garnish
These ingredients work together to create bright and fresh flavors. Each item plays a vital role in making this dish pop.
Ingredient Substitutions
You can swap some ingredients if you need to. Here are some ideas:
- Cod fillets: You can use haddock or tilapia instead.
- Olive oil: Avocado oil works well as a substitute.
- Fresh dill: If you don't have fresh dill, dried dill is a good choice. Use less, as it's stronger.
- Paprika: You can replace it with cayenne for heat or omit it for a milder taste.
These swaps still keep the dish tasty and enjoyable. So, don’t worry if you lack some items.
Fresh vs. Dried Dill
Fresh dill brings a bright, vibrant taste to the cod. It adds a nice crunch and strong aroma. You use more of it because it has a lighter flavor.
Dried dill is more intense and can be handy when fresh is not available. Just remember to use less. One teaspoon of dried dill is enough for this recipe.
Both types of dill have their place in cooking. Fresh is great for a burst of flavor, while dried is easier to store and last longer.
Step-by-Step Instructions
Prepping the Oven and Baking Dish
First, you need to set your oven. Preheat it to 400°F (200°C). This high heat will help the cod cook evenly and quickly. Next, grab a baking dish. Line it with parchment paper. This step makes clean-up easy and keeps the fish from sticking.
Making the Lemon Dill Mixture
In a small bowl, mix your ingredients. Use 3 tablespoons of olive oil. Add the zest and juice of one large lemon. Then, include 2 minced garlic cloves and 1 tablespoon of fresh chopped dill. If you don’t have fresh dill, dried dill works too; just use 1 teaspoon. Add 1 teaspoon of paprika for flavor. Finally, season with salt and pepper to taste. Stir well until combined. This mixture will add zest to your cod.
Marinating and Baking the Cod
Take your cod fillets and place them in the prepared baking dish. Brush the lemon dill mixture on each fillet. Make sure every bit of fish gets coated. This gives the cod full flavor. Let the fillets sit and marinate for about 10 minutes. This waiting time helps the fish soak in the flavors. Now, it’s time to bake! Place the dish in the oven. Bake for 12 to 15 minutes. You know your cod is ready when it flakes easily with a fork. After baking, let the cod rest for a few minutes. Garnish with lemon slices and fresh dill sprigs for a lovely finish. Enjoy your meal!
Tips & Tricks
Ensuring Flaky Cod
To get flaky cod, start with fresh fillets. Look for bright, moist fish. The texture should feel firm. Avoid fish that looks dull or has a strong smell. Baking at 400°F cooks the cod perfectly. It only takes 12-15 minutes. Keep an eye on it; overcooking makes the fish tough. When done, the fish should flake easily with a fork.
Flavor Enhancements
Adding flavor is key to this dish. Use fresh lemon juice and zest for the best taste. Fresh dill also adds a bright note. If you like spice, try adding a pinch of cayenne pepper. You can also swap out dill for other herbs. Try parsley, thyme, or basil for a different twist. A splash of white wine can add depth, too. Brush the cod well with the lemon dill mixture for a burst of flavor.
Common Mistakes to Avoid
Avoid common mistakes to make the best baked cod. Do not skip marinating the fish. It helps the flavors soak in. Overcrowding the baking dish can lead to uneven cooking. Make sure each fillet has space. Forgetting to preheat the oven can also ruin your dish. Always preheat for even cooking. Lastly, don’t rush to serve the fish right away. Letting it rest for a few minutes helps the juices settle.
Pro Tips
- Choose Fresh Cod: Always opt for fresh cod fillets when possible, as they have a superior taste and texture compared to frozen ones.
- Marination Time Matters: Allow the cod to marinate for at least 10 minutes to enhance the flavors of the lemon and dill.
- Check for Doneness: The cod is perfectly cooked when it flakes easily with a fork; be sure not to overcook it to maintain moisture.
- Serving Suggestions: Pair the baked cod with a light salad or steamed vegetables for a balanced meal that complements the zesty flavors.
Variations
Adding Different Herbs
You can switch up the herbs in this dish. Instead of dill, try basil or parsley. Both herbs add a fresh taste. You can also mix herbs for a unique blend. Chives lend a nice onion flavor. Experiment to find your favorite mix!
Alternative Seafood Options
If you want to change the fish, try salmon or tilapia. Salmon brings a rich, buttery taste. Tilapia is mild and absorbs flavors well. You can use any firm white fish, like halibut or mahi-mahi. Just adjust the cooking time based on thickness.
Serving Suggestions
Serve Lemon Dill Baked Cod with rice or quinoa. Both grains soak up the lovely lemon sauce. Fresh veggies like asparagus or green beans pair well, too. For a light touch, add a simple salad with lemon vinaigrette. This makes a complete, tasty meal!
Storage Info
How to Store Leftovers
To store leftovers, first, let the cod cool down to room temperature. Then, place the cod in an airtight container. Make sure to separate the fillets with parchment paper to avoid sticking. Store it in the fridge for up to three days. This way, you can enjoy the fresh flavors later.
Reheating Instructions
When you're ready to reheat, preheat your oven to 350°F (175°C). Place the cod on a baking sheet. Cover it with foil to keep it moist. Heat for about 10 minutes or until warmed through. You can also reheat in the microwave. Use a microwave-safe plate and cover it with a damp paper towel. Heat for about 1-2 minutes.
Freezing Tips
If you want to freeze the cod, wrap each fillet tightly in plastic wrap. Then, place them in a freezer-safe bag. Remove as much air as possible. This helps prevent freezer burn. You can freeze the cod for up to three months. When ready to eat, thaw it in the fridge overnight before reheating.
FAQs
What can I serve with Lemon Dill Baked Cod?
You can pair Lemon Dill Baked Cod with many sides. Here are some great options:
- Steamed vegetables like broccoli or green beans
- A fresh garden salad with lemon vinaigrette
- Quinoa or rice for a filling base
- Roasted potatoes for a hearty touch
These sides add color and flavor. They balance the light taste of the cod. Try mixing and matching to find your favorite combo!
Can I use frozen cod fillets?
Yes, you can use frozen cod fillets. Just make sure to thaw them first. Thawing helps the fish cook evenly. You can thaw them in the fridge overnight or use cold water for quicker thawing.
Once thawed, follow the same steps in the recipe. Your cod will still turn out delicious!
How do I know when cod is fully cooked?
Cod is fully cooked when it flakes easily with a fork. The fish should have a white, opaque look. If it is still translucent or mushy, it needs more time.
For best results, aim for an internal temperature of 145°F (63°C). Use a meat thermometer for accuracy. This ensures your cod is safe and tasty!
This blog post covered everything you need for Lemon Dill Baked Cod. We explored ingredients, from fresh to dried dill. I shared step-by-step instructions, tips for flaky fish, and fun variations. You learned how to store leftovers and answered common questions.
Try this recipe for a tasty dish that is easy and rewarding. Cooking can be fun, so enjoy the process and share your results. Good luck with your cooking!
.png)