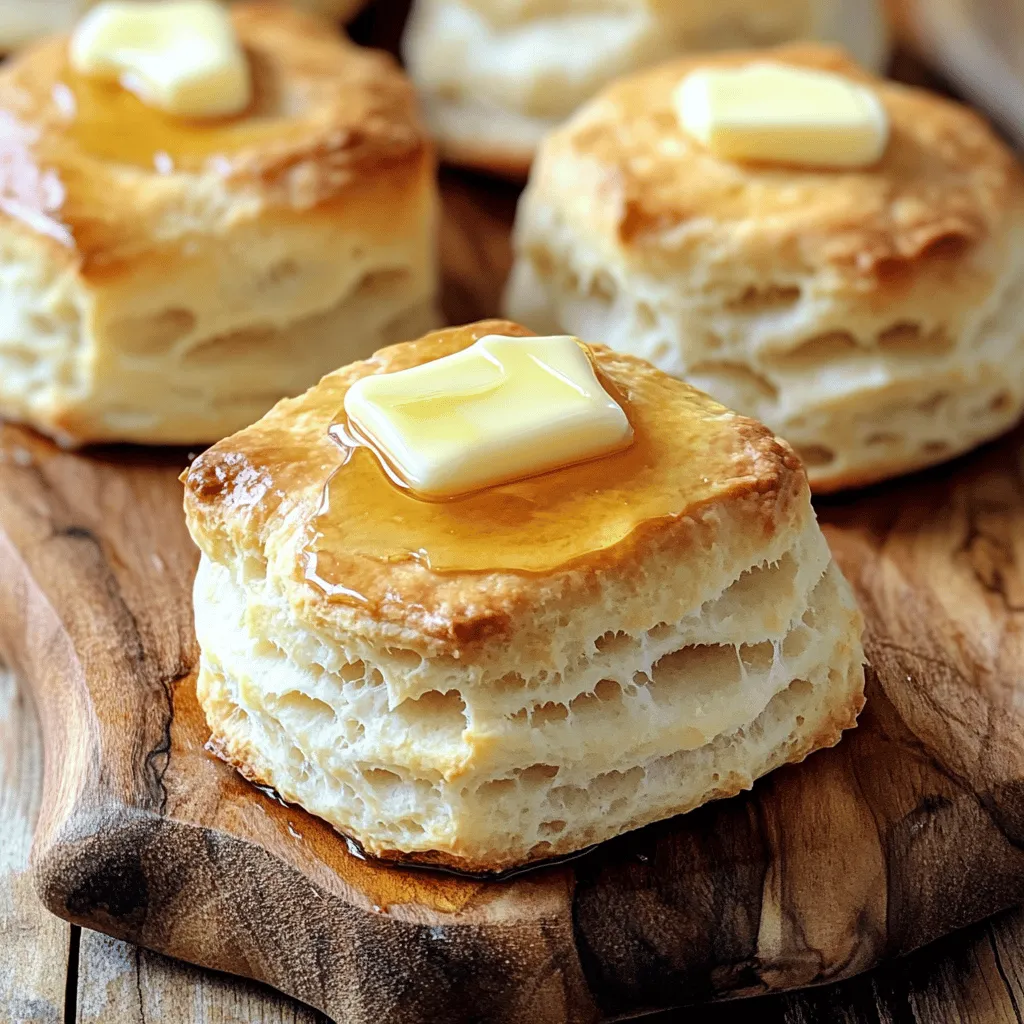
Are you ready to bake the flakiest homemade buttermilk biscuits? This simple recipe will make your kitchen smell amazing and leave everyone wanting more. With just a few simple ingredients and easy steps, you can create golden, delicious biscuits from scratch. Let’s explore how to whip up these tasty treats that pair perfectly with jams or savory dishes. Your family will thank you for this one!
Why I Love This Recipe
- Flaky Texture: These biscuits are incredibly flaky, thanks to the layered folding method that creates air pockets for a light and tender bite.
- Quick and Easy: This recipe is simple and can be prepared in just 30 minutes, making it perfect for a last-minute breakfast or brunch.
- Versatile: Homemade buttermilk biscuits can be enjoyed plain, with butter, or served alongside jam, gravy, or your favorite savory dish.
- Comfort Food: There’s nothing quite like the aroma of freshly baked biscuits that brings warmth and comfort to any meal.
Ingredients
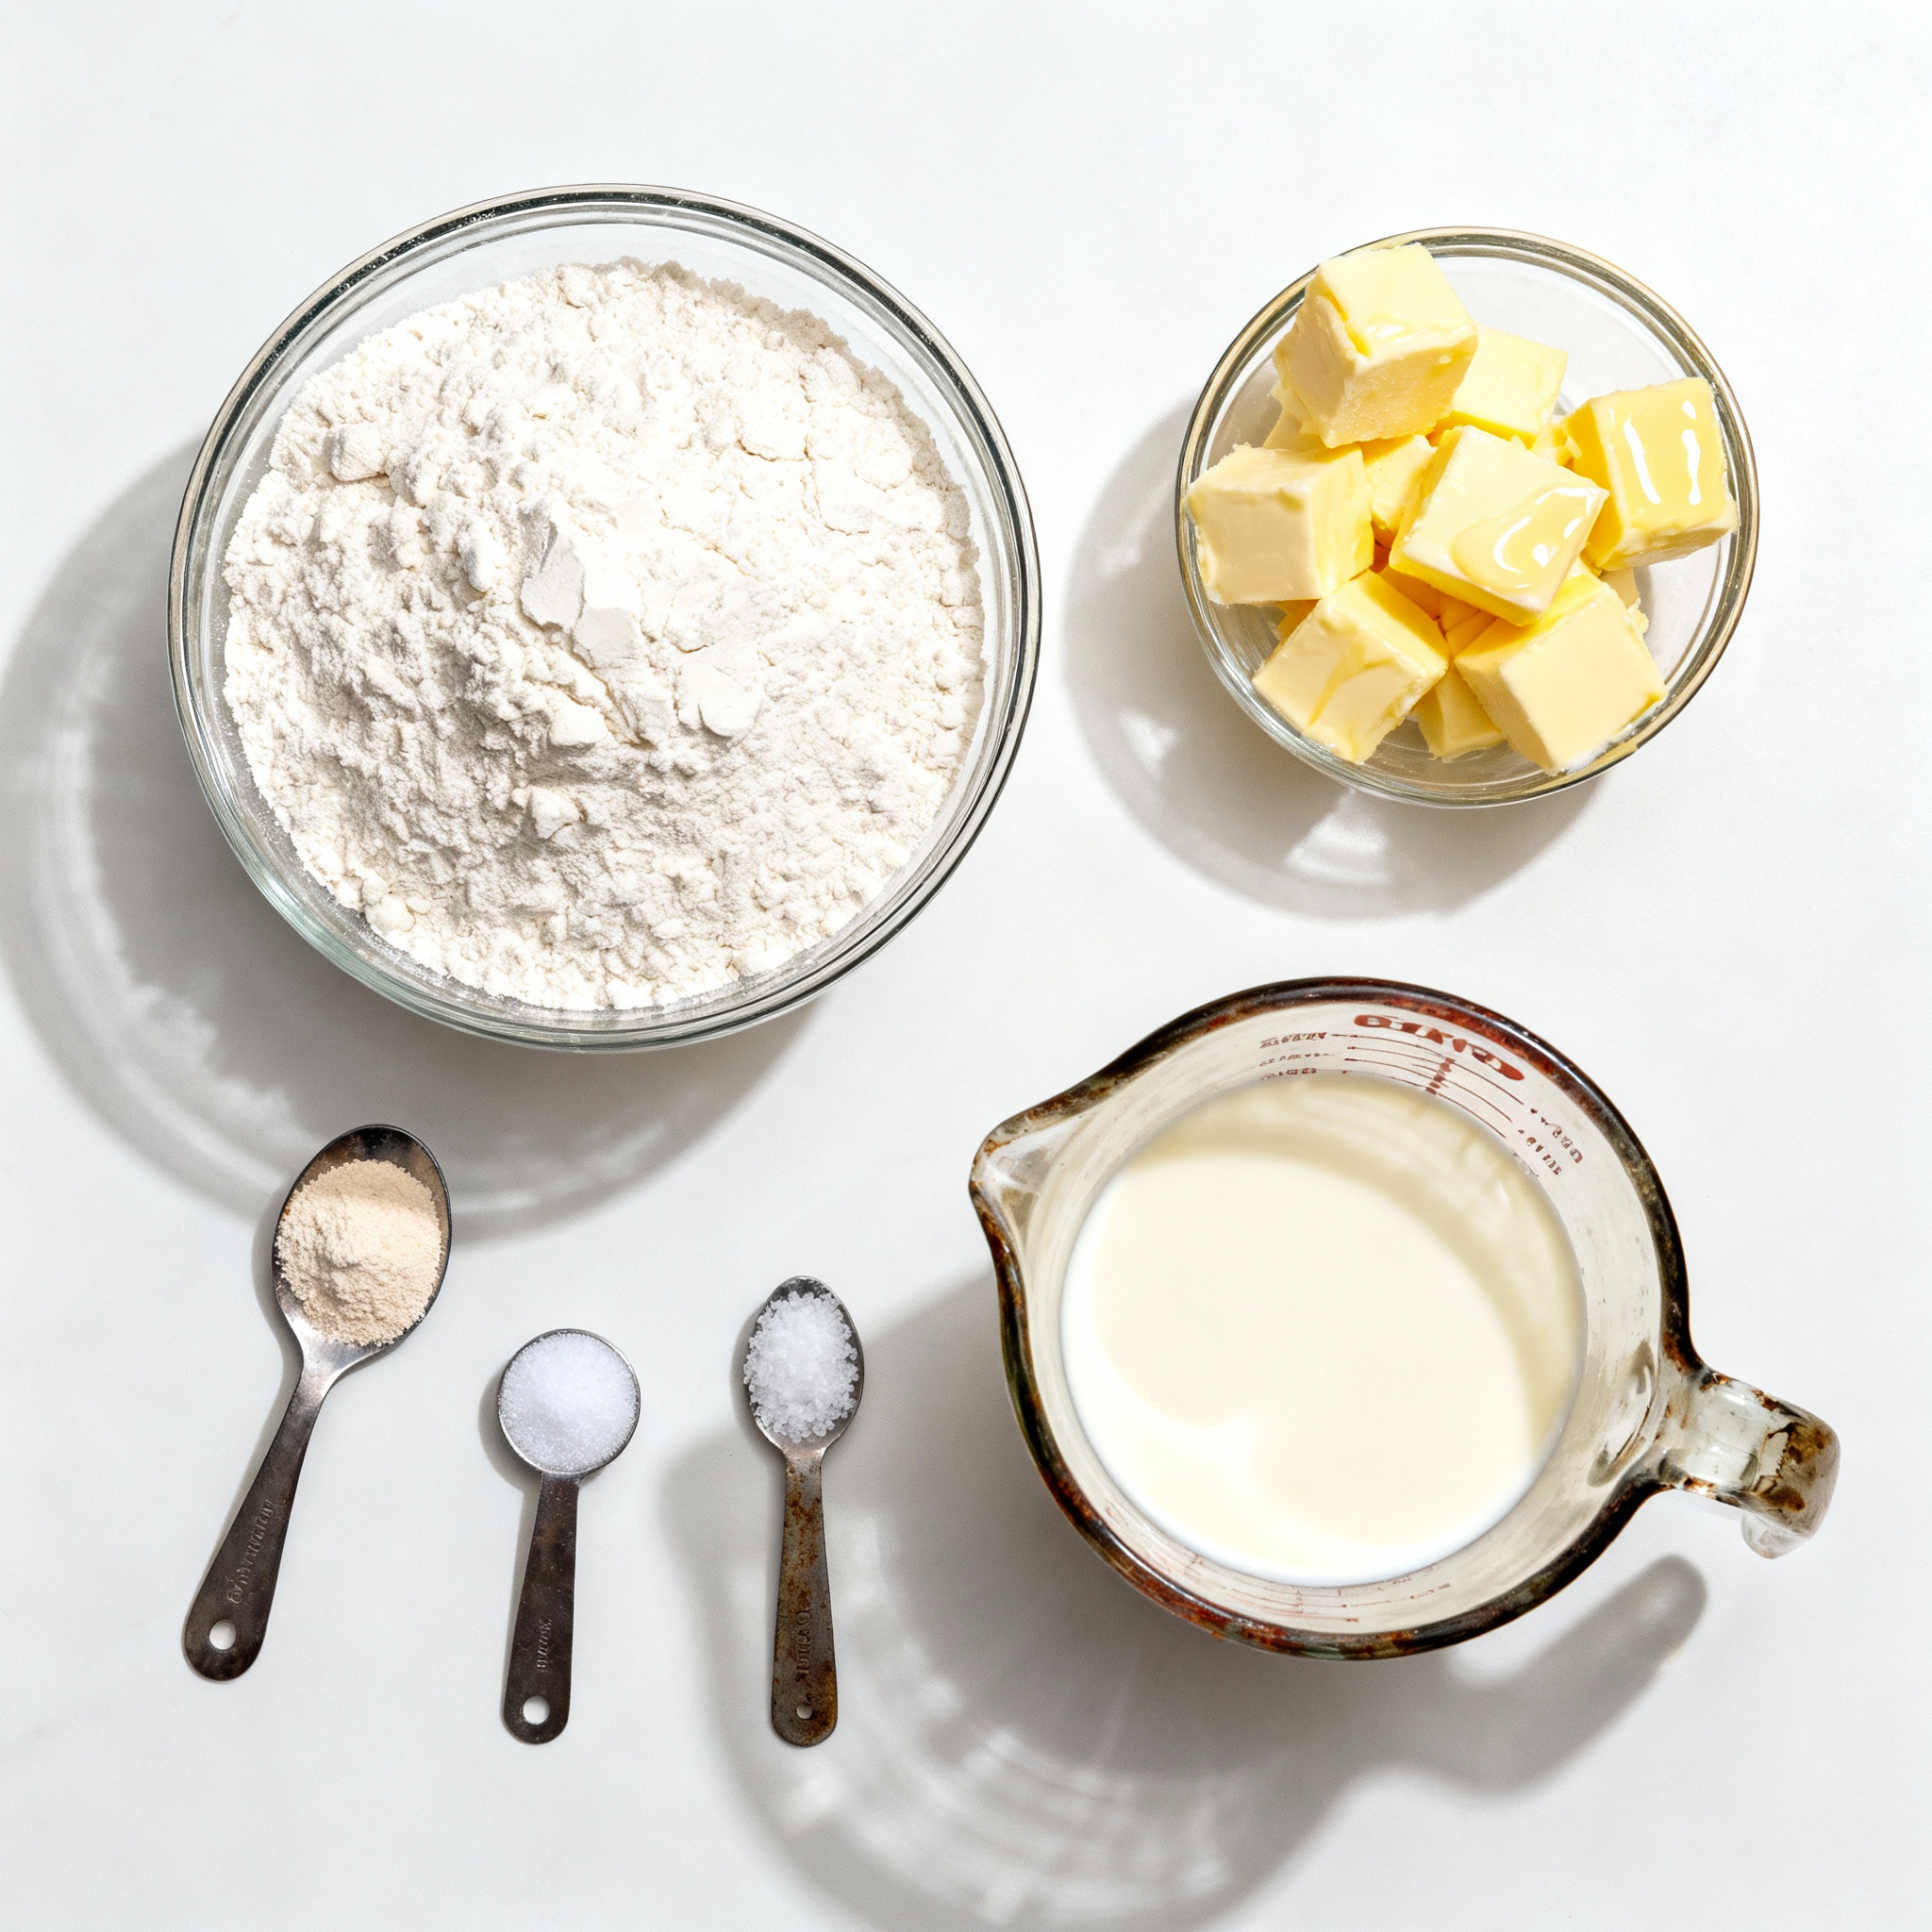
List of Ingredients
– 2 cups all-purpose flour
– 1 tablespoon baking powder
– 1/2 teaspoon baking soda
– 1/2 teaspoon salt
– 1/4 cup unsalted butter, cold and cubed
– 3/4 cup buttermilk, plus extra for brushing
I love using simple, fresh ingredients to make my buttermilk biscuits. The flour is the base, giving the biscuits their structure. Baking powder and baking soda help them rise and become fluffy. Salt adds flavor, making each bite delicious.
I always use cold butter. It creates that flaky texture we all love. When you mix in the butter, you should aim for pea-sized pieces. This helps the biscuits rise nicely while baking.
Buttermilk is key for moisture and flavor. It also reacts with the baking soda. This reaction makes the biscuits rise even more and adds a slight tang. I often keep extra buttermilk on hand for brushing the tops. This gives them a beautiful, golden color when baked.
Gather these ingredients, and you’ll be ready to create your own batch of homemade buttermilk biscuits.
Step-by-Step Instructions
Preparation Steps
– Preheat your oven to 425°F (220°C) and line a baking sheet with parchment paper.
– In a large mixing bowl, whisk together the flour, baking powder, baking soda, and salt until well combined.
– Add the cold, cubed butter to the flour mixture. Use a pastry cutter or your fingers to cut the butter into the flour until the mixture looks like coarse crumbs. Some small chunks of butter should remain.
– Pour in the buttermilk and gently stir with a fork until just combined. Be careful not to overmix. The dough should be soft and a bit sticky.
Shaping the Biscuits
– Turn the dough out onto a lightly floured surface. With floured hands, gently knead the dough a few times until it holds together, about 5-6 times.
– Pat the dough into a rectangle about 1-inch thick. Fold the dough over itself in thirds, like folding a letter. Flatten it out again to 1-inch thickness. Repeat this folding process 1-2 more times to create those flaky layers.
– Using a floured biscuit cutter, cut out biscuits from the dough. Press straight down without twisting. Place the biscuits on the prepared baking sheet. You can keep them close for soft edges or space them apart for crisp edges.
Baking the Biscuits
– Brush the tops of the biscuits with a bit more buttermilk for a nice golden finish.
– Bake in the preheated oven for 12-15 minutes. Look for the tops to be golden brown and the biscuits to be fluffy.
– Remove from the oven and let them cool slightly before serving warm.
Pro Tips
- Use Cold Butter: Make sure the butter is very cold to achieve flaky layers. This is essential for that perfect biscuit texture.
- Don’t Overmix: Mix the dough just until combined. Overmixing can lead to tough biscuits.
- Layering Technique: The folding technique helps create layers. Don’t skip this step for extra fluffiness!
- Brush with Buttermilk: Brushing the tops with buttermilk before baking ensures a beautiful golden color and adds moisture.
Tips & Tricks
Achieving Flakiness
To make your biscuits flaky, start with cold ingredients. This helps keep the butter solid while baking. When the butter melts, it creates steam, which forms layers. Avoid overmixing the dough. Just mix until the flour and buttermilk come together. Overmixing makes the biscuits tough.
Use a folding technique for layers. After mixing, pat the dough into a rectangle. Fold it over itself in thirds, like a letter. This creates those nice flaky layers. Repeat this folding process a couple of times for the best results.
Ingredient Substitutions
If you don’t have buttermilk, you can use milk mixed with vinegar or lemon juice. Let it sit for about five minutes before using. For gluten-free options, almond flour or a gluten-free blend can work well. Just make sure to adjust the liquid used.
If you need dairy-free, coconut oil or vegan butter are great substitutes for the butter. They will keep your biscuits soft and tasty without the dairy.
Serving Suggestions
These biscuits shine when served warm. Try them with a pat of butter on top. You can also drizzle honey or maple syrup for a sweet touch. For something savory, pair them with your favorite jams or spreads. They go well with fruit preserves or even a rich gravy. Enjoy them as a side with soup or salad for a complete meal.
Variations
Homemade buttermilk biscuits are great on their own, but you can change them up easily. Here are some fun variations to try.
Cheesy Buttermilk Biscuits
– Adding cheddar cheese: Mix in one cup of shredded cheddar cheese. This gives a nice, rich flavor.
– Herbs and spices for flavor: Add dried herbs like rosemary or thyme. A pinch of garlic powder also works well.
Sweet Buttermilk Biscuits
– Incorporating sugar and vanilla: For sweet biscuits, add two tablespoons of sugar and a splash of vanilla extract. This makes them perfect for breakfast.
– Using fruit fillings: You can fold in fresh fruit like blueberries or diced strawberries. This adds natural sweetness and flavor.
Savory Biscuit Variations
– Adding cooked bacon or sausage: Crumble cooked bacon or sausage into the dough. This adds a savory bite that many will love.
– Using garlic or onion powder: Mix in garlic or onion powder for a savory twist. This gives your biscuits a nice depth of flavor.
These variations let you put your own spin on the classic recipe.Enjoy experimenting!
Storage Info
Storing Leftover Biscuits
To keep your leftover biscuits fresh, store them in an airtight container. Place a piece of parchment paper between layers to prevent sticking. Store them in the fridge for up to three days. If you want to keep them longer, freezing is a great option.
Tips for freezing biscuits:
– Wrap each biscuit in plastic wrap, then place them in a freezer bag.
– Label the bag with the date.
– Freeze for up to three months.
Reheating Instructions
When you want to enjoy your biscuits again, reheating is key. You can warm them in the oven or microwave.
Methods for warming biscuits:
– Oven: Preheat to 350°F (175°C). Place biscuits on a baking sheet and warm for about 10 minutes.
– Microwave: Place biscuits on a plate and cover with a damp paper towel. Heat for about 20-30 seconds.
Maintaining texture when reheating:
To keep the biscuits flaky, avoid the microwave if possible. The oven provides a better texture. If using the microwave, cover the biscuits to prevent them from drying out. Enjoy your warm, flaky biscuits just like they were fresh out of the oven!
FAQs
How do I make buttermilk at home?
You can make buttermilk with milk and vinegar or lemon juice. Just take 1 cup of milk and add 1 tablespoon of white vinegar or lemon juice. Stir gently, then let it sit for about 5-10 minutes. It will curdle slightly and thicken, giving you homemade buttermilk for your biscuits.
Why are my biscuits not fluffy?
If your biscuits aren’t fluffy, check a few things. First, make sure your baking powder is fresh. Old baking powder can lose its power. Also, be careful not to overmix the dough. Mixing too much can make biscuits tough. Lastly, use cold butter and buttermilk to help create those fluffy layers.
Can I make the dough ahead of time?
Yes, you can make the dough ahead. After mixing, wrap it tightly in plastic wrap and place it in the fridge. Use it within 24 hours for the best results. Just remember to let the dough sit at room temperature for a few minutes before cutting and baking.
How do I know when the biscuits are done?
You’ll know your biscuits are done when they turn a nice golden brown on top. The edges should look crisp, and the biscuits should feel light when you lift them. You can also insert a toothpick in the center; if it comes out clean, your biscuits are ready to enjoy!
You now know how to make perfect buttermilk biscuits. We covered the ingredients, step-by-step instructions, and tips to ensure flakiness. You also learned about variations and how to store leftovers. These biscuits can be served in many delightful ways. Experiment with flavors and enjoy your baking journey. Whether you go savory or sweet, these biscuits will impress. Keep this guide handy for future projects. Happy baking!
.png)