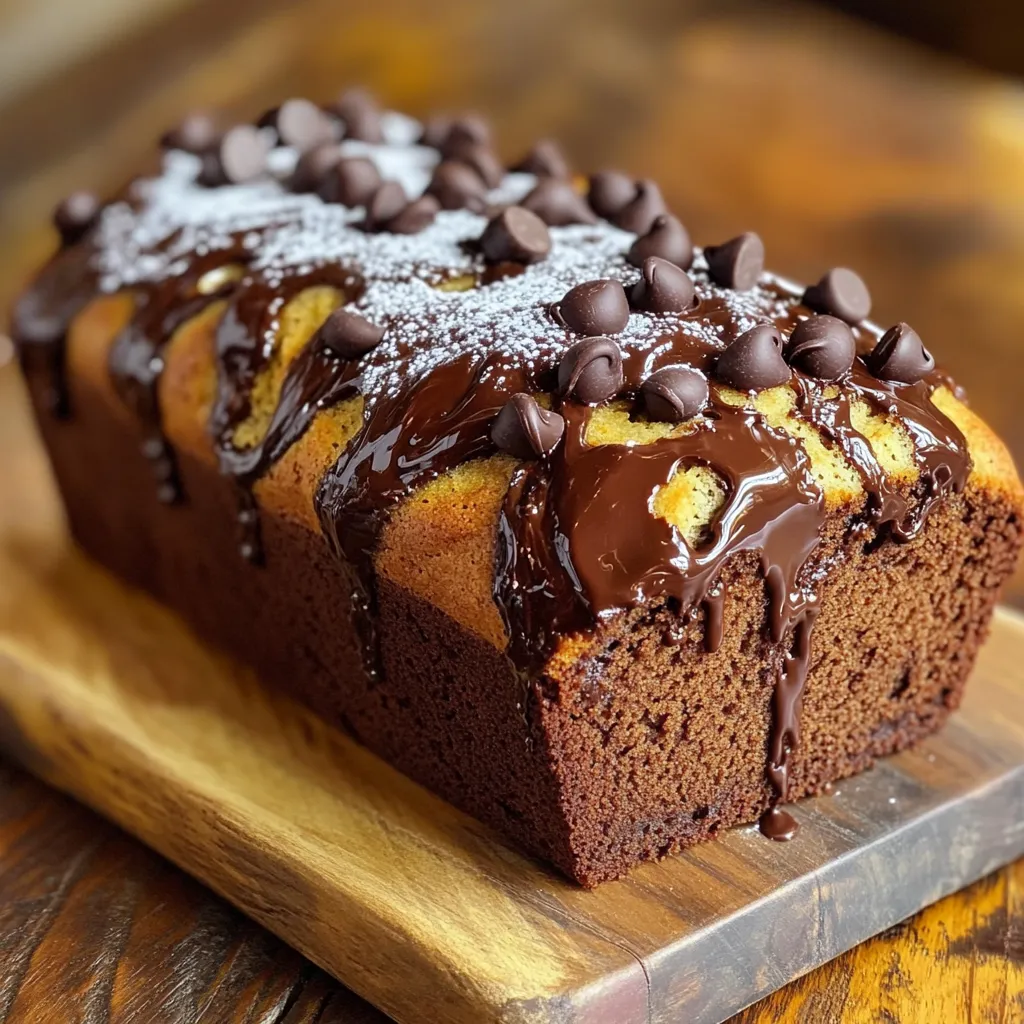
Are you ready to bake a scrumptious Chocolate Marble Loaf that steals the show? This easy recipe will guide you step-by-step to create a delicious treat that combines rich chocolate and fluffy vanilla batter. Whether you’re a baking pro or just starting out, I’ll share secrets to achieve the perfect marble effect. Get your ingredients ready, and let’s dive into this tasty adventure together!
Why I Love This Recipe
- Deliciously Decadent: This chocolate marble loaf strikes the perfect balance between rich chocolate and vanilla flavors, making it a delightful treat for any occasion.
- Easy to Make: With simple ingredients and straightforward steps, this recipe is perfect for bakers of all skill levels, ensuring a delicious outcome with minimal effort.
- Perfect for Sharing: Yielding 8-10 slices, this loaf is ideal for gatherings, picnics, or as a sweet gift for friends and family.
- Stunning Presentation: The beautiful marble effect makes it not only tasty but visually appealing, perfect for impressing guests at any event.
Ingredients
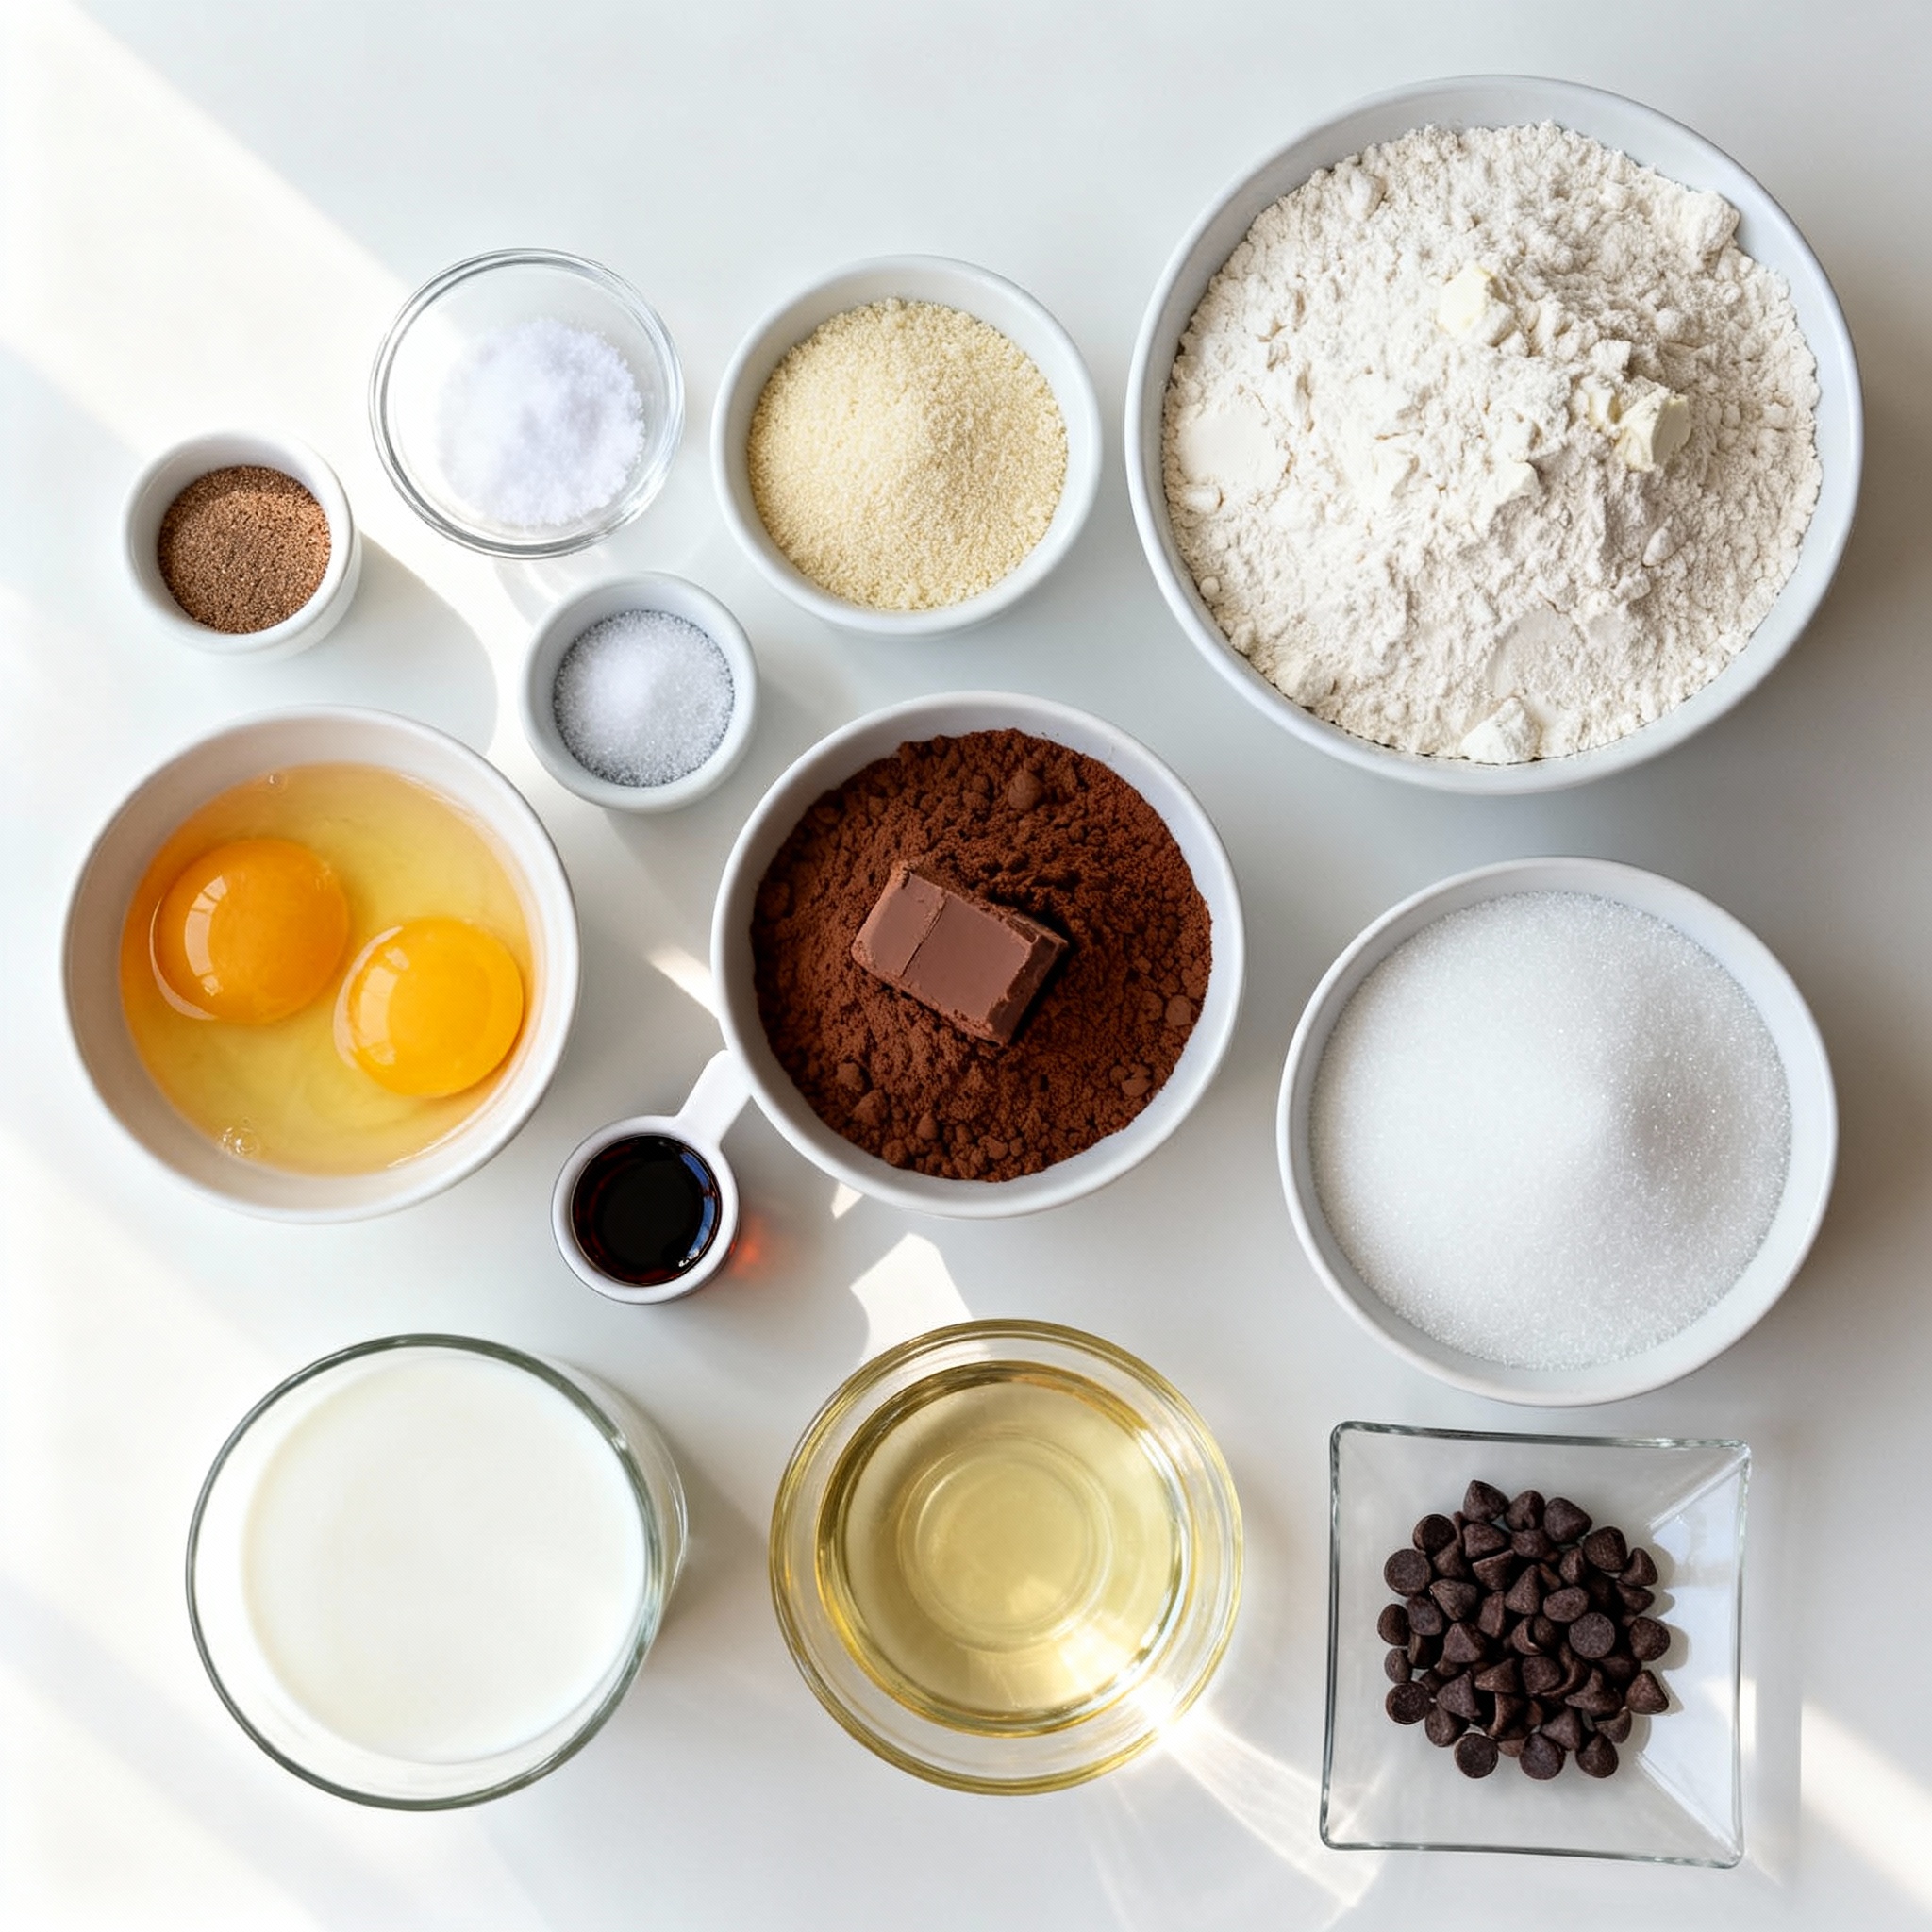
List of Ingredients
To make the chocolate marble loaf, gather these items:
– 1 ½ cups all-purpose flour
– 1 teaspoon baking powder
– ½ teaspoon baking soda
– ¼ teaspoon salt
– ½ cup unsalted butter, softened
– 1 cup granulated sugar
– 2 large eggs
– 1 teaspoon vanilla extract
– ½ cup buttermilk
– ¼ cup unsweetened cocoa powder
– 1 tablespoon hot water
– ½ cup chocolate chips (optional)
Necessary Equipment
You will need a few tools to bake this loaf:
– 9×5 inch loaf pan
– Mixing bowls (medium and large)
– Whisk
– Electric mixer or wooden spoon
– Measuring cups and spoons
– Parchment paper
– Knife or skewer for marbling
Optional Add-ins
You can make your loaf even better with these options:
– ½ cup chopped nuts (like walnuts or pecans)
– ½ cup dried fruits (like cherries or raisins)
– A pinch of cinnamon for warmth
– Extra chocolate chips for a richer taste
Step-by-Step Instructions
Preparing the Oven and Pan
Start by preheating your oven to 350°F (175°C). This step is key for even baking. While the oven heats, grab a 9×5 inch loaf pan. Grease it well with butter or cooking spray. Line the bottom with parchment paper. This helps your loaf come out easily later.
Mixing the Batter
In a medium bowl, whisk together 1 ½ cups of all-purpose flour, 1 teaspoon of baking powder, ½ teaspoon of baking soda, and ¼ teaspoon of salt. Set this bowl aside. In a large bowl, cream ½ cup of softened unsalted butter with 1 cup of granulated sugar. Mix this for about 3-4 minutes until it’s light and fluffy. Next, add in 2 large eggs, one at a time. Mix well after each egg. Stir in 1 teaspoon of vanilla extract. Gradually add the dry mix to this bowl, while alternating with ½ cup of buttermilk. Start and end with the dry mix. Mix until just combined.
Creating the Marble Effect
In a small bowl, mix ¼ cup of unsweetened cocoa powder with 1 tablespoon of hot water until smooth. Take half of the batter from the large bowl and fold it into this cocoa mix. Now it’s time to marble. In your prepared loaf pan, pour half of the vanilla batter first. Then, add the chocolate batter. Finally, top it with the rest of the vanilla batter. Use a knife or skewer to swirl the batters together. Be gentle so you don’t over-mix.
Baking and Cooling
If you want, sprinkle ½ cup of chocolate chips on top for extra chocolate flavor. Now, bake your loaf in the preheated oven for 50-60 minutes. Check if it’s done by sticking a toothpick in the center. If it comes out clean, your loaf is ready. Let it cool in the pan for about 10 minutes. After that, move it to a wire rack to cool completely. Enjoy the wonderful aroma that fills your kitchen!
Pro Tips
- Use Room Temperature Ingredients: Make sure your butter and eggs are at room temperature for a smoother batter and better incorporation of ingredients.
- Don’t Overmix: When combining the wet and dry ingredients, mix just until combined to keep your loaf light and fluffy.
- Check for Doneness: Start checking your loaf at the 50-minute mark; every oven is different, and you want to avoid overbaking.
- Cool Completely: Allow the loaf to cool completely on a wire rack to ensure the texture remains perfect and to prevent sogginess.
Tips & Tricks
Achieving the Perfect Marble Effect
To get a nice marble look, mix your batters gently. Pour half of the vanilla batter first. Then, add the chocolate batter on top. Finally, add the rest of the vanilla batter. Use a knife to swirl the batters together. Be careful not to mix too much. You want to see both colors.
Ensuring Moisture and Flavor
To keep your loaf moist, do not overbake it. Check with a toothpick after 50 minutes. If it comes out clean, it’s done. Adding buttermilk helps too. It gives the loaf a rich taste and keeps it soft. If you like, add chocolate chips for extra flavor.
Common Mistakes to Avoid
One common mistake is overmixing your batter. This can make your loaf dense. Another mistake is skipping the parchment paper. It helps with easy removal and keeps the loaf intact. Lastly, don’t forget to preheat your oven. A hot oven is key for a good rise.
Variations
Chocolate Marble Loaf with Nuts
You can add nuts for a crunchy twist. Walnuts or pecans work best. Chop them into small pieces. Mix about ½ cup of nuts into the vanilla batter. This will add a nice texture and flavor. The nuts pair well with the chocolate. You can also sprinkle some on top before baking.
Vegan Chocolate Marble Loaf
For a vegan version, swap the eggs and butter. Use 1 cup of applesauce instead of eggs. Replace butter with ½ cup of coconut oil or a vegan butter alternative. Use plant-based milk in place of buttermilk. Almond or soy milk are great options. Follow the same steps, and you’ll have a tasty vegan treat.
Gluten-Free Chocolate Marble Loaf
To make this loaf gluten-free, use a gluten-free flour blend. Ensure it is a 1:1 baking mix for best results. You can still use the same amount of other ingredients. Be careful to check for gluten in any cocoa powder or chocolate chips. This way, everyone can enjoy this delicious loaf without worry.
Storage Info
How to Store Leftovers
To keep your chocolate marble loaf fresh, wrap it tightly in plastic wrap. Place it in an airtight container. This helps keep the loaf moist and flavorful. You can store it at room temperature for up to three days. If you want it to last longer, refrigerate it. In the fridge, it stays good for about a week.
Freezing Instructions
Freezing your loaf is easy. First, let it cool completely. Then, wrap it in plastic wrap. After that, place it in a freezer bag or container. Make sure to remove as much air as possible. Your chocolate marble loaf can stay in the freezer for up to three months. When you are ready to eat it, just thaw it in the fridge overnight.
Reheating Tips
To enjoy your chocolate marble loaf warm, preheat your oven to 350°F (175°C). Slice the loaf and place the pieces on a baking sheet. Heat for about 10 minutes. You can also use a microwave. Place a slice on a microwave-safe plate and heat it for 15-20 seconds. This will make it warm and soft again. Enjoy it with a cup of coffee or tea!
FAQs
Can I use regular milk instead of buttermilk?
Yes, you can use regular milk. Buttermilk adds a tangy taste and moisture. If you don’t have it, make a quick substitute. Mix 1 cup of milk with 1 tablespoon of vinegar or lemon juice. Let it sit for 5 to 10 minutes. This will give you a similar flavor and texture for your cake.
How do I know when my cake is done baking?
To check if your cake is done, use a toothpick. Insert it in the center of the loaf. If it comes out clean or with a few moist crumbs, your cake is ready. If it has wet batter on it, bake for a few more minutes and check again. Keep an eye on the time, but also trust your senses.
Can I add more cocoa powder for a richer chocolate flavor?
Absolutely! You can add up to 2 tablespoons more cocoa powder. Just remember to adjust the flour slightly. For every tablespoon of cocoa, remove one tablespoon of flour. This keeps the balance right in your batter. Your cake will turn out more chocolatey and delicious!
This post covered how to make a delicious marble loaf cake. You learned about the key ingredients and necessary tools, plus optional add-ins for extra flavor. I shared step-by-step instructions to help you mix, bake, and cool your cake perfectly. Tips on achieving the best marble effect and avoiding common mistakes were included. I also gave variations for vegan and gluten-free options. Finally, you now know how to store and reheat your cake. Enjoy your baking journey and create something tasty!
.png)


