Are you looking for a tasty snack that your kids will love? Say goodbye to boring snacks and say hello to crunchy kids-friendly veggie chips! These simple and fun snacks are easy to make and packed with nutrition. In this article, I'll guide you through making the perfect veggie chips, from picking the right ingredients to fun flavor variations. Get ready to transform snack time into a crunchy adventure!
Why I Love This Recipe
- Vibrant Colors: The variety of colorful vegetables not only makes the dish visually appealing but also packs it with nutrients.
- Healthy Snack: These veggie chips are a guilt-free snack option that satisfies your crunch cravings without the extra calories.
- Customizable: You can easily switch up the vegetables based on what you have on hand or your personal preferences.
- Quick and Easy: With just a few simple steps, you can have a delicious snack ready in no time!
Ingredients
List of Ingredients for Crunchy Kids-Friendly Veggie Chips
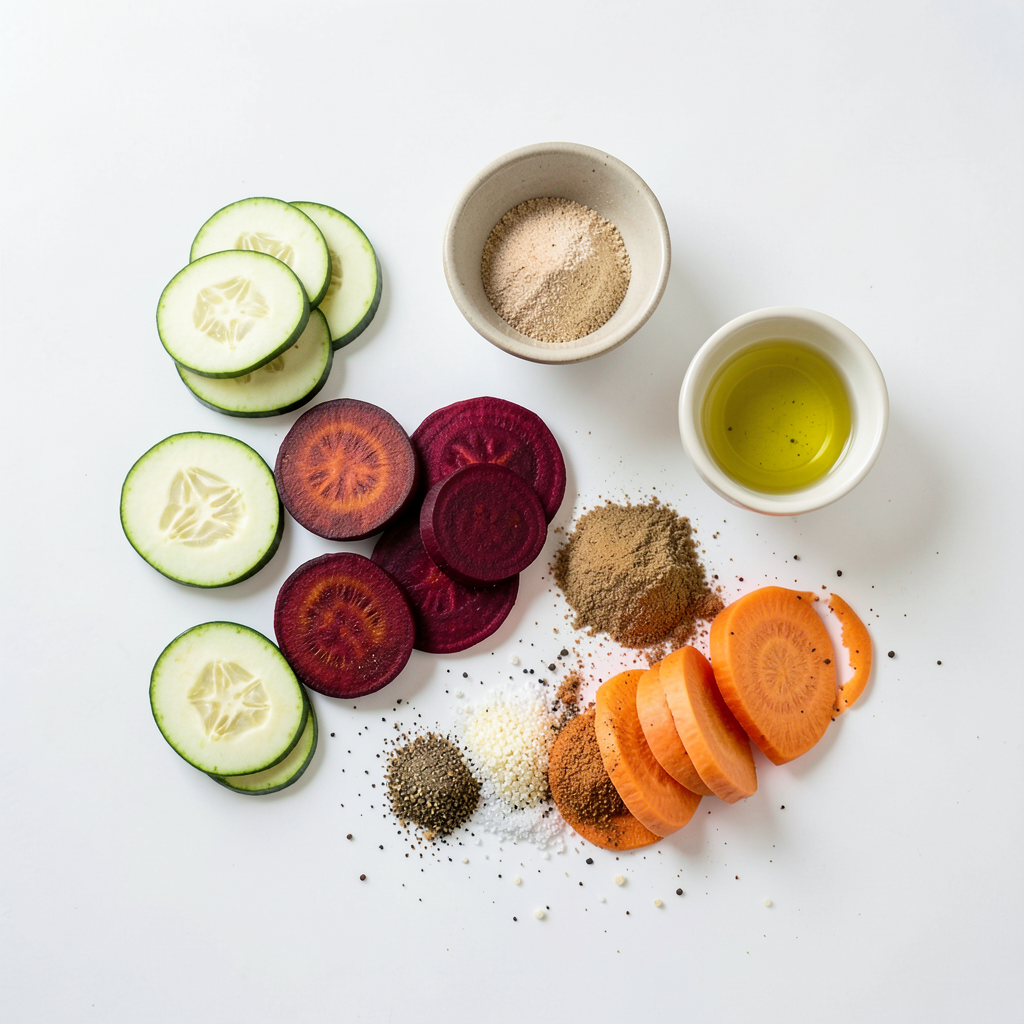
- 1 medium zucchini, thinly sliced
- 1 medium sweet potato, thinly sliced
- 1 beetroot, thinly sliced
- 1 carrot, thinly sliced
- 2 tablespoons olive oil
- 1 teaspoon garlic powder
- 1 teaspoon onion powder
- ½ teaspoon smoked paprika
- Salt and pepper to taste
- Optional: 1 tablespoon nutritional yeast
Nutritional Benefits of Each Vegetable
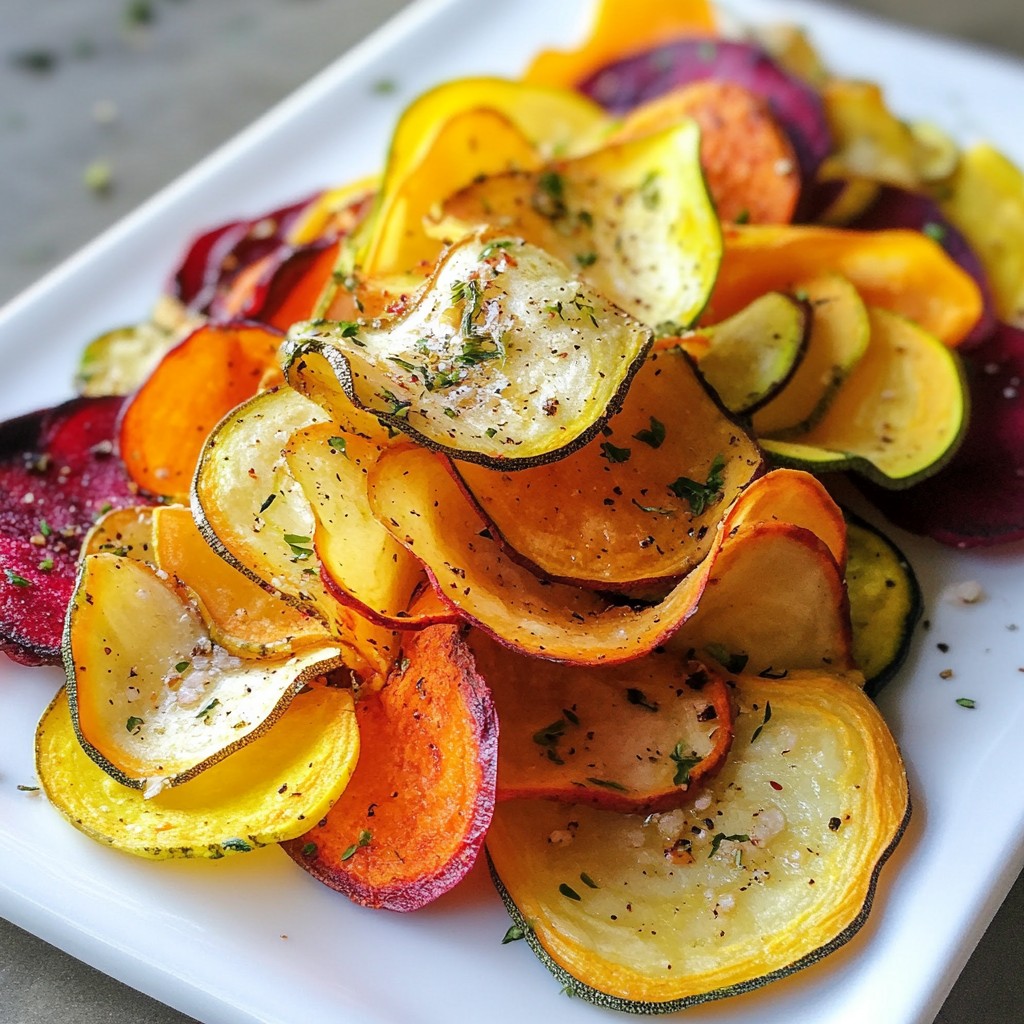
Each vegetable in this recipe brings unique nutrients. Zucchini is low in calories and high in water, which keeps kids hydrated. Sweet potatoes are rich in beta-carotene, which is good for eyes and skin. Beets help with blood flow and have antioxidants. Carrots are great for vision and are a good source of fiber. Together, these veggies offer a balanced mix of vitamins and minerals, making them a smart snack choice.
Suggested Seasonings and Optional Add-Ins
Seasonings can make a big difference. Garlic powder adds a nice flavor without being too strong. Onion powder gives a sweet taste that kids love. Smoked paprika adds a hint of smokiness. For a cheesy touch, sprinkle nutritional yeast on top after baking. You can also try adding your favorite herbs like oregano or basil for extra flavor.
Step-by-Step Instructions
Preparation and Slicing Techniques
To make these veggie chips, start with fresh vegetables. I like using zucchini, sweet potato, beetroot, and carrot. Wash each veggie well. Then, slice them very thin. A mandoline slicer works great for uniform slices. Thin slices help the chips turn out crispy. Aim for about 1/8 inch thick. If they are too thick, they may be chewy.
Baking Process for Perfect Crispy Chips
Now, preheat your oven to 375°F (190°C). Line two baking sheets with parchment paper. In a bowl, mix the sliced veggies. Drizzle 2 tablespoons of olive oil over the top. Add 1 teaspoon of garlic powder, 1 teaspoon of onion powder, and ½ teaspoon of smoked paprika. Sprinkle salt and pepper to taste. Toss well to coat each slice. Spread the veggie slices in a single layer on the baking sheets. This lets them bake evenly. Bake for 15-20 minutes. Flip the chips halfway through to make sure they get crispy on both sides. Watch them closely. They can burn quickly, especially with beetroot and sweet potatoes.
Cooling and Storing Instructions
When the chips are crispy and slightly golden, take them out of the oven. Let them cool for a few minutes. They will become crunchier as they cool. If you like, sprinkle 1 tablespoon of nutritional yeast for a cheesy taste. Serve the chips right away or store them in an airtight container. They stay fresh for up to 3 days. Enjoy this tasty, healthy snack with your kids!
Tips & Tricks
How to Achieve Maximum Crispiness
To make your veggie chips as crispy as possible, follow these steps:
- Slice Thinly: Use a sharp knife or a mandoline slicer. Aim for slices about 1/8 inch thick. Thinner slices cook better and crisp up nicely.
- Dry the Veggies: After washing, pat your veggies dry with a clean cloth. Removing moisture helps them crisp up in the oven.
- Use Olive Oil Sparingly: Drizzle just enough olive oil to coat the slices. Too much oil can make them soggy.
- Single Layer: Spread the veggie slices out in a single layer on the baking sheet. Overlapping them can lead to uneven cooking.
Common Mistakes to Avoid
Here are some mistakes to skip for perfect veggie chips:
- Skipping the Preheat: Always preheat your oven. This helps to kickstart the cooking process for better texture.
- Ignoring the Flip: Remember to flip your chips halfway through baking. This ensures even crispiness on both sides.
- Not Watching the Time: Keep an eye on the chips as they bake. Different veggies may cook at different rates.
Best Tools for Making Veggie Chips
Using the right tools can make your cooking easier and more fun:
- Mandoline Slicer: This tool helps you slice veggies quickly and evenly.
- Baking Sheets: Use heavy-duty baking sheets to prevent warping. Lining them with parchment paper makes cleanup easy.
- Mixing Bowl: A large bowl lets you toss the veggie slices with oil and seasonings well.
- Cooling Rack: If you have one, a cooling rack helps air circulate around the chips. This keeps them crisp as they cool.
By following these tips, you can create delicious, crunchy veggie chips that kids will love!
Pro Tips
- Use a Mandoline Slicer: A mandoline slicer helps achieve even thickness, ensuring that all chips bake at the same rate for perfect crispiness.
- Experiment with Seasonings: Feel free to play with different spices and herbs, such as cayenne pepper for heat or dried herbs for an aromatic twist.
- Storage Tips: To maintain crispness, store the chips in an airtight container with a silica gel packet to absorb moisture.
- Mix Veggie Colors: Using a variety of colorful veggies not only makes the dish visually appealing but also adds a range of nutrients to your snack.
Variations
Flavor Variations for Kids (e.g. Cheese, Spicy)
You can easily change the flavor of these veggie chips. For a cheesy taste, mix in nutritional yeast. It gives a great flavor that kids love. If your kids enjoy a bit of heat, sprinkle some chili powder or cayenne pepper. This adds a fun kick. You can also try ranch powder for a zesty twist. Encourage your kids to help pick their favorite flavors!
Different Vegetables to Use
Feel free to get creative with your veggie choices. You can use:
- Kale
- Sweet potatoes
- Carrots
- Beets
- Zucchini
- Parsnips
Each veggie brings its own unique taste and nutrition. For a colorful mix, use a rainbow of vegetables. This makes the chips more fun and exciting for kids to eat.
Baking vs. Air Frying: Which is Better?
Both baking and air frying can make great veggie chips. Baking is simple and needs less oil. It gives the chips a nice crunch. Air frying cooks them faster and can make them even crispier. If you want to save time, air frying might be the way to go. However, both methods are healthy and delicious, so try both to see what you like best!
Storage Information
How to Store Leftover Veggie Chips
To keep your veggie chips fresh, place them in an airtight container. You can use a glass jar or a plastic container with a tight lid. Make sure the chips are cool before sealing them. This step helps avoid moisture inside the container, which can make them soggy. Store the container in a cool, dark place, away from heat and light.
Shelf Life and Freshness Tips
Homemade veggie chips last for about three days. After that, they may lose their crispiness. For the best taste and crunch, eat them within the first two days. If you notice any signs of moisture, toss the chips. To keep the flavors strong, avoid exposing them to strong smells from other foods.
Tips for Packing in School Lunches
Veggie chips make a fun snack for kids' lunchboxes. Use small containers to keep them safe from crushing. Pair them with a dip, like hummus or yogurt, in a small cup for added fun. This combo makes a tasty and healthy lunch option. Kids love the crunch, and they will enjoy the colorful mix!
FAQs
Can I make veggie chips in advance?
Yes, you can make veggie chips in advance. After baking, let them cool completely. Store the chips in an airtight container. They can stay fresh for up to three days. You can also prep the veggies ahead of time. Slice and season the veggies, then keep them in the fridge. Bake them right before serving for the best crunch.
What is the best way to reheat leftover veggie chips?
To reheat leftover veggie chips, preheat your oven to 350°F (175°C). Spread the chips out on a baking sheet. Heat for about 5-10 minutes, checking often. This helps restore their crunch. You can also use an air fryer. Heat them for about 3-5 minutes at 350°F (175°C) for quick results.
Are veggie chips healthier than regular potato chips?
Veggie chips are often healthier than regular potato chips. They have more vitamins and minerals from the vegetables. They usually contain less fat, especially if you bake them. However, keep an eye on added salt and oil. Making them at home lets you control these factors. This way, you can enjoy a tasty and healthy snack!
Making veggie chips is fun and easy. First, we explored the ingredients and their health perks. Then, I shared step-by-step instructions for preparation, baking, and storage. You learned tips for crispiness and variations to keep things exciting.
In my experience, they are a tasty snack for kids and adults alike. Try different veggies and flavors. With proper storage, these chips stay fresh longer. Now, enjoy your crunchy creations and feel proud of your healthy snacks!