
Looking for a tasty snack your kids will love? Try these Crispy Kids Turkey and Cheese Pinwheels! They’re fun to make, tasty to eat, and packed with flavor. Plus, you can customize them with different fillings and colors that excite kids’ taste buds. In this post, I’ll guide you through easy steps to craft these delicious pinwheels. Let’s get rolling and make snack time a hit!
Why I Love This Recipe
- Kid-Friendly: These pinwheels are not only fun to eat but also easy to make, making them perfect for kids.
- Versatile Fillings: You can customize the fillings based on your child's preferences, adding different veggies or spreads.
- Quick Preparation: With just 15 minutes of prep time, these pinwheels are a fast and convenient meal option.
- Crispy and Delicious: Pan-frying gives them a delightful crispy texture that kids will love.
Ingredients
List of Ingredients
- Flour tortillas
- Sliced turkey breast
- Cream cheese
- Shredded cheddar cheese
- Baby spinach or lettuce
- Grated carrot
- Dijon mustard (optional)
- Salt and pepper
- Cooking spray or olive oil
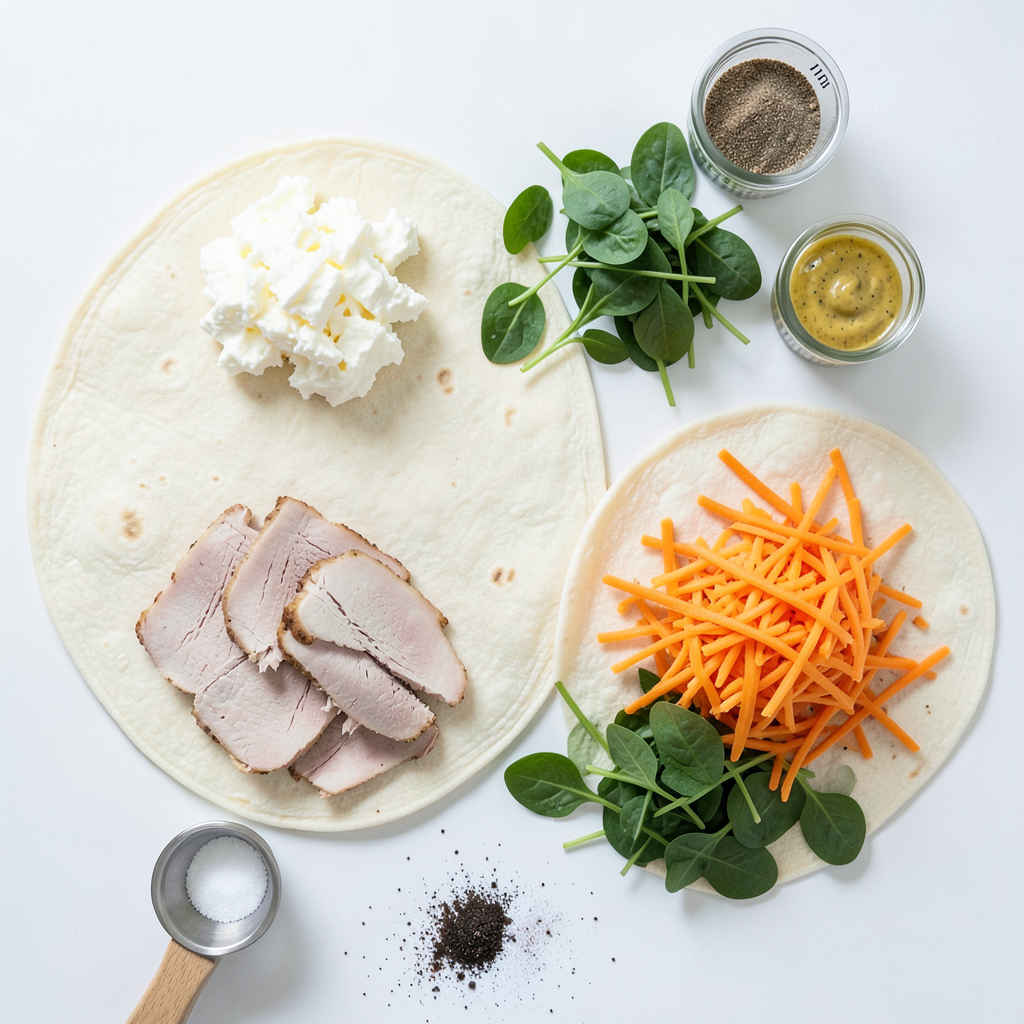
To make crispy kids turkey and cheese pinwheels, gather these ingredients. You will need flour tortillas, which act as the wrap. Sliced turkey breast adds protein and flavor. Cream cheese serves as a tasty base. It adds creaminess that holds everything together. Shredded cheddar cheese gives a nice sharp taste.
You can use baby spinach or lettuce for some crunch and freshness. Grated carrot adds a sweet touch and bright color. If you want a kick, Dijon mustard can be a fun addition. Remember to add salt and pepper to taste. Lastly, cooking spray or olive oil will help achieve that perfect crispiness when frying.
These simple yet tasty ingredients make the pinwheels a hit with kids and adults alike. Each component plays its part in creating a delightful bite. So, gather your items, and let’s get rolling!
Step-by-Step Instructions
Preparation Steps
1. Laying out tortillas and spreading cream cheese
Start by laying out your flour tortillas on a flat surface. Take your softened cream cheese and spread a nice layer on each tortilla. Leave a small border at the edges for easy rolling.
2. Layering turkey, cheese, and veggies
On top of the cream cheese, add about 4 oz of sliced turkey. Next, sprinkle a quarter of the shredded cheddar cheese evenly over the turkey. Then add a handful of baby spinach or lettuce, followed by some grated carrot for extra crunch.
3. Rolling the tortillas and sealing them
Begin at one edge and tightly roll the tortilla away from you to form a log shape. Use the cream cheese to help seal the edge so it stays closed.
Cooking Instructions
1. Preheating the skillet
Heat a non-stick skillet over medium heat. Lightly spray it with cooking spray or brush it with olive oil to prevent sticking.
2. Cooking the pinwheels to achieve crispiness
Cut each rolled tortilla into 1-inch thick slices. Place the pinwheels cut-side down in the skillet. Cook them for about 2-3 minutes until golden brown and crispy. Flip them and cook the other side for another 2-3 minutes.
3. Cooling and serving the pinwheels
Once all sides are crispy, remove the pinwheels from the skillet. Let them cool slightly before serving. Arrange them on a platter and add fresh herbs or cherry tomatoes for color. Serve with a small bowl of dipping sauce, like ranch or honey mustard.
Tips & Tricks
Tips for Perfect Pinwheels
- Ensuring even spreading of cream cheese: Spread cream cheese smoothly on the tortilla. Make sure to leave a small border. This helps keep the filling from spilling out when you roll it up.
- Ideal thickness for filling layers: Aim for thin layers of turkey and cheese. If they are too thick, your pinwheels may not roll well. A light layer of veggies adds crunch without making it too bulky.
Kid-Friendly Suggestions
- Creative veggie substitutes: Use thin slices of cucumber, bell peppers, or even shredded zucchini. These colorful options can make the pinwheels more fun for kids.
- Using different spreads for variety: Swap cream cheese for hummus, guacamole, or even a flavored spread. This adds new tastes that kids might enjoy.
Pro Tips
- Use Fresh Ingredients: Freshly grated carrots and crisp baby spinach enhance the flavor and crunch of the pinwheels.
- Customize Fillings: Feel free to add other ingredients like sliced avocado, bell peppers, or even hummus for added flavor and nutrition.
- Perfectly Crispy: Ensure your skillet is adequately heated before adding the pinwheels to achieve that golden-brown, crispy exterior.
- Make Ahead: You can prepare the pinwheels in advance and store them in the refrigerator. Just cook them right before serving for the best texture.
Variations
Alternative Ingredients
You can change up the meats in these pinwheels. Try using ham or chicken instead of turkey. Each meat brings a new taste and vibe. Kids often love trying different flavors.
For cheese, think beyond cheddar. Monterey jack or mozzarella can work great too. Each cheese adds its own creamy twist. Mixing and matching meats and cheeses makes every batch unique and fun.
Themed Pinwheel Ideas
Get creative with your pinwheel presentations. For holidays, use festive colors. Red and green for Christmas or orange and black for Halloween can make meals special.
For parties, make a platter with different pinwheel flavors. Mix turkey, ham, and veggie pinwheels. This way, there’s something for everyone. A fun presentation keeps kids excited about eating.
Storage Info
How to Store Leftover Pinwheels
You can store leftover pinwheels in the fridge. Wrap them tightly in plastic wrap or foil. This keeps them fresh. They will last for up to three days. If you want to store them longer, freezing is a great choice.
To freeze pinwheels, cut them into slices first. Place the slices in a single layer on a baking sheet. Freeze them for about an hour. Once frozen, transfer the slices into a freezer bag. They can stay in the freezer for up to three months.
Reheating Tips
To restore crispiness, use a skillet for reheating. Preheat it over medium heat. Place the pinwheels cut-side down in the skillet. Cook for about two minutes on each side. This method keeps them crunchy.
Avoid sogginess by not using the microwave. The microwave can make the pinwheels soft. If you must use it, heat them for only a short time. Check often to prevent them from getting too wet.
FAQs
Can I make pinwheels in advance?
Yes, you can make pinwheels ahead of time. Wrap them tightly in plastic wrap. This keeps them fresh. Store them in the fridge for up to a day. Just slice and cook when ready to eat.
What dipping sauces pair well with pinwheels?
Dipping sauces can enhance the fun! Here are some tasty options:
- Ranch dressing
- Honey mustard
- Salsa
- Ketchup
- Barbecue sauce
Let your kids pick their favorites for extra excitement!
Are there gluten-free tortilla options available?
Absolutely! Many stores sell gluten-free tortillas. Look for ones made from rice, corn, or almond flour. They work great for pinwheels. Just make sure to check the label for any allergens. Enjoy your pinwheel fun!
You now have a simple and fun recipe for pinwheels. We covered the needed ingredients, easy steps to prepare, and tips for perfect results. You learned how to add twists for fancier options and how to store leftovers.
Pinwheels are flexible and kid-friendly. You can try many ingredients for plenty of taste. Enjoy making these tasty snacks for yourself, family, or parties. They’re sure to please everyone!