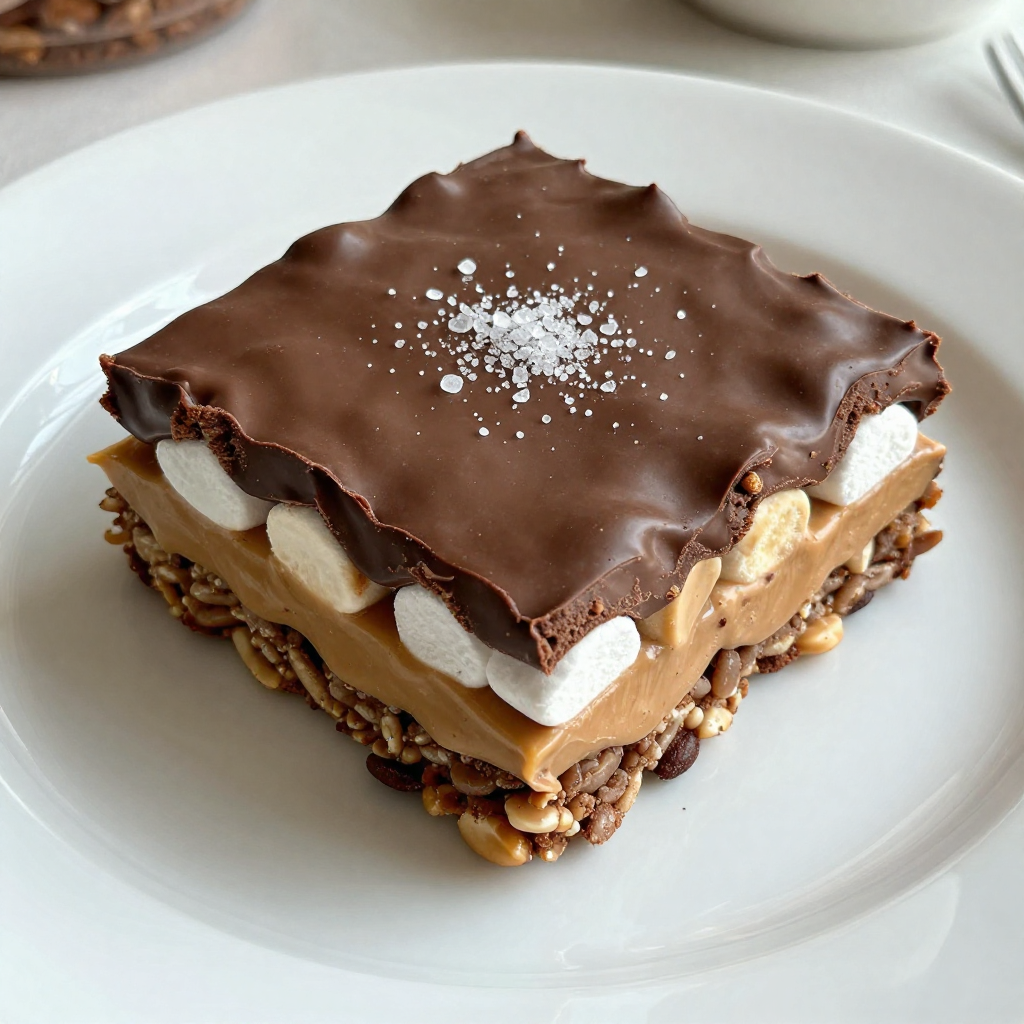
Craving something sweet and salty? Chocolate Peanut Butter Rice Krispie Treats will satisfy that urge! Packed with gooey chocolate and creamy peanut butter, these treats are easy to make and fun to customize. I’ll guide you through the simple steps, share helpful tips, and offer tasty variations to try. Let's dive into this delightful treat and make your taste buds dance!
Why I Love This Recipe
- Deliciously Indulgent: This recipe combines the rich flavors of chocolate and peanut butter, creating a treat that is both decadent and satisfying.
- Quick and Easy:
- No-Bake Delight: Since there's no baking involved, you can enjoy these treats without the need to turn on the oven, making it a great option for warm days.
- Customizable: This recipe is versatile; you can easily add nuts, swap out the cereal, or use different types of chocolate to suit your taste preferences.
Ingredients
Main Ingredients for Chocolate Peanut Butter Rice Krispie Treats
To make these tasty treats, you need:
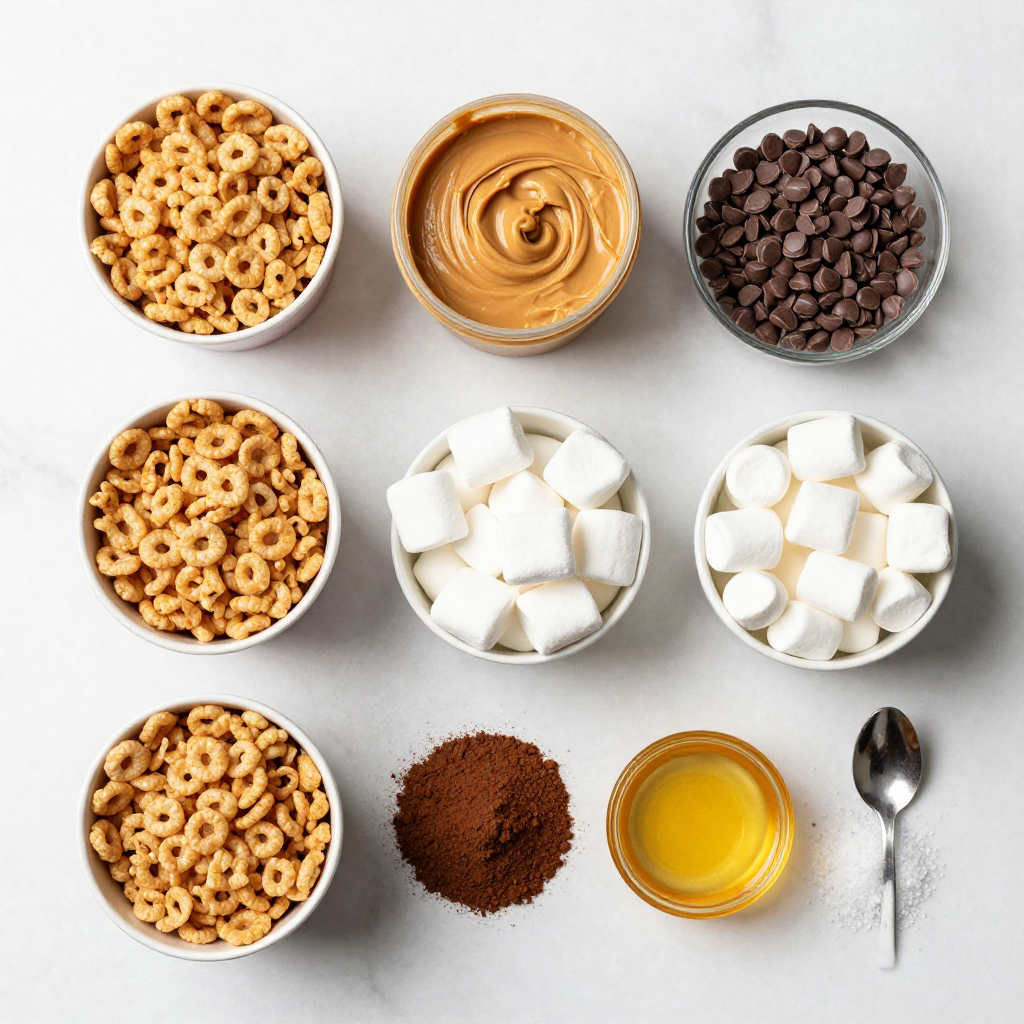
- 4 cups Rice Krispies cereal
- 1 cup creamy peanut butter
- 1 cup semi-sweet chocolate chips
- 1 cup mini marshmallows
- 1/2 cup unsweetened cocoa powder
- 1/4 cup honey or maple syrup
- 1 teaspoon vanilla extract
- Pinch of salt
These ingredients create a sweet and crunchy snack. The Rice Krispies give a nice crunch, while the peanut butter and chocolate blend for rich flavor. The marshmallows add a chewy texture and sweetness.
Optional Add-ins and Substitutes
You can customize your treats with fun add-ins! Here are some ideas:
- Use crunchy peanut butter for more texture.
- Swap honey with agave syrup for a vegan option.
- Add nuts like almonds or peanuts for extra crunch.
- Mix in dried fruits like raisins or cranberries for a fruity twist.
Feel free to experiment! Each change can give your treats a new taste.
Nutritional Information per Serving
One serving has about:
- Calories: 180
- Protein: 3g
- Carbohydrates: 23g
- Sugars: 8g
- Fat: 9g
These treats are rich in flavor but should be enjoyed in moderation. They make a great treat after a meal or a snack during the day.
Step-by-Step Instructions
Preparation: Pan and Equipment Setup
Start by gathering your tools. You will need a 9x9 inch baking pan and parchment paper. Line the pan with parchment paper. Leave some paper hanging over the edges. This will help you lift the treats out later. You will also need a large saucepan for melting the chocolate and peanut butter. A spatula will help you mix everything well.
Melting the Chocolate and Peanut Butter Mixture
Next, melt the peanut butter and chocolate. Place your saucepan on medium heat. Add 1 cup of creamy peanut butter, 1 cup of semi-sweet chocolate chips, and 1/2 cup of unsweetened cocoa powder. Also, add 1/4 cup of honey or maple syrup and a pinch of salt. Stir this mix continuously. Keep stirring until it is smooth and melted. Once melted, take it off the heat. Stir in 1 teaspoon of vanilla extract for extra flavor.
Mixing and Combining Ingredients
Now it’s time to mix in the marshmallows. Quickly add 1 cup of mini marshmallows to the warm chocolate-peanut butter mix. Stir for about 1 minute until they start to melt. This makes your mix gooey and tasty. Next, fold in 4 cups of Rice Krispies cereal. Make sure every piece is coated well. Once mixed, transfer the mixture into your prepared pan. Use a greased spatula or your hands to press it down evenly. Let it cool at room temperature for about 30 minutes. You can also chill it in the fridge for 15 to 20 minutes. After it sets, lift the treats out and cut them into squares. Enjoy your delicious Chocolate Peanut Butter Rice Krispie Treats!
Tips & Tricks
How to Achieve the Perfect Texture
To get that great texture, follow a few simple steps. First, use fresh Rice Krispies. Stale cereal can make your treats tough. Next, melt the chocolate and peanut butter slowly. Stir the mix until it is smooth. If it gets too hot, the texture can change. Finally, fold in the Rice Krispies gently. This keeps them crispy and light.
Common Mistakes to Avoid
Many people make a few common mistakes. One big mistake is over-mixing the Rice Krispies. This can lead to tough treats. Another error is not pressing the mix down enough in the pan. If you don’t pack it well, your treats may crumble. Lastly, avoid using too much heat when melting your mixture. This causes burning and can ruin the flavor.
Enhancing Flavor with Additional Ingredients
You can add extra ingredients to boost flavor. Try adding a pinch of cinnamon for warmth. A sprinkle of sea salt on top can enhance the chocolate taste. You might also mix in crushed nuts for a crunchy texture. If you like a sweeter treat, add a bit more honey or maple syrup. These small changes can make a big difference!
Pro Tips
- Use Fresh Ingredients: Always use fresh mini marshmallows and high-quality chocolate chips for the best flavor and texture.
- Press Firmly: When transferring the mixture to the pan, press it down firmly to ensure the treats hold together when cut.
- Experiment with Mix-ins: Feel free to add nuts, dried fruit, or extra chocolate chunks to customize your treats.
- Storage Tips: Store the treats in an airtight container at room temperature to keep them fresh for up to a week.
Variations
Different Toppings to Try
You can make your Chocolate Peanut Butter Rice Krispie Treats even better with fun toppings. Here are some ideas:
- Chopped nuts: Add crushed peanuts or almonds for crunch.
- Drizzled chocolate: Melt some chocolate and drizzle it on top for extra sweetness.
- Sprinkles: Colorful sprinkles can make your treats pop and look festive.
- Coconut flakes: Sweetened or unsweetened coconut adds a chewy texture and tropical flavor.
These toppings can give your treats a new twist. Feel free to mix and match!
Alternative Sweeteners for Healthier Options
If you want to cut down on sugar, there are great sweetener options. Consider these:
- Agave syrup: This is a low-glycemic sweetener that works well.
- Coconut sugar: It has a caramel-like taste and is less processed.
- Date syrup: This adds a rich flavor and is packed with nutrients.
Using these alternatives can help you enjoy your treats in a healthier way. Just remember to adjust the amount based on sweetness.
Creative Mix-ins for Custom Treats
You can customize your treats by adding fun mix-ins. Here are some ideas:
- Dried fruit: Chopped apricots or raisins can add natural sweetness.
- Chocolate chunks: Extra chocolate pieces can make each bite even better.
- Peanut butter chips: More peanut butter flavor can thrill your taste buds.
- Cereal blends: Mix in other cereals for different textures and flavors.
Adding these mix-ins can make your treats special and unique. Experiment until you find your favorite combinations!
Storage Info
Best Practices for Storing Treats
To keep your Chocolate Peanut Butter Rice Krispie Treats fresh, store them in an airtight container. This helps prevent them from drying out. Place parchment paper between layers to avoid sticking. Store at room temperature for best taste.
How to Freeze for Long-Term Storage
You can freeze these treats for later enjoyment. First, cut them into squares. Wrap each square in plastic wrap or foil. Then, place them in a freezer-safe bag or container. They can last up to three months in the freezer. Thaw in the fridge overnight before serving.
Shelf Life and Freshness Tips
These treats stay fresh for about one week at room temperature. If you notice any changes in texture or smell, it's best to throw them away. Always check for signs of spoilage before eating. Enjoy them while they are still soft and tasty!
FAQs
Can I use crunchy peanut butter instead of creamy?
Yes, you can use crunchy peanut butter! It adds texture and a nutty crunch. Just swap it in for creamy peanut butter in equal amounts. The treats will still be delicious.
How do I make my treats less sticky?
To make your treats less sticky, grease your hands with a bit of oil. Lightly oiling the spatula helps too. You can also let the mixture cool a bit more before pressing it into the pan.
What are some gluten-free options for this recipe?
For gluten-free options, choose gluten-free Rice Krispies. Check the labels on other ingredients too, like cocoa powder and marshmallows. This way, everyone can enjoy these yummy treats!
In this post, we explored how to make Chocolate Peanut Butter Rice Krispie Treats. We covered key ingredients, step-by-step instructions, and helpful tips. I shared variations for extra fun and storage advice to keep your treats fresh. Remember, you can mix and match flavors to suit your taste. Enjoy these treats, and don't be afraid to get creative! With practice, you’ll master this delicious recipe easily. Dive in and share your tasty creations!
.png)


