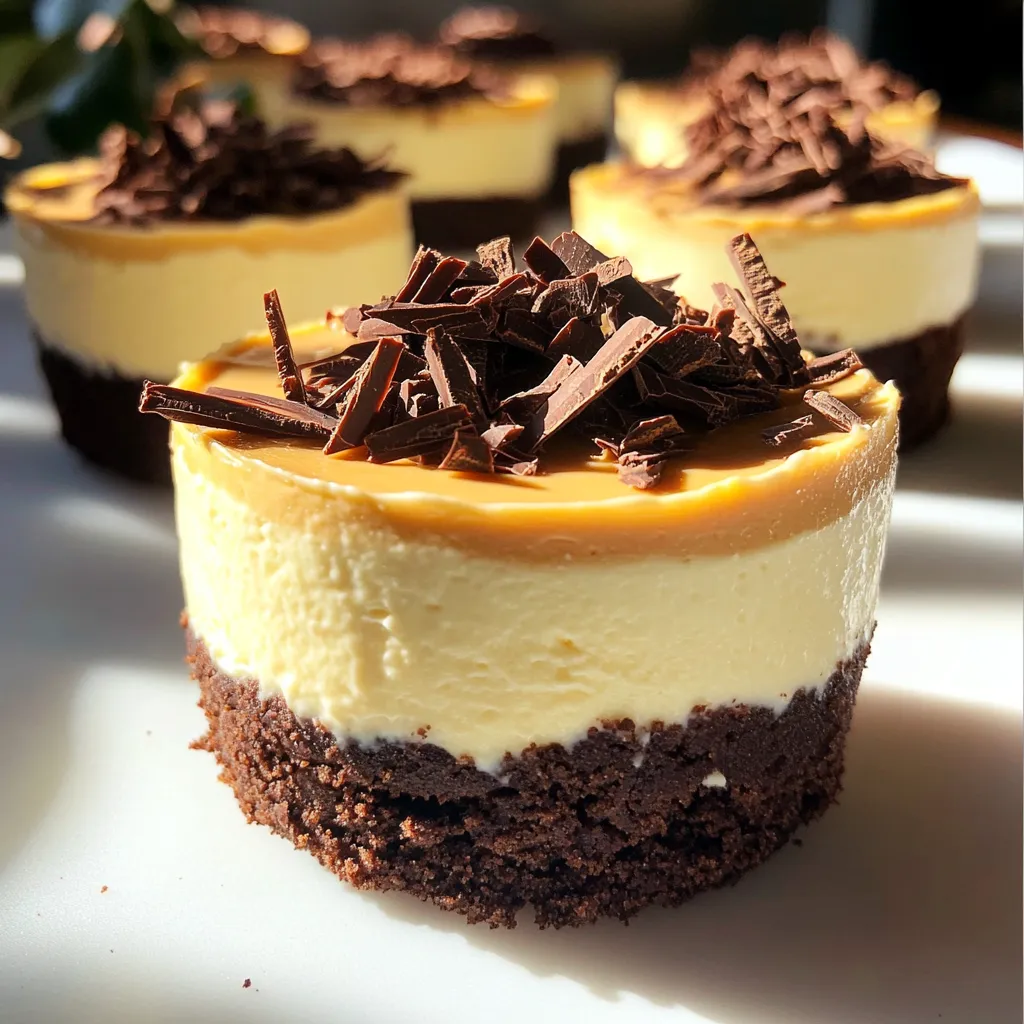
Indulge your sweet tooth with my easy no-bake Chocolate Peanut Butter Cheesecake Cups! These delightful treats combine the rich flavors of chocolate and peanut butter in a simple, fun way. Perfect for dessert lovers, these cups are quick to prepare and perfect for any occasion. Want to impress your friends and family? Follow along for a creamy, satisfying dessert that’s hard to resist! Let’s dive in!
Why I Love This Recipe
- Decadent Flavor: The combination of chocolate and peanut butter creates a rich and indulgent dessert that satisfies any sweet tooth.
- No-Bake Convenience: This recipe is perfect for warm days or when you want a quick dessert without turning on the oven.
- Easy to Customize: You can add your favorite toppings or mix-ins, such as nuts or caramel, to make it your own.
- Perfect Portions: These individual cups are great for serving guests and controlling portion sizes, making them ideal for parties.
Ingredients
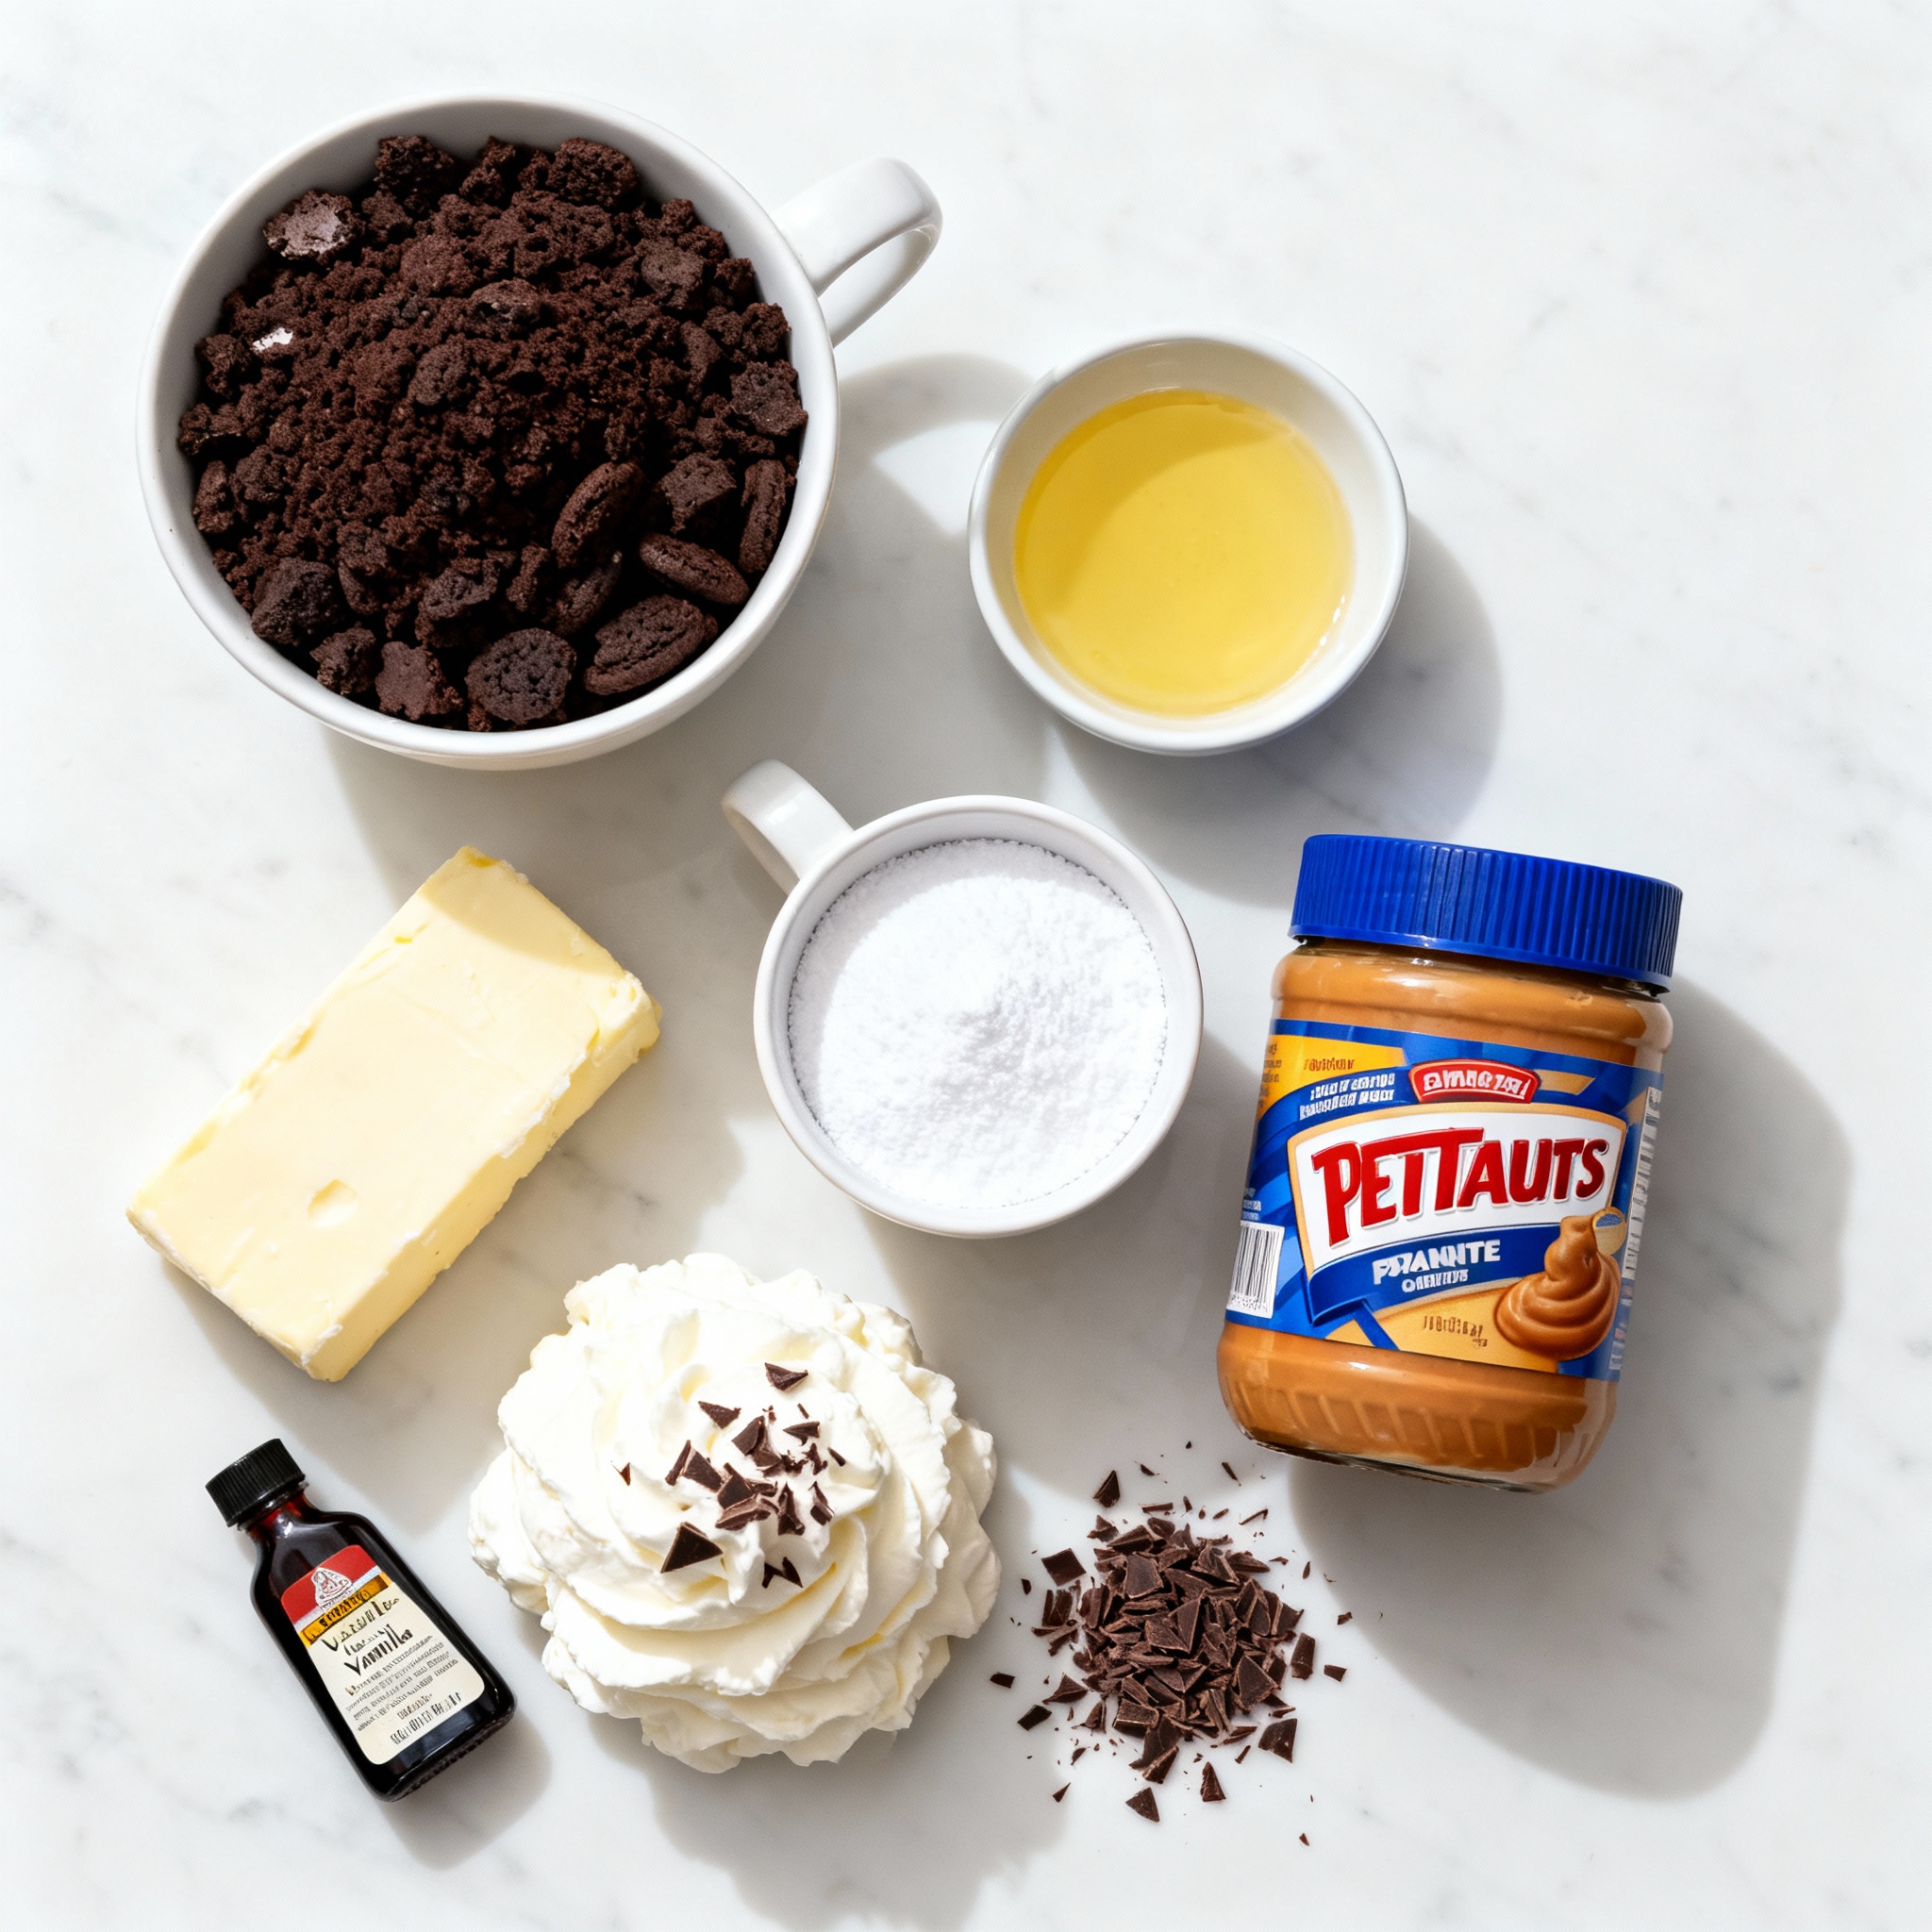
To make Chocolate Peanut Butter Cheesecake Cups, gather these simple ingredients:
– 1 cup chocolate cookie crumbs
– 4 tablespoons unsalted butter, melted
– 1 cup cream cheese, softened
– ½ cup creamy peanut butter
– ½ cup powdered sugar
– 1 teaspoon vanilla extract
– 1 cup whipped cream (or whipped topping)
– Chocolate shavings or chips for garnish
These ingredients create a rich, creamy treat that satisfies any sweet tooth.
Start with chocolate cookie crumbs for a tasty base. The melted butter helps bind the crumbs together. For the filling, cream cheese and peanut butter give that luscious texture. The powdered sugar adds sweetness, while vanilla extract brings flavor. Finally, whipped cream makes the filling light and fluffy.
Don’t forget the chocolate shavings or chips! They add a nice touch on top. Each ingredient works together for a delightful dessert experience.
Step-by-Step Instructions
Preparation of the Cookie Base
To start, gather your chocolate cookie crumbs and melted butter. In a medium bowl, mix these two until the crumbs are fully coated. This will form a rich and tasty base. Next, divide the crumb mixture into eight small dessert cups or muffin liners. Press the mixture firmly down to create a solid crust. Make sure it is even and packed well.
Making the Cheesecake Filling
Now, it’s time to make the cheesecake filling. In a separate bowl, beat the softened cream cheese and creamy peanut butter together until smooth. You want a creamy texture without lumps. Slowly add the powdered sugar and vanilla extract to this mixture. Keep mixing until it is fully combined. Finally, gently fold in the whipped cream. This step will give your filling a light and fluffy texture.
Assembling the Cups
Spoon the peanut butter cheesecake mixture evenly over each cookie crust in the dessert cups. Use a spatula to smooth the tops, making them look nice. Once done, place the cups in the refrigerator and let them set for at least four hours. This waiting time allows the flavors to meld and the cheesecake to firm up, creating a perfect treat.
Pro Tips
- Use High-Quality Chocolate Cookies: Opt for premium chocolate cookies for a richer flavor and better texture in the crust.
- Room Temperature Ingredients: Ensure that your cream cheese is at room temperature for a smoother, lump-free cheesecake filling.
- Chill for Perfect Texture: Allow the cheesecake cups to chill for the full 4 hours to achieve the best texture and flavor.
- Creative Garnishes: Experiment with different toppings like crushed peanuts or caramel drizzle for added flavor and presentation.
Tips & Tricks
Perfecting the Cheesecake Cups
To make the filling just right, start with soft cream cheese. This helps blend well with peanut butter. Mix until it is smooth and creamy. Lumps can ruin the texture, so blend carefully.
For the cookie base, use a firm hand. After mixing the chocolate cookie crumbs with melted butter, press the mixture down tightly into the cups. This gives a strong base that holds together well. An even layer helps each bite taste great.
Garnishing Ideas
For a fun touch, top your cheesecake cups with chocolate shavings or chips. They add a nice look and extra chocolate flavor. You can also try nuts, caramel, or even fruit for a twist.
If you want something unique, consider crushed cookies or colorful sprinkles. These choices can change the look and taste, making your cups special.
Time-Saving Tips
You can prepare these cups ahead of time. Make them the day before a party to save stress. Just keep them in the fridge until it’s time to serve.
If you’re short on time, use store-bought whipped cream. It cuts down on mixing time and still tastes great. You can also use ready-made cookie crumbs to speed things up.
Variations
Flavor Variations
You can easily switch up the flavors in these cheesecake cups. For a nutty twist, try using different nut butters. Almond or cashew butter can add a unique taste. Just replace the peanut butter with your choice. You can also infuse your cheesecake with fun flavors like espresso or vanilla. A teaspoon of espresso powder will give it a rich kick. Or, add an extra splash of vanilla extract for a sweeter touch. These small changes can make a big difference!
Dietary Modifications
If you have dietary needs, you can still enjoy these treats. For gluten-free options, simply use gluten-free cookies for the crust. There are many tasty brands that work well. You can also make vegan cheesecake cups. Use a vegan cream cheese and a plant-based whipped topping. This way, everyone can savor the rich taste of chocolate and peanut butter.
Serving Style Ideas
How you serve these cups can add a special touch. Presenting them in mason jars or elegant glasses makes for a fun display. It adds charm to any gathering or party. You can also create mini versions for bite-sized treats. Just use smaller cups or muffin liners. These mini cups are perfect for sharing. They let everyone enjoy a little taste without overindulging.
Storage Info
How to Store Leftover Cheesecake Cups
To keep your cheesecake cups fresh, place them in the fridge. Use an airtight container or cover them tightly with plastic wrap. This method stops air from getting in and keeps them tasty for days. Ensure they are cooled completely before storing. Enjoy them cold for the best flavor!
Freezing Options
Yes, you can freeze these cheesecake cups! Freezing can be a great way to save leftovers. To freeze, wrap each cup tightly in plastic wrap. Then, put them in a freezer-safe container. This helps avoid freezer burn. When you want to eat them, move the cups to the fridge to thaw overnight. They will taste just as good!
Shelf Life
In the fridge, the cheesecake cups last about five days. After that, they may start to lose their flavor. Watch for signs of spoilage, like a sour smell or a change in color. If the whipped cream looks watery or the crust feels soggy, it’s best to toss them. Always trust your senses for safety!
FAQs
Can I make these cheesecake cups ahead of time?
Yes, you can make these cheesecake cups a day or two ahead. This gives the flavors time to blend, making them even tastier. Just cover them well and store them in the fridge. This way, you can save time on the day you plan to serve them.
What’s the best way to soften cream cheese?
To soften cream cheese, take it out of the fridge and let it sit at room temperature for about 30 minutes. If you’re in a hurry, you can cut it into small cubes. Place the cubes in a microwave-safe bowl and heat them in short bursts of 10-15 seconds. Check often to avoid melting. The goal is a smooth texture for mixing.
Can I substitute the whipped cream?
Yes, you can substitute whipped cream with whipped topping or even Greek yogurt for a healthier twist. Just remember that using yogurt will change the flavor a bit. If you want a dairy-free option, there are coconut cream or almond-based whipped toppings available.
These cheesecake cups are easy and fun to make. You mix chocolate cookie crumbs with butter to form the base. Then, you whip up a rich filling with cream cheese and peanut butter. Remember to chill them well before serving. Use our tips to add your favorite toppings or flavor twists. Whether it’s a party or a treat for yourself, these cups will impress. Enjoy your new dessert and share it with friends!
.png)


