If you love sweet treats that are also easy to make, you're in for a treat! Chocolate Covered Peanut Clusters are simple, delicious bites that satisfy your cravings. With just a few ingredients like roasted peanuts and dark chocolate, you can whip these up in no time. In this post, I'll share step-by-step instructions, tips for perfecting your clusters, and tasty variations to keep things fun. Let’s get started!
Why I Love This Recipe
- Quick and Easy: This recipe comes together in just 15 minutes, making it a perfect last-minute treat for any occasion.
- Irresistible Flavor: The combination of rich dark chocolate and crunchy peanuts creates a delightful sweet-and-salty experience.
- Customizable: You can easily modify this recipe by adding ingredients like dried fruits, pretzels, or different types of nuts.
- Perfect for Sharing: These clusters are ideal for parties or as homemade gifts, sure to impress friends and family alike.
Ingredients
Complete List of Ingredients
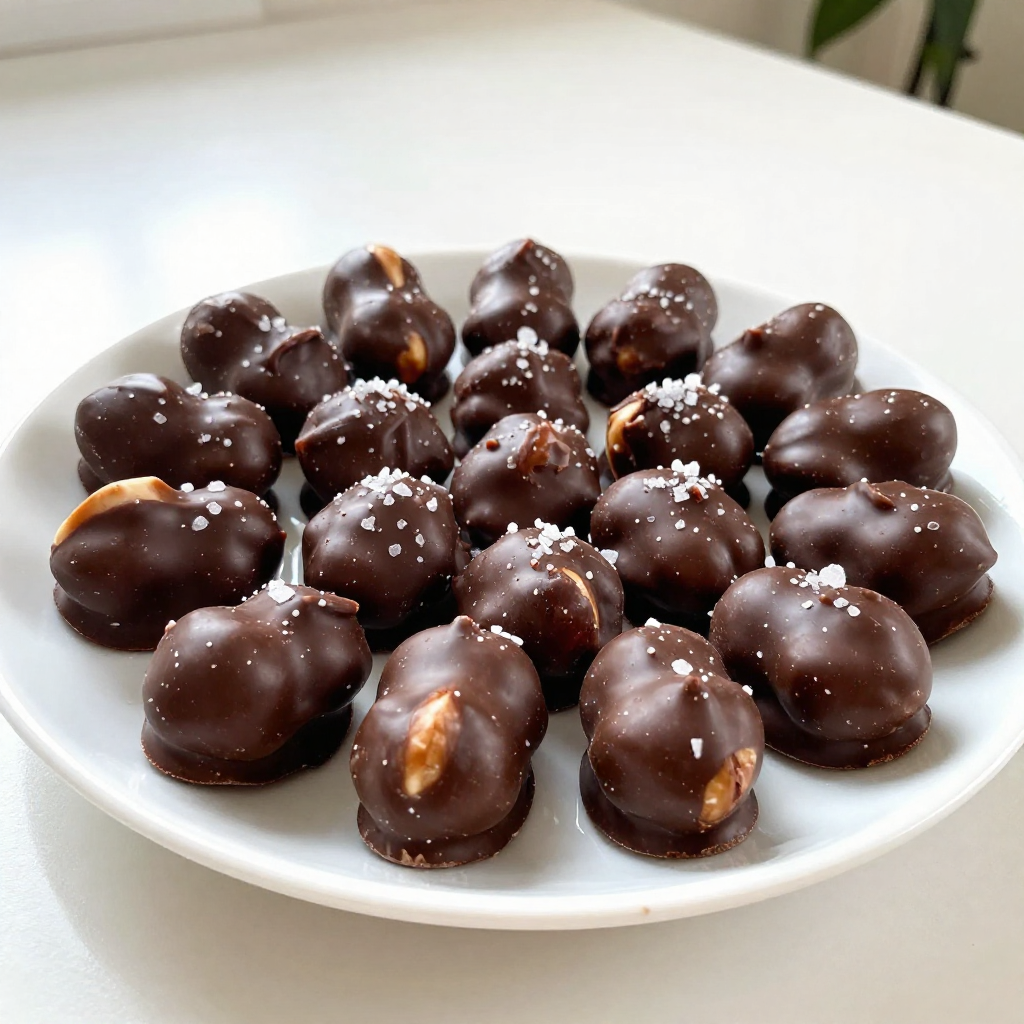
- 2 cups roasted unsalted peanuts
- 2 cups dark chocolate chips
- 1 tablespoon coconut oil (optional)
- Sea salt (optional)
To make chocolate covered peanut clusters, you need just a few simple ingredients. First, grab 2 cups of roasted unsalted peanuts. These peanuts give the clusters their crunch and flavor. Next, you need 2 cups of dark chocolate chips. Dark chocolate adds a rich taste that pairs well with the peanuts.
If you want smoother chocolate, consider using 1 tablespoon of coconut oil. This oil helps the chocolate melt evenly. Lastly, sea salt is optional. A light sprinkle of sea salt can add a nice sweet-and-salty twist to each bite.
Gather these ingredients, and you will be ready to create these sweet treats!

Step-by-Step Instructions
Preparation Steps
- How to prepare the baking sheet: First, take a baking sheet and line it with parchment paper. This paper keeps the clusters from sticking. It also makes cleanup easy. Set the lined sheet aside for later.
- Melting the chocolate: Grab a microwave-safe bowl. Add the dark chocolate chips and coconut oil if you want it smooth. Heat in the microwave for 30 seconds. Take it out and stir. Repeat this until the chocolate is fully melted and looks shiny.
- Mixing the peanuts with chocolate: Once the chocolate is melted, add the roasted unsalted peanuts. Gently fold the peanuts into the chocolate. Make sure every peanut gets coated well. This is where the magic begins!
Forming and Chilling Clusters
- How to drop mounds of chocolate-peanut mixture: Use a tablespoon or a small ice cream scoop. Drop spoonfuls of the chocolate-peanut mix onto the prepared baking sheet. Leave some space between each mound. They will spread a bit as they set.
- Sprinkling sea salt: If you like a sweet-and-salty treat, sprinkle a little sea salt on top of each cluster. This adds a nice flavor kick that pairs well with the chocolate.
- Chilling the clusters to set: Now, place the baking sheet in the refrigerator. Let it chill for about 30 minutes. This helps the chocolate harden completely. Once set, the clusters will be ready to enjoy!
Tips & Tricks
Perfecting Your Chocolate Covered Peanut Clusters
To make your chocolate covered peanut clusters a hit, follow these simple tips:
- Melting Chocolate Smoothly: Always use a microwave-safe bowl. Heat the chocolate chips in 30-second bursts. Stir often to avoid burning. If you want a smoother mix, add a tablespoon of coconut oil. It helps the chocolate stay smooth.
- Coating Peanuts Evenly: After melting the chocolate, gently fold in the peanuts. Use a spatula to ensure every peanut gets coated. This makes for tasty bites.
- Storing for Freshness: Keep your clusters in an airtight container. You can store them at room temperature or in the fridge for a firmer bite. They stay fresh for about a week.
Common Mistakes to Avoid
Here are some mistakes to steer clear of when making your clusters:
- Chocolate Seizing: This happens when water gets into the chocolate. Make sure all your bowls and tools are dry. If the chocolate seizes, you can try adding a bit of coconut oil to rescue it.
- Clustering Shapes: If your clusters don't look good, space them out on the baking sheet. They should not touch. This helps them form nice shapes as they set.
- Overmelting Chocolate: Don’t heat chocolate too long. It will burn and ruin the flavor. Stop heating once it is mostly melted. Stirring will melt the rest.
Pro Tips
- Use Quality Chocolate: Choose high-quality dark chocolate for the best flavor and texture. Look for chocolate with at least 60% cocoa content for a rich taste.
- Chill Before Serving: For even firmer clusters, let them chill in the refrigerator longer than 30 minutes. This will ensure a perfect bite every time.
- Add Variety: Feel free to mix in other ingredients like dried fruits, or coconut flakes for additional flavor and texture in your clusters.
- Store Properly: Keep your clusters in an airtight container to maintain freshness. If you prefer a firmer texture, store them in the refrigerator.
Variations
Exploring Different Types of Chocolate
You can use different types of chocolate for your clusters. Dark chocolate brings a rich flavor. It also has health benefits. Milk chocolate gives a sweeter taste. Some people prefer this creamier option. You can even try white chocolate. White chocolate adds a sweet and buttery touch. Each type of chocolate changes the taste and feel of your clusters.
Other Nut Choices
Peanuts are classic, but you can switch things up. Try using almonds instead. Almonds add a nice crunch and a hint of sweetness. Cashews are another good choice. They give a creamy texture. For a fun twist, add seeds like sunflower or pumpkin seeds. They provide a great crunch and extra nutrients.
Flavor Additions
You can make your clusters even more exciting with flavors. Adding spices like cinnamon gives warmth. A hint of cayenne adds a kick for those who like heat. You might also consider dried fruits. Chopped raisins or cranberries add sweetness and chewiness. These additions make your clusters unique and tasty.
Storage Info
Ideal Storage Conditions
You can store chocolate covered peanut clusters at room temperature or in the fridge. If you want a firmer bite, keep them in the fridge. If you prefer a softer treat, room temperature works well.
Use an airtight container to keep the clusters fresh. This prevents air from getting in and helps maintain their taste. I like to use glass jars or plastic containers with tight lids. You can also layer clusters with parchment paper to stop them from sticking together.
Shelf Life
These tasty clusters last about two weeks at room temperature. If you keep them in the fridge, they can last up to a month.
Check for signs of spoilage. If they smell off or the chocolate looks dull, it’s time to toss them. Always trust your senses; if something doesn’t seem right, it’s better to be safe!
FAQs
Common Questions
Can I use fresh peanuts instead of roasted? Using fresh peanuts is not the best choice. Roasted peanuts have a richer flavor and crunch. Fresh peanuts can be soft and won't give you the same taste.
How can I make these clusters vegan? To make these clusters vegan, use dairy-free chocolate chips. Look for brands that are marked vegan. You can also skip the coconut oil if you prefer.
What are some allergy considerations? Peanuts are a common allergen. If you have nut allergies, consider using seeds like sunflower or pumpkin. Always check labels for cross-contamination warnings.
Troubleshooting Questions
Why did my chocolate not melt properly? Your chocolate may not melt well if it overheats. Always microwave in short bursts. Stir often to ensure even melting and avoid burning.
How do I prevent clusters from sticking to the sheet? Using parchment paper is key. It creates a barrier between the chocolate and the sheet. Make sure to line your baking sheet fully for best results.
Can I freeze chocolate covered peanut clusters? Yes, you can freeze these clusters. Place them in an airtight container. They can last for up to three months in the freezer.
Making chocolate-covered peanut clusters is easy and fun. You learned about the main ingredients and how to prepare them. We also covered key tips to perfect your clusters and variations to try.
Remember to avoid overmelting the chocolate and store your clusters correctly. Enjoy experimenting with different chocolates and nuts. These sweet treats can fit any preference and are perfect for sharing. Each bite combines crunchy peanuts and smooth chocolate. You now have the tools to make these delicious snacks. Happy cooking!
.png)


