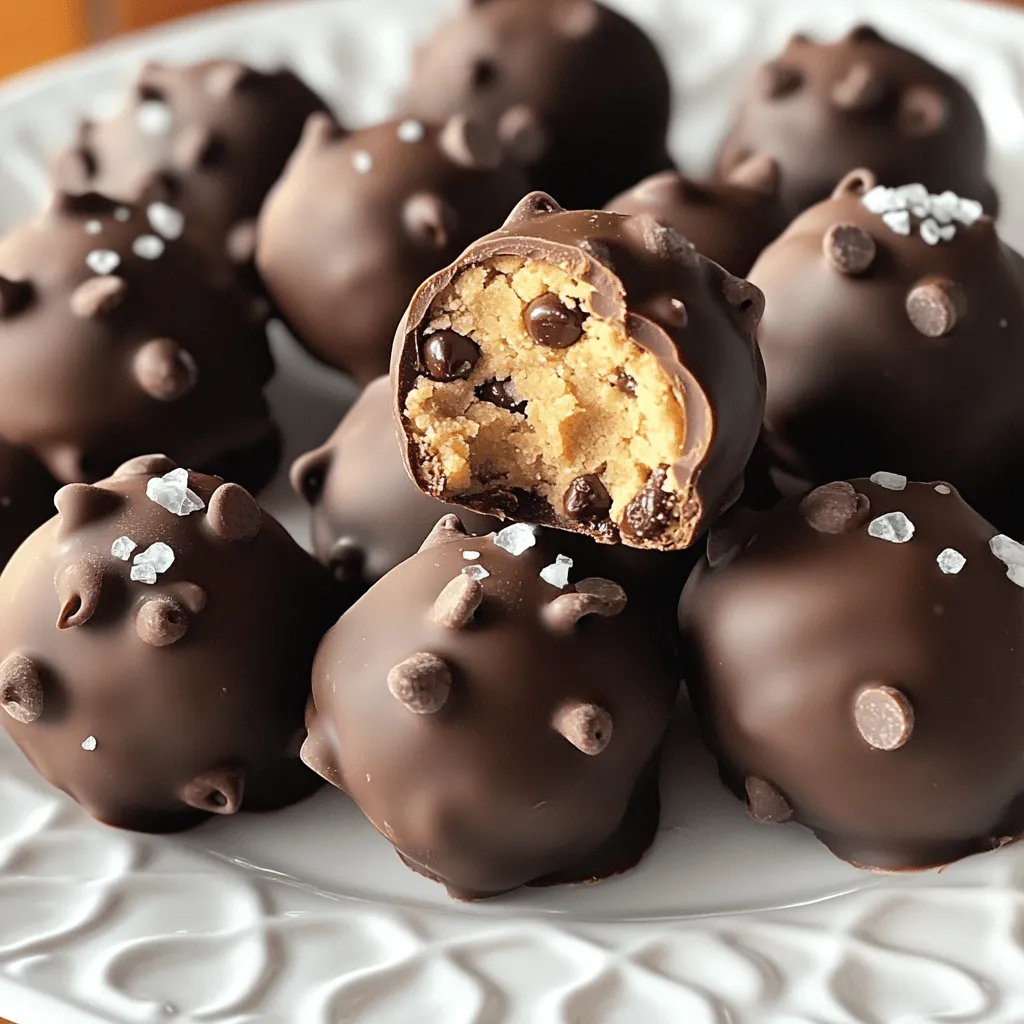
If you crave a sweet treat that’s easy to make and oh-so-delicious, you’ve found it! These Chocolate Chip Cookie Dough Truffles are creamy, indulgent, and bursting with flavor. Whether you’re a baking novice or a seasoned pro, I’ll guide you through every step. From gathering simple ingredients to perfecting the coating, you’ll impress family and friends with these irresistible bites. Let’s dive into this amazing recipe!
Why I Love This Recipe
- Deliciously Decadent: These truffles combine the irresistible flavors of chocolate chip cookies with the rich indulgence of chocolate coating.
- Easy to Make: With simple ingredients and straightforward steps, you can whip up these delightful treats in no time.
- Customizable: Feel free to experiment with different types of chocolate or add nuts for a unique twist on the classic flavor.
- Perfect for Sharing: These truffles make a great gift or party treat, sure to impress friends and family alike.
Ingredients
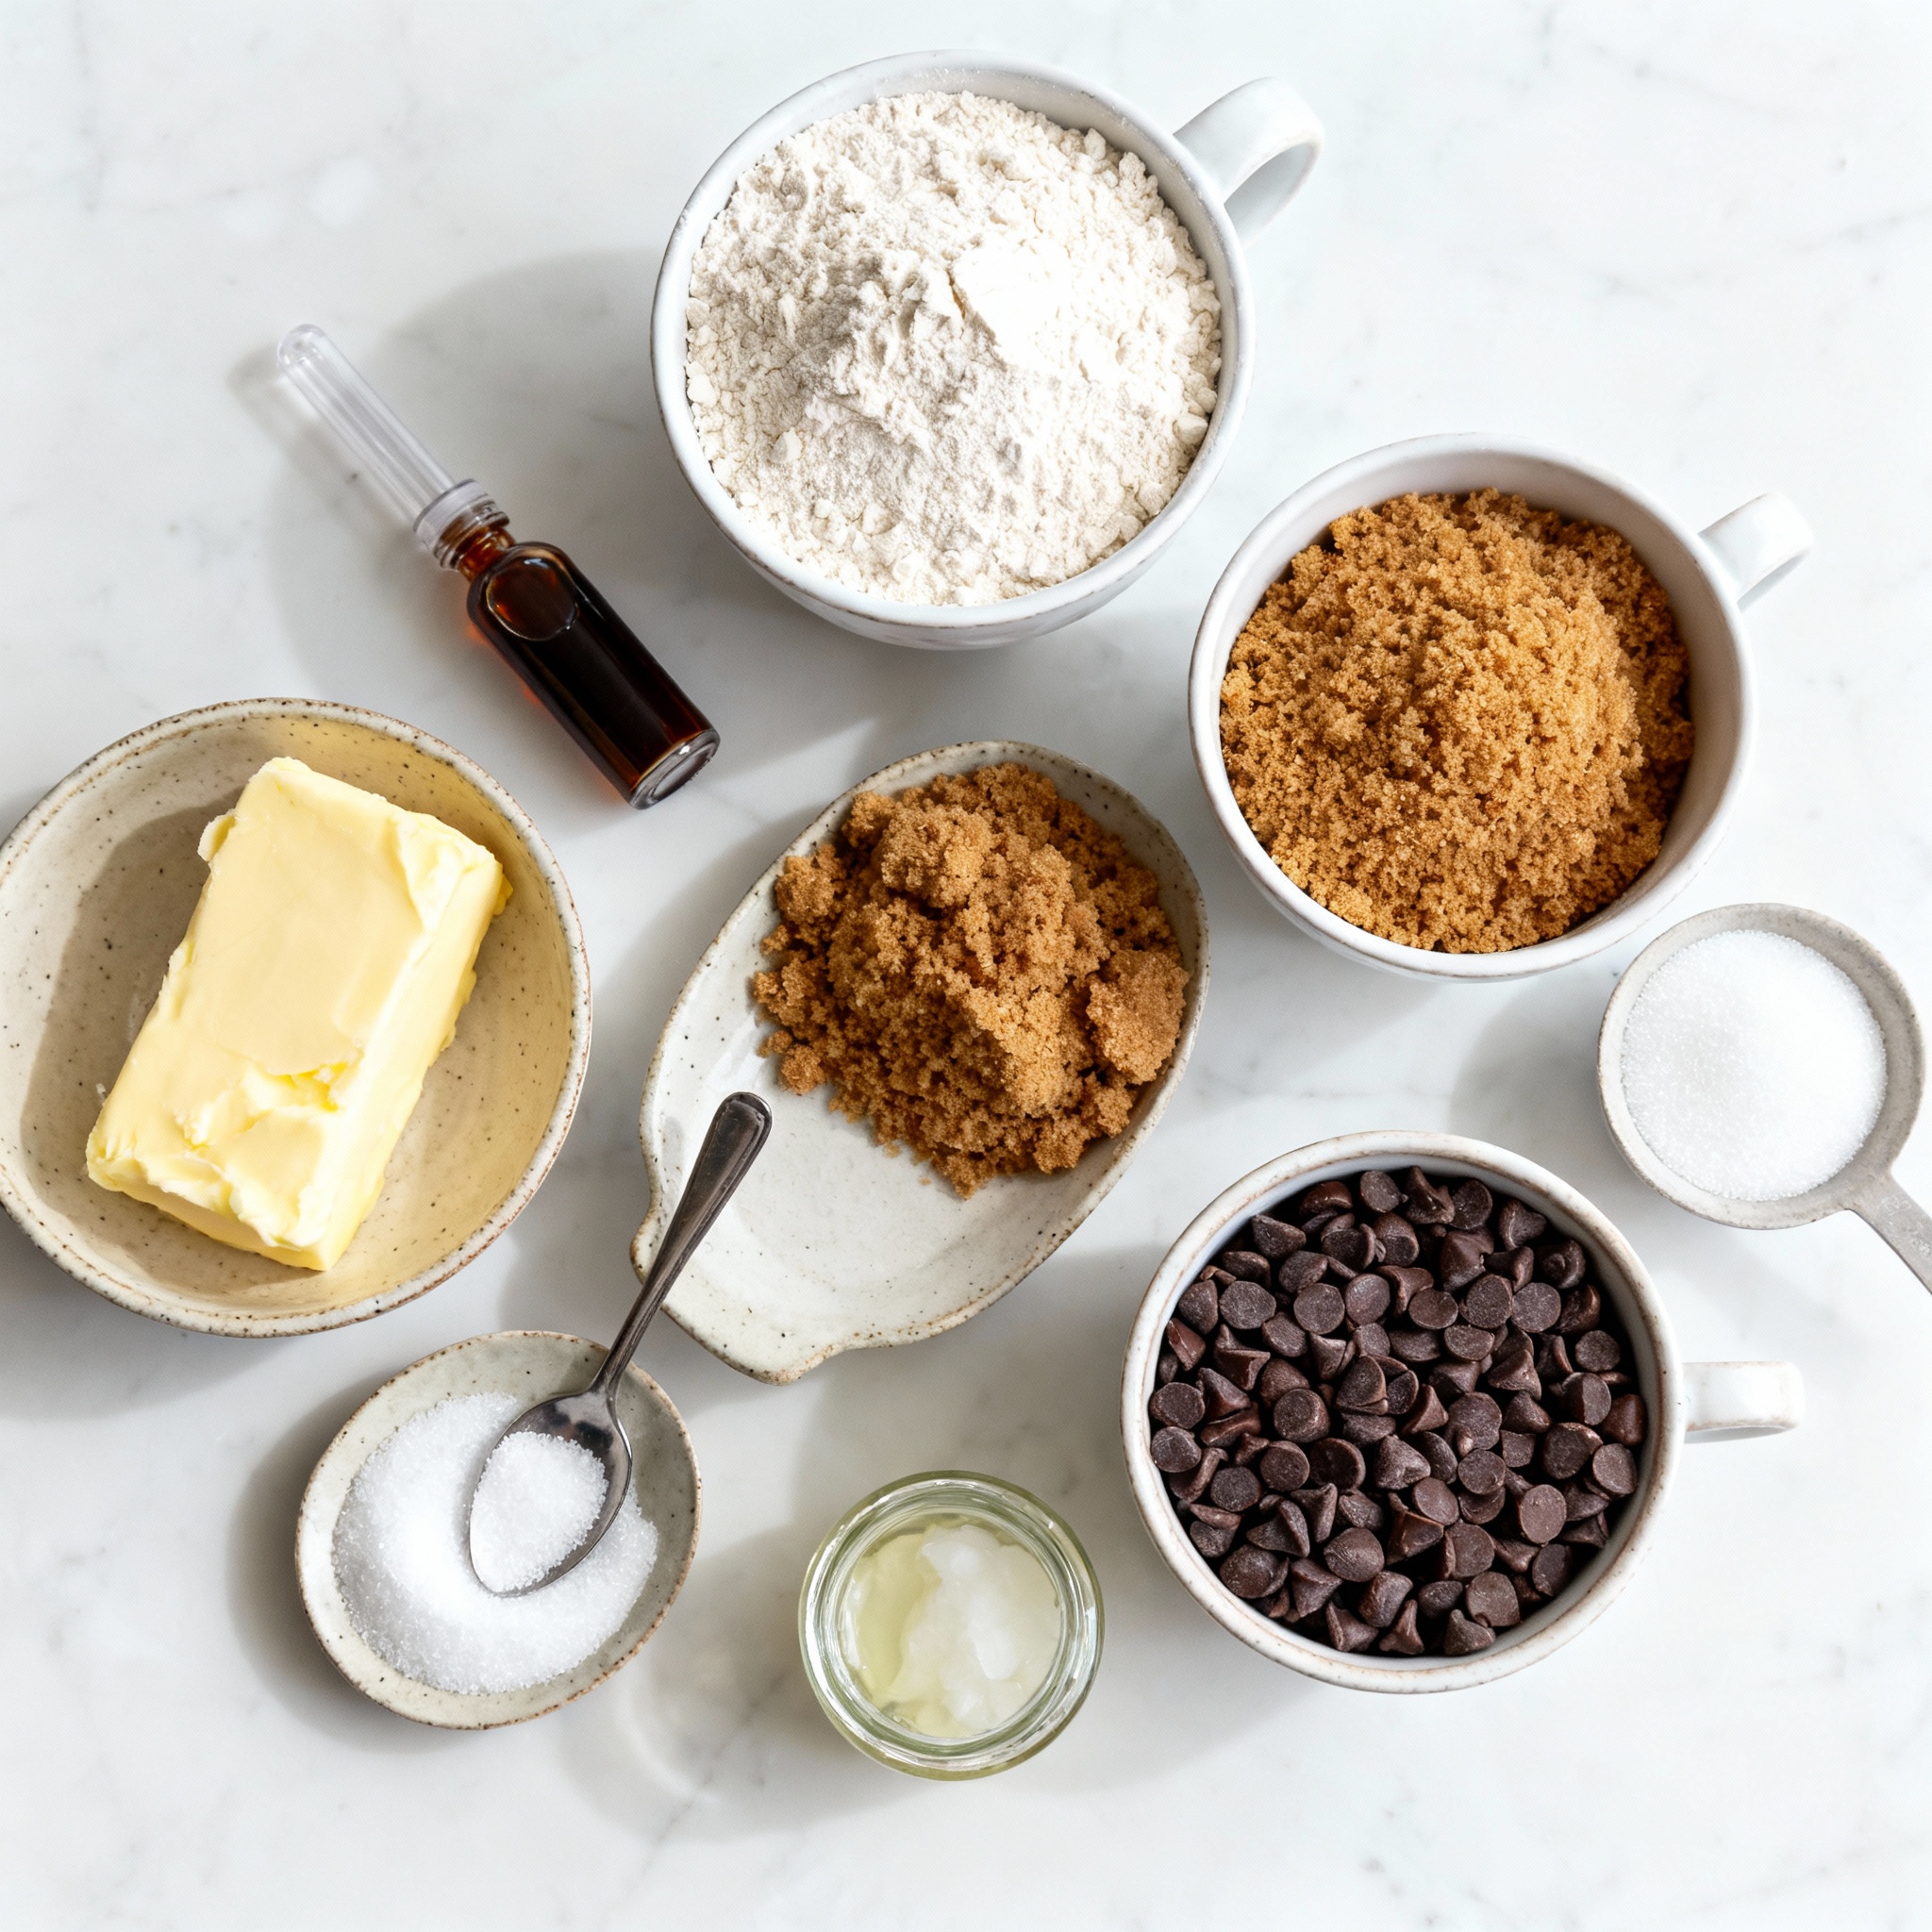
Detailed Ingredient List
– 1 cup all-purpose flour
– ½ cup unsalted butter, softened
– ½ cup brown sugar, packed
– ¼ cup granulated sugar
– 1 teaspoon vanilla extract
– 1 teaspoon salt
– ½ cup mini chocolate chips
– 1 cup semi-sweet chocolate chips (for coating)
– 1 tablespoon coconut oil (optional, for smoother coating)
The ingredients for Chocolate Chip Cookie Dough Truffles are simple but key. First, we have all-purpose flour. This gives the truffles their classic cookie dough texture. It’s important to heat the flour first to kill any bacteria.
Next is unsalted butter. It should be soft to blend well with the sugars. The brown sugar adds a rich, caramel-like flavor, while the granulated sugar brings that sweet crunch.
Vanilla extract adds a warm flavor. Salt is crucial too, as it balances the sweetness. The mini chocolate chips add fun bursts of chocolate in each bite.
Finally, we coat the truffles with semi-sweet chocolate chips. Adding coconut oil makes the coating smooth and shiny, but it’s optional.
Ingredient Substitutions
– Alternatives for butter: You can use coconut oil or vegan butter for a dairy-free option.
– Gluten-free flour options: Almond flour or gluten-free all-purpose flour work well as substitutes.
– Vegan ingredient swaps: Use maple syrup instead of sugar and coconut cream instead of butter for a vegan treat.
These substitutions allow for different diets while keeping the taste delicious. Adjust as needed to fit your preferences.
Step-by-Step Instructions
Preparation Steps
1. Heating flour for safety: Start by heating 1 cup of all-purpose flour in the microwave for about 1 minute. This step makes the flour safe to eat. It kills any germs. Let it cool a bit after heating.
2. Creaming butter and sugars: In a large bowl, add ½ cup of softened unsalted butter, ½ cup of brown sugar, and ¼ cup of granulated sugar. Mix these together until they are light and fluffy. This step adds air to your dough.
3. Mixing in other ingredients: Next, add 1 teaspoon of vanilla extract and 1 teaspoon of salt to the butter mixture. Stir until everything is well combined. Gradually mix in the cooled flour. Keep mixing until a dough forms. Finally, fold in ½ cup of mini chocolate chips. Make sure they are evenly spread throughout the dough.
Rolling and Freezing
1. Techniques for evenly sized balls: Use a small scoop or spoon to take out portions of dough. Roll each portion into a ball about 1 inch in diameter. Place the balls on a parchment-lined baking sheet. This helps keep the truffles from sticking.
2. Freezing tips for firmness: Once you have rolled all the dough into balls, freeze them for about 30 minutes. This step helps the truffles firm up. A firm truffle is easier to coat with chocolate.
Coating with Chocolate
1. Melting chocolate methods: In a microwave-safe bowl, combine 1 cup of semi-sweet chocolate chips and 1 tablespoon of coconut oil if you want a smoother finish. Microwave this mixture in 30-second intervals. Stir between each interval until the chocolate is fully melted and smooth.
2. Dipping tips for a smooth finish: Take each frozen cookie dough ball and dip it into the melted chocolate. Make sure to cover it completely. Use a fork to lift it out. Let any extra chocolate drip off before placing it back on the parchment-lined sheet. This helps create a nice finish. After coating all truffles, put them back in the fridge for at least 15 minutes to let the chocolate set.
Pro Tips
- Chill the Dough: For easier rolling, chill the dough in the refrigerator for about 15 minutes before scooping.
- Use Quality Chocolate: Opt for high-quality chocolate chips for coating to enhance the flavor of your truffles.
- Experiment with Flavors: Add a pinch of cinnamon or espresso powder to the dough for a unique twist on the classic flavor.
- Storage Tips: Store truffles in an airtight container in the refrigerator for up to a week for optimal freshness.
Tips & Tricks
Achieving the Perfect Texture
To make great truffles, pay close attention to your ingredients. Start with softened butter, as it helps create a creamy dough. The flour should be heated to kill any bacteria. This step is key to safe eating. Let it cool before mixing it in.
For the dough’s consistency, aim for a soft but not sticky texture. If it feels too dry, add a tiny bit of milk. If it’s too wet, mix in a bit more flour. Getting this balance right ensures your truffles hold their shape.
Presentation Ideas
Serving your truffles can be fun! Place them on a fancy plate. Arrange them in a circle or stack them for height. For a special touch, sprinkle a few extra mini chocolate chips or some sea salt on top. This adds color and makes them look gourmet.
You can also use cupcake liners for individual servings. This makes it easy to grab and enjoy. Add a small tag with the flavor or a fun note for guests.
Common Mistakes to Avoid
One common mistake is overmixing the dough. This can make your truffles tough. Mix just until everything is combined for a soft texture.
When dipping in chocolate, ensure it’s fully melted. If it’s too thick, add a bit of coconut oil. This gives a smoother finish. Also, let excess chocolate drip off before placing them back on the sheet. This prevents clumping. Following these tips will help you create perfect Chocolate Chip Cookie Dough Truffles every time!
Variations
Flavor Enhancements
You can make your truffles even better by adding nuts or different types of chocolate. Chopped walnuts or pecans add crunch and flavor. Try using dark chocolate chips or white chocolate chips for a twist. You can also use flavored extracts like almond or mint. These flavors make your truffles stand out.
Fun Add-Ins
Adding sprinkles, candies, or crushed cookies can bring fun to your truffles. You can mix in mini M&Ms or crushed Oreos for a new taste. Seasonal variations are also great! In December, add peppermint for a festive touch. During Easter, use pastel sprinkles. These little changes can make a big difference.
Coating Alternatives
You don’t have to stick to semi-sweet chocolate for coating. White or dark chocolate works well too. Each type gives a unique taste. You can also use crushed nuts as a coating. This adds extra texture and flavor. It’s fun to try different coatings to find your favorite.
Storage Info
Best Practices for Storage
Store your chocolate chip cookie dough truffles in an airtight container. This helps keep them fresh and tasty. You can choose to refrigerate them or freeze them, depending on when you plan to eat them.
– Refrigeration: If you keep them in the fridge, they stay good for about a week.
– Freezing: If you want them to last longer, freeze them. They can stay fresh for up to three months.
For both methods, make sure the container seals tightly. This helps avoid any unwanted smells from the fridge or freezer.
Shelf Life
How long can truffles be stored? When stored properly, your truffles can last a week in the fridge. In the freezer, they can last for three months.
Look for signs of spoilage. If you see any mold or odd smells, it’s best to toss them. Also, if the chocolate coating looks dull or has white spots, it’s best to eat them soon.
Reheating or Refreshing Truffles
If your truffles lose their texture after storage, don’t worry! You can restore their soft feel. Simply let them sit at room temperature for about 10-15 minutes before serving.
For the best taste, serve them chilled. The cold chocolate coating adds a nice crunch. You can also pop them in the microwave for a few seconds to warm them slightly. Just be careful not to melt the chocolate. Enjoy your truffles fresh!
FAQs
What is the best way to make these truffles gluten-free?
To make these truffles gluten-free, simply swap the all-purpose flour for a gluten-free flour blend. Look for blends that measure cup-for-cup, which makes it easy. You can also use almond or coconut flour. Remember, always heat your flour in the microwave for safety.
Can I use different types of chocolate for coating?
Yes, you can use various types of chocolate for coating. Dark chocolate adds a rich taste, while white chocolate offers a sweet flavor. You can also try milk chocolate for a classic sweet treat. Just ensure the chocolate melts smoothly for the best coating.
How do I know when the truffles are set properly?
You know the truffles are set when the chocolate coating is firm to the touch. After refrigerating them for at least 15 minutes, check if the chocolate is not sticky. If it feels solid and has a nice sheen, they are ready to enjoy.
What can I do with leftover cookie dough?
If you have leftover cookie dough, you can make mini cookie dough bites. Roll them into smaller balls and freeze them for later. You can also bake a few cookies if you want that classic treat. Just remember, raw dough is best enjoyed in small amounts!
You learned how to make tasty truffles by following clear steps. We covered ingredients and helpful tips for the best texture. Remember, you can swap ingredients for different diets, like gluten-free or vegan. Storage is key for keeping them fresh. Avoid mistakes like overmixing to ensure a perfect treat. I hope you feel confident to try these recipes and make your own variations. Enjoy sharing them with others, and have fun creating!
.png)


