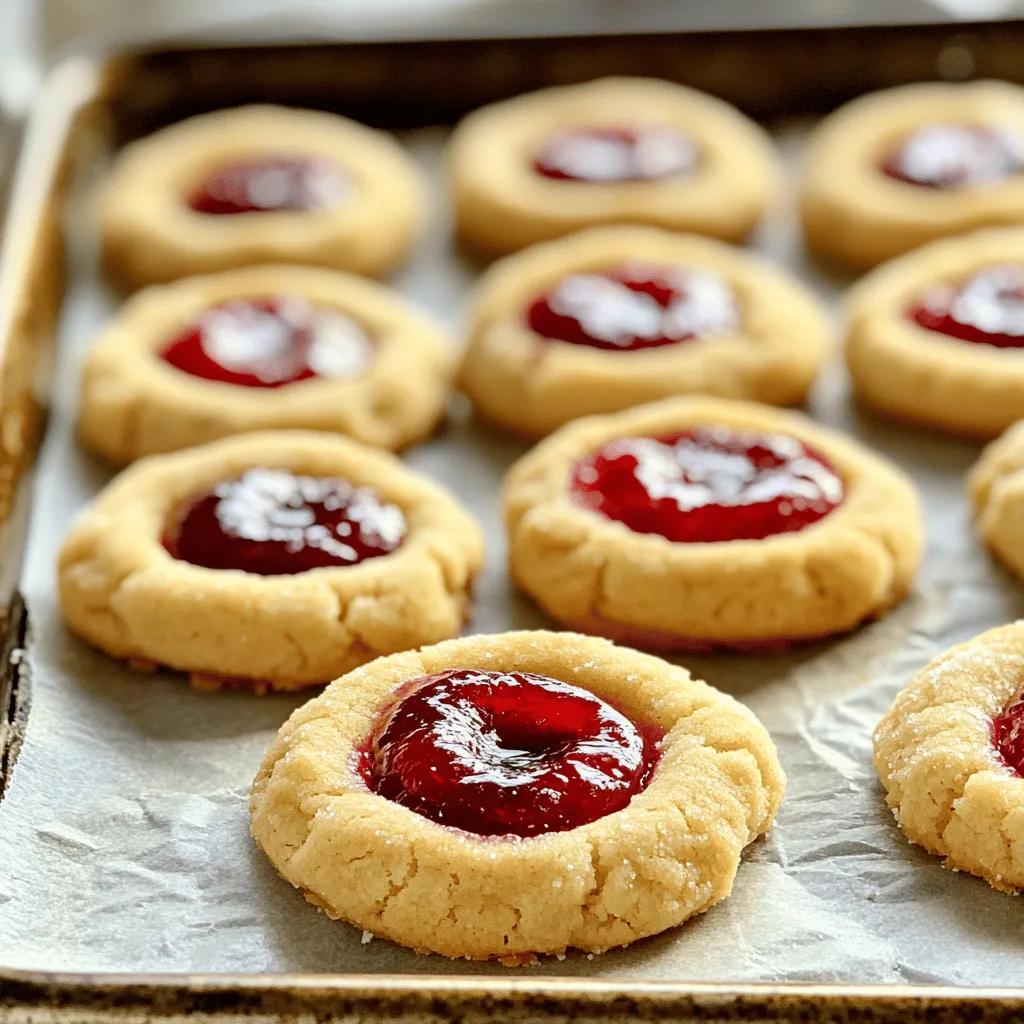
Get ready to delight your taste buds with Cherry Pie Thumbprint Cookies! This treat combines a sweet, buttery base with rich cherry preserves, creating the perfect bite. I’ve gathered an easy recipe that even beginners can master. You’ll love how simple these cookies are to make—from the basic ingredients to baking them to perfection. Let’s dive into how to create these delicious cookies that everyone will adore!
Why I Love This Recipe
- Delicious Flavor Combination: The blend of cherry preserves with the buttery cookie creates a delightful taste that is both sweet and slightly tart.
- Easy to Make: This recipe is straightforward and perfect for bakers of all levels, making it a great choice for family baking sessions.
- Perfect for Any Occasion: These cookies are versatile enough to be enjoyed at parties, holidays, or as a simple treat with tea or coffee.
- Beautiful Presentation: The thumbprint design filled with cherry preserves makes these cookies visually appealing and inviting.
Ingredients
Detailed Ingredient List
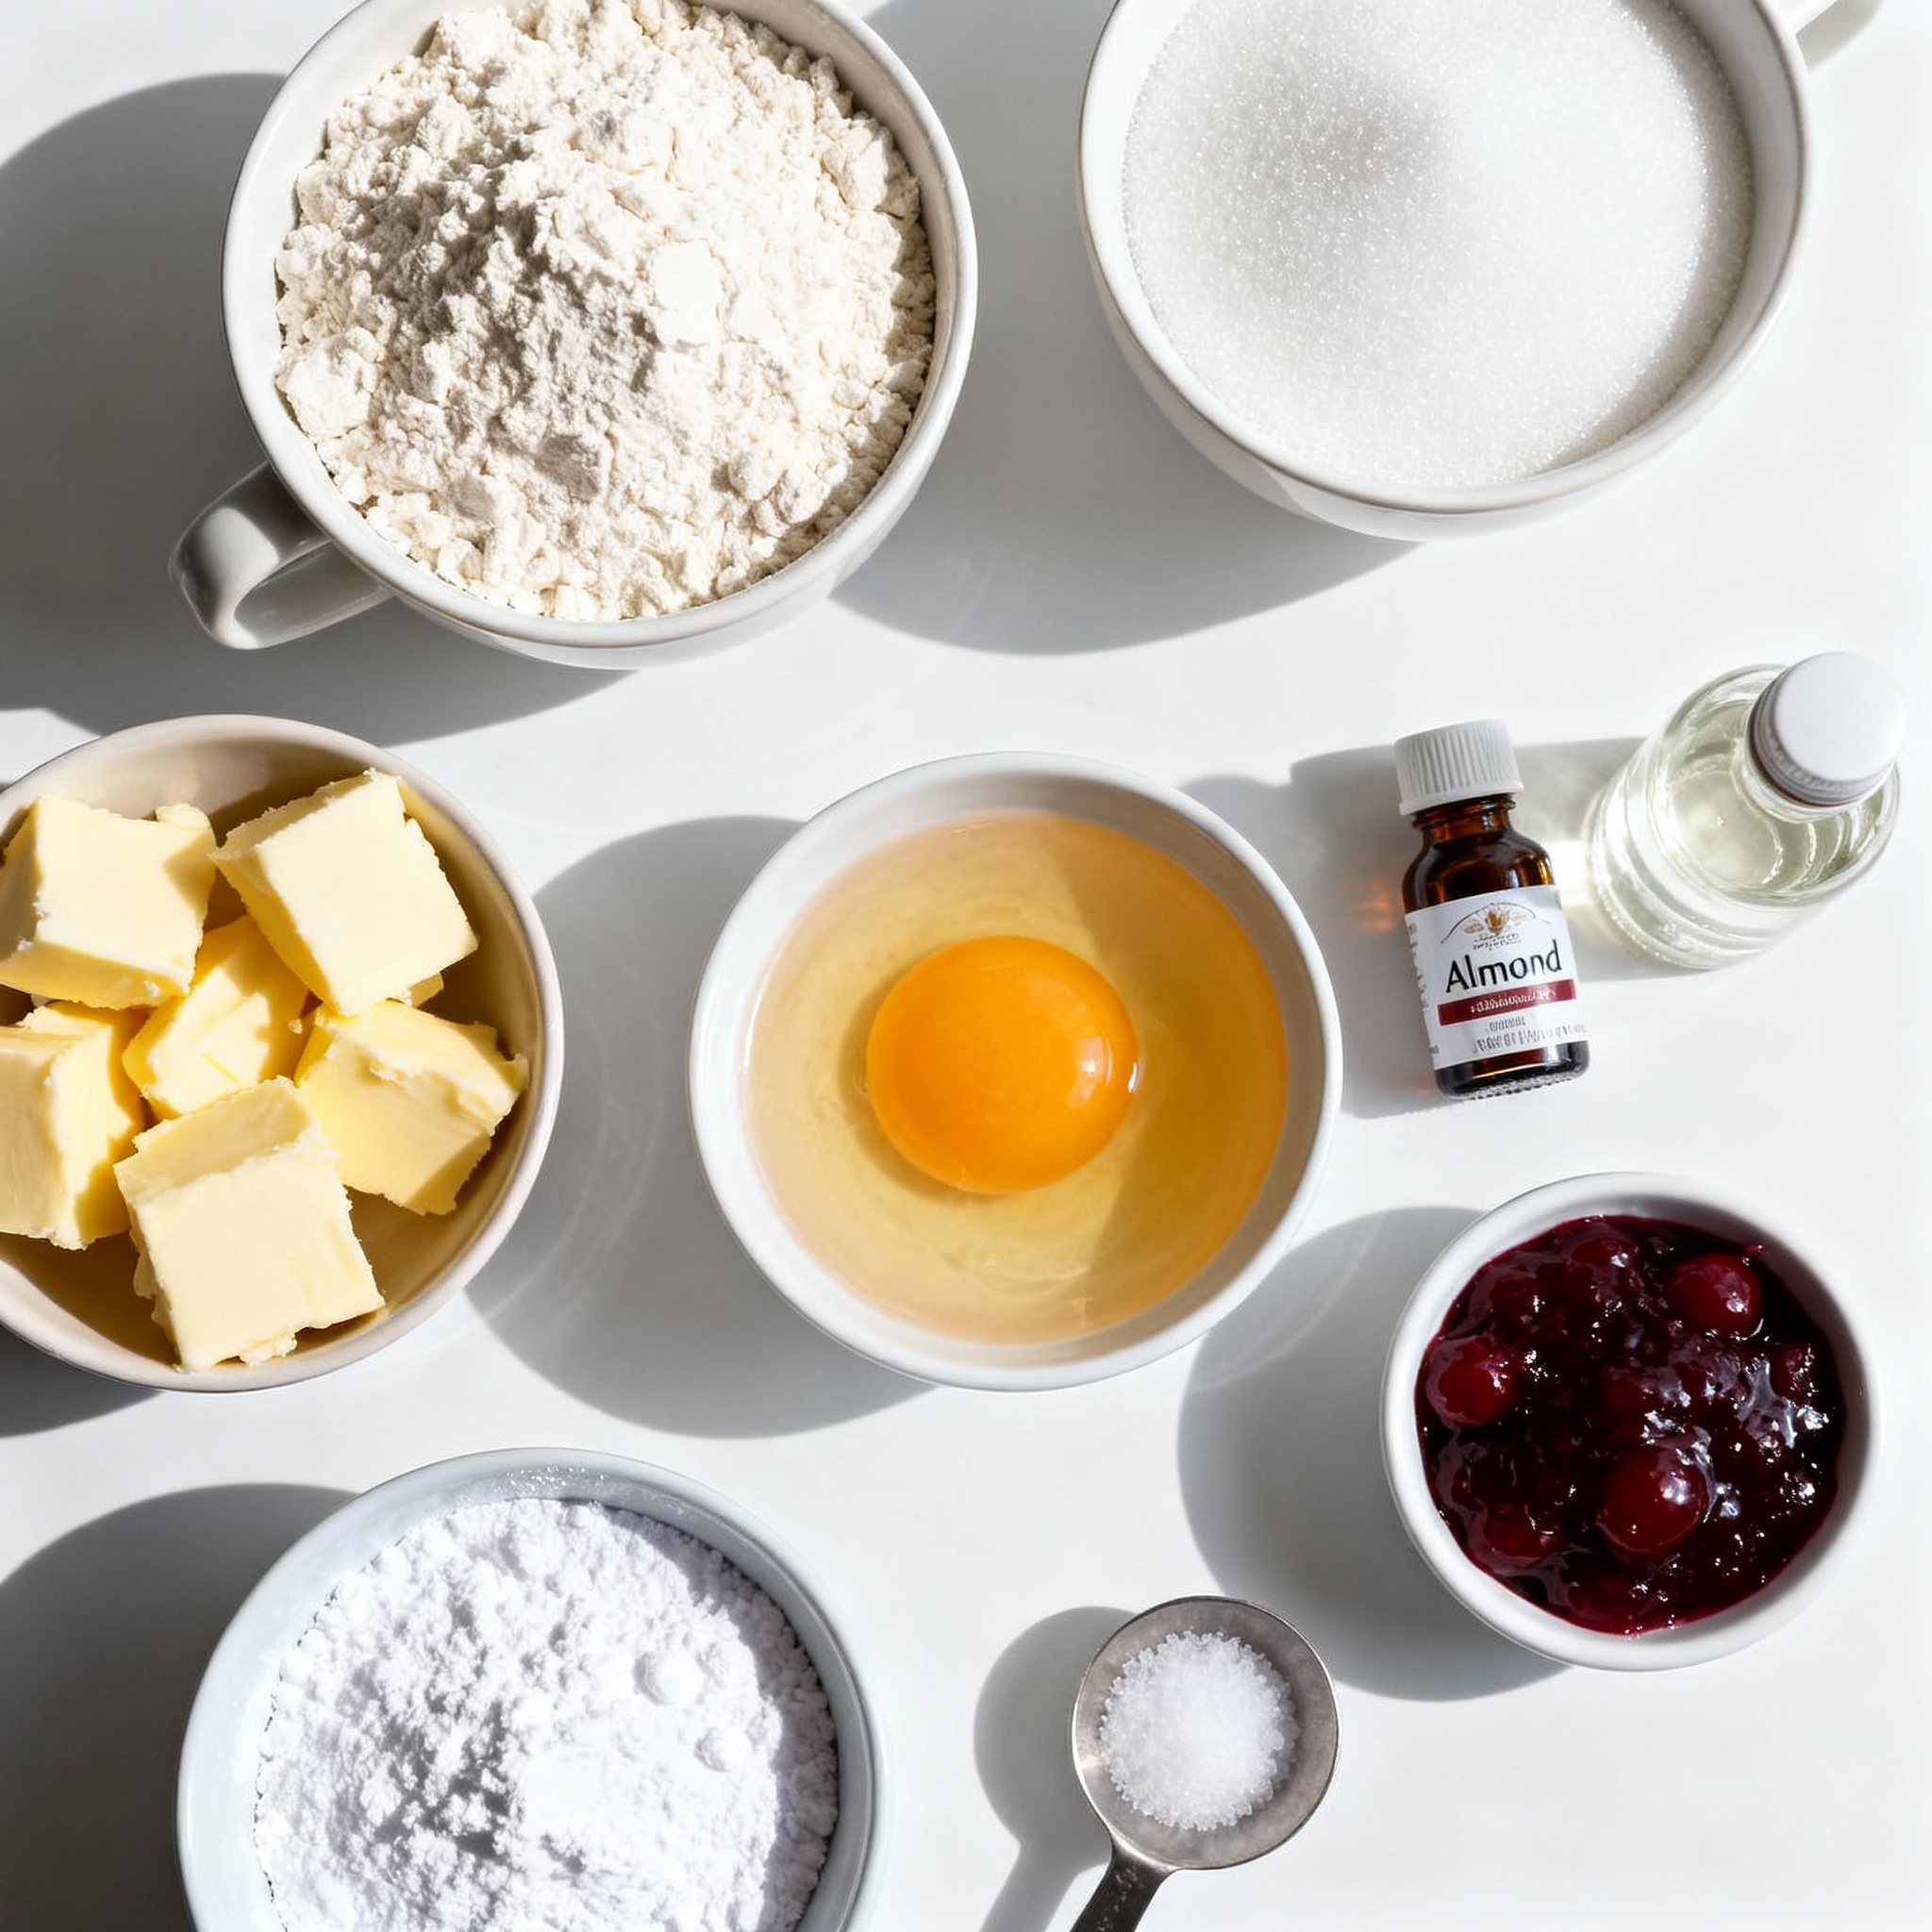
To make Cherry Pie Thumbprint Cookies, you need the following ingredients:
– 2 cups all-purpose flour
– 1/2 cup granulated sugar
– 1/2 cup unsalted butter, softened
– 1 large egg yolk
– 1 teaspoon vanilla extract
– 1/4 teaspoon almond extract
– 1/4 teaspoon salt
– 1/3 cup cherry preserves
– 1/2 cup powdered sugar (for dusting)
These ingredients work together to create tasty cookies with a sweet cherry center.
Ingredient Substitutions
If you need to make changes, here are some ideas:
– You can use salted butter instead of unsalted. Just skip the added salt.
– If you don’t have cherry preserves, try raspberry or apricot preserves for a twist.
– For a gluten-free option, look for a 1:1 gluten-free flour blend. This will work well in the recipe.
Feel free to explore these swaps to make the cookies your own!
Step-by-Step Instructions
Preparation Steps
– Preheat your oven to 350°F (175°C). Line a baking sheet with parchment paper.
– In a large bowl, cream together 1/2 cup of softened butter and 1/2 cup of granulated sugar. Mix until it feels light and fluffy. This step adds air to the mix.
Dough Formation
– Next, mix in 1 large egg yolk, 1 teaspoon of vanilla extract, and 1/4 teaspoon of almond extract. Blend well until smooth.
– Gradually add 2 cups of all-purpose flour and 1/4 teaspoon of salt. Stir until a dough forms. It should come together nicely without being sticky.
Shaping Cookies
– Scoop tablespoon-sized portions of dough. Roll them into balls in your hands.
– Place the balls on the baking sheet, leaving 2 inches of space between each.
– Using your thumb or a small spoon, make a well in the center of each ball. Ensure it’s deep enough to hold the cherry preserves.
Baking Process
– Bake the cookies for 12-15 minutes. They should be golden around the edges but still soft in the center.
– Let the cookies cool on the baking sheet for 5 minutes. After that, transfer them to a wire rack to cool completely.
– Once cooled, dust them lightly with powdered sugar for a sweet finish.Enjoy the fun of making these treats!
Pro Tips
- Chill the Dough: For the best texture, chill the dough for 30 minutes before shaping the cookies. This will help them hold their shape while baking.
- Use Fresh Preserves: Opt for high-quality cherry preserves or homemade if possible. Fresh, flavorful preserves will enhance the overall taste of the cookies.
- Don’t Overfill: When adding the cherry preserves, be cautious not to overfill the wells. This can cause the preserves to spill over during baking.
- Experiment with Extracts: Feel free to experiment with different extracts like lemon or orange for a unique twist on the flavor profile of these cookies.
Tips & Tricks
Baking Tips
To get the perfect cookie texture, focus on the creaming step. Cream the butter and sugar until it looks light and fluffy. This helps the cookies rise well.
For the wells, be careful not to overfill. If you add too much cherry preserves, they will spill over while baking. A small spoonful is enough to make each cookie shine.
Presentation Suggestions
Dust your cookies with powdered sugar right before serving. This adds a sweet touch and makes them look fancy. Pair these cookies with a cup of tea or coffee for the best experience. The flavors blend well together.
Enhancements
Want to make your cookies pop? Add a pinch of cinnamon or lemon zest to the dough. These spices can give your cookies a nice twist.
For decoration, try drizzling melted chocolate on top after baking. It not only looks great but also adds more flavor. You can also use colorful sprinkles for a fun look.
Variations
Flavor Variations
You can change the flavor of your Cherry Pie Thumbprint Cookies easily. Try using different types of fruit preserves. Raspberry, apricot, or even blueberry can work well. Each fruit gives a new twist to the cookies. You can also add nuts or chocolate chips. Chopped pecans or walnuts can add a nice crunch. If you love chocolate, mix in some mini chocolate chips for a sweet surprise.
Dietary Variations
Making these cookies vegan is simple. Replace the egg yolk with a flax egg. Mix one tablespoon of ground flaxseed with three tablespoons of water. Let it sit for a few minutes until it thickens. You can also use plant-based butter to keep the rich taste. For low-sugar cookies, try using a sugar substitute. Stevia or monk fruit sweetener can cut down the sugar without losing flavor.
Seasonal Variations
You can adapt the cookies for different seasons too. In autumn, add pumpkin puree and spices like cinnamon or nutmeg. This gives your cookies a warm, cozy flavor. For the holidays, top them with festive sprinkles or colored icing. You can also use peppermint extract for a minty twist. These fun variations make your Cherry Pie Thumbprint Cookies perfect for any occasion.
Storage Info
Storing Cookies
To keep your Cherry Pie Thumbprint Cookies fresh, store them in an airtight container. This method keeps moisture out and preserves their softness. Line the container with parchment paper, so the cookies do not stick together.
– Use a plastic or glass container with a tight lid.
– Avoid metal containers, as they can trap moisture.
– Store cookies at room temperature for up to a week.
Freezing Instructions
You can freeze unbaked dough for later use. This method lets you enjoy fresh cookies anytime.
– To freeze, scoop the dough into balls and place them on a tray.
– Freeze the dough balls for two hours and then transfer them to a freezer bag.
– Label the bag with the date and type of cookie.
When you want to bake frozen cookies, thaw them in the fridge overnight.
– Add a minute or two to the baking time if the dough is still cold.
This way, you can enjoy warm, delicious cookies whenever you want!
FAQs
Common Questions
How do I know when the cookies are done?
You can tell the cookies are done when the edges turn light brown. The center should still look soft. If they are golden around the edges, it’s time to take them out.
Can I use other fruits for thumbprint cookies?
Yes, you can use many types of fruit preserves. Strawberry, raspberry, or apricot work well. Feel free to mix and match to find your favorite!
What can I serve with Cherry Pie Thumbprint Cookies?
These cookies pair nicely with milk or tea. You can also serve them with ice cream for a fun dessert. They are great for parties or casual snacks.
Baking Troubleshooting
Why did my cookies spread too much?
Cookies may spread if the butter is too warm. Make sure to chill your dough for about 30 minutes before baking. This helps them hold their shape.
What to do if the dough is too sticky?
If your dough is sticky, add a bit more flour. Start with a tablespoon at a time until the dough is manageable. You want it soft, but not sticky.
Recipe Adjustments
How can I adjust the recipe for fewer servings?
To make fewer cookies, simply halve the ingredients. This will give you about 12 cookies. Make sure to adjust your baking time as well.
Can I double the recipe for a larger batch?
Yes, you can double the recipe easily. Just make sure you have a big bowl for mixing. Baking times should stay the same, but keep an eye on them.
You learned how to make Cherry Pie Thumbprint Cookies, starting with key ingredients. We covered substitutions and tips for success. Proper storage can keep your cookies fresh longer. You can enhance flavors and adapt recipes to fit your needs. Remember, baking is a fun adventure. Experiment with variations and enjoy the process. These cookies are perfect for any occasion and sure to impress! Happy baking!
.png)


