Are you ready to indulge in a sweet delight that’s simple to make? This Banana Nutella Crepe Cake is the perfect treat for any occasion. With layers of fluffy crepes, rich Nutella, and ripe bananas, it’s a dessert everyone will love. In this guide, I’ll walk you through easy steps to create this mouthwatering cake. Trust me, your taste buds will thank you! Let’s dive in!
Why I Love This Recipe
- Deliciously Indulgent: This crepe cake layers Nutella and bananas, creating a rich and satisfying dessert that is hard to resist.
- Perfect for Any Occasion: Whether it’s a birthday, a holiday, or simply a weekend treat, this cake is sure to impress your guests.
- Easy to Make: Despite its impressive appearance, this crepe cake is simple to prepare and can be made ahead of time.
- Customizable: You can easily switch up the flavors by adding different fruits or spreads, making it versatile for everyone’s taste.
Ingredients
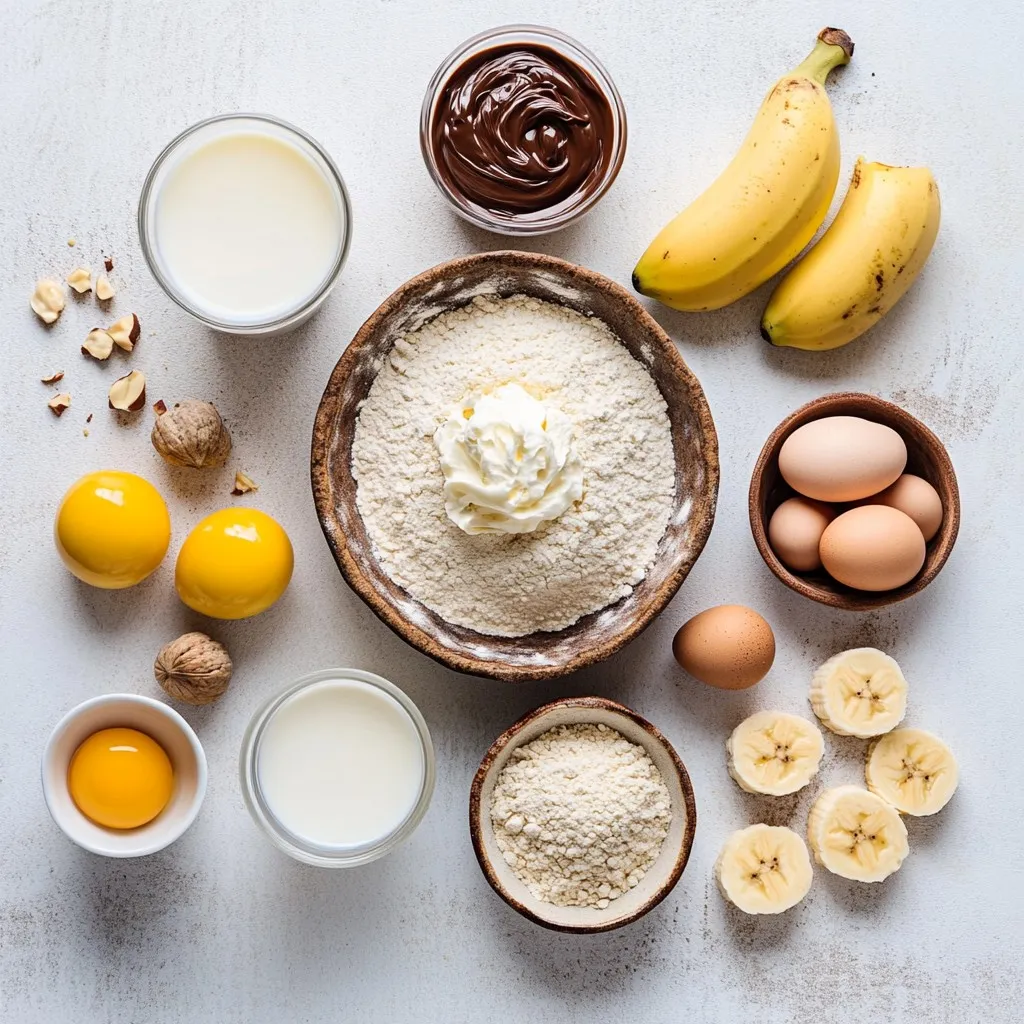
List of Ingredients
– 2 cups all-purpose flour
– 3 large eggs
– 1 ½ cups milk
– ½ cup water
– 1 tablespoon vanilla extract
– 2 tablespoons sugar
– 4 tablespoons unsalted butter, melted
– 3 ripe bananas, sliced
– 1 cup Nutella
– Whipped cream for serving (optional)
– Chopped hazelnuts for garnish (optional)
To make this Banana Nutella crepe cake, gather these simple ingredients. You need two cups of all-purpose flour to create a smooth batter. Use three large eggs to bind the mixture. For the liquid, use one and a half cups of milk and half a cup of water. The vanilla extract adds a lovely flavor, so don’t skip the tablespoon.
Two tablespoons of sugar will give the crepes a touch of sweetness. Melt four tablespoons of unsalted butter for cooking the crepes. You’ll need three ripe bananas, sliced, to layer with Nutella. One cup of Nutella brings the rich, chocolatey taste we all love. Lastly, whipped cream can top your cake, and chopped hazelnuts add a nice crunch.
Make sure to have everything ready. This way, you will enjoy the process more! Each ingredient plays a role in making this cake a delightful treat.
Step-by-Step Instructions
Preparing the Crepe Batter
– Mixing the Ingredients
Start by taking a large bowl. Add 2 cups of all-purpose flour, 3 large eggs, and 1 ½ cups of milk. Then, pour in ½ cup of water, 1 tablespoon of vanilla extract, and 2 tablespoons of sugar. Use a whisk to mix everything well until it is smooth.
– Allowing Batter to Rest
Let the batter sit for 30 minutes. This step helps the gluten relax. A relaxed batter makes for softer crepes.
Cooking the Crepes
– Heating the Skillet
Heat a non-stick skillet over medium heat. Lightly grease it with 4 tablespoons of melted butter. Make sure the skillet is hot but not smoking.
– Cooking and Flipping the Crepes
Pour about ¼ cup of batter into the skillet. Swirl it around to coat the bottom. Cook for 1-2 minutes until the edges lift. Flip the crepe carefully and cook for another minute. Place the cooked crepe on a plate. Repeat until all batter is used, stacking the crepes as you go.
Assembling the Cake
– Layering Nutella and Bananas
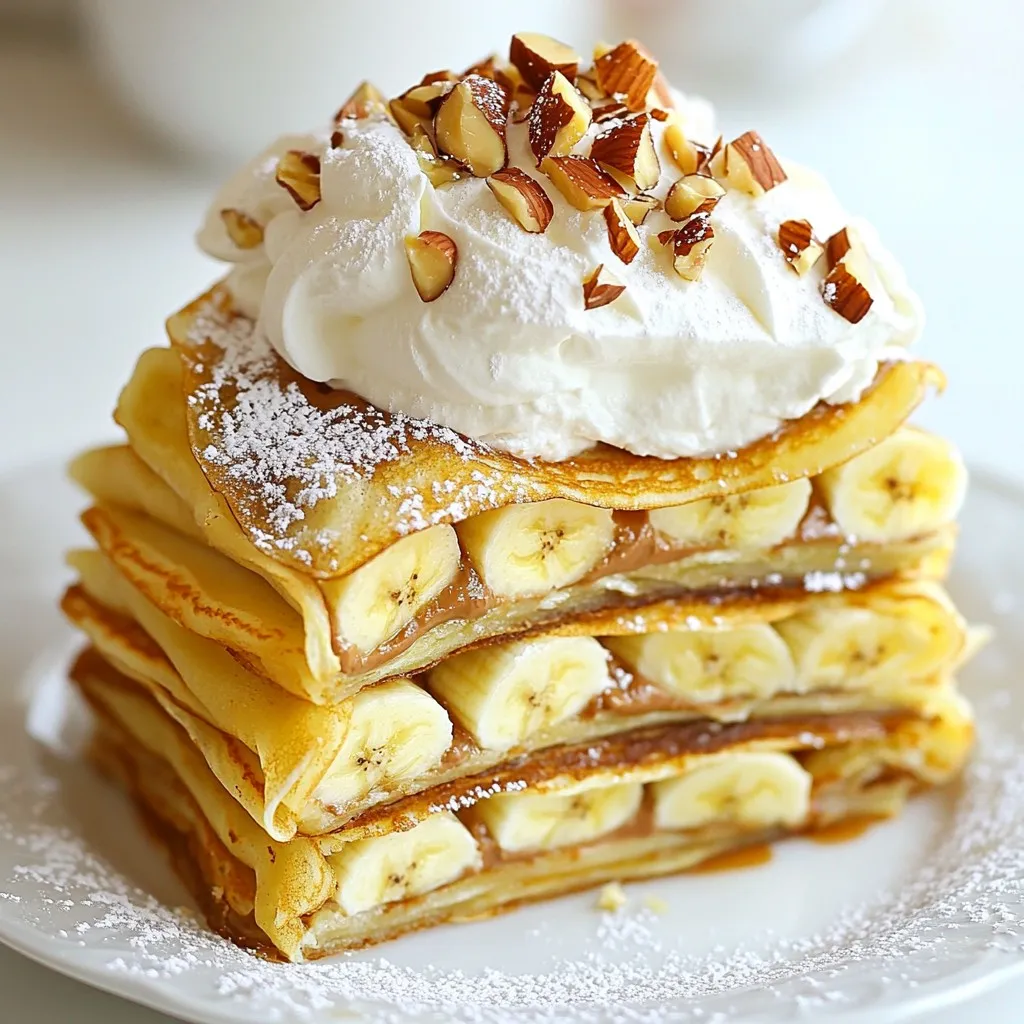
On a serving plate, place one crepe. Spread a thin layer of Nutella over it. Add a few banana slices on top. Place another crepe on top and repeat. Keep layering until you use all crepes, finishing with a crepe on top.
– Final Layer of Crepes
Make sure the last layer is a crepe. This helps hold everything together.
Chilling the Cake
– Importance of Chilling
Cover the assembled cake with plastic wrap. Chill it in the refrigerator for at least 2 hours. Chilling helps the layers set and makes it easier to slice.
Serving Suggestions
– How to Slice and Serve
When you’re ready, slice the cake into wedges. Use a sharp knife for clean cuts.
– Optional Toppings
Top each slice with whipped cream if you like. You can also sprinkle chopped hazelnuts for a nice crunch. Enjoy your delicious cake!
Tips & Tricks
Perfecting Your Crepes
– Tips for Smooth Batter: Start with room temperature eggs. This helps mix better. Whisk all the ingredients well until no lumps remain. Let the batter rest for 30 minutes. This step makes the crepes smooth.
– Avoiding Sticking: Use a non-stick skillet for cooking. Lightly grease it with melted butter. Pour just enough batter to coat the bottom. This helps prevent sticking during cooking.
Flavor Enhancements
– Adding Additional Ingredients: You can mix in a pinch of salt. This brings out the sweetness. Try adding cinnamon for a warm flavor. A little cocoa powder can make it richer too.
– Using Different Spreads: Nutella is great, but you can try chocolate spread. Almond butter or peanut butter also works well. For a fruity twist, spread a layer of fruit jam.
Decorating Your Cake
– Presentation Ideas: Stack the crepes tall for a beautiful look. Use a cake stand to elevate your dessert. Dust powdered sugar on top for a classic touch.
– Custom Garnishing Options: Use whipped cream for a fluffy finish. Chopped hazelnuts add crunch and flavor. Fresh fruit like berries or banana slices make it vibrant.
Pro Tips
- Rest the Batter: Letting the crepe batter rest for at least 30 minutes allows the gluten to relax, resulting in tender and easy-to-flip crepes.
- Use the Right Heat: Make sure your skillet is at the right temperature—too hot can burn the crepes, while too cool can result in undercooked crepes.
- Layering Technique: For the best presentation, spread a thin layer of Nutella and add banana slices evenly between each crepe to ensure balanced flavors in every bite.
- Chill Before Serving: Allowing the assembled cake to chill for at least 2 hours helps the layers set and makes it easier to slice.
Variations
Substitute Fillings
You can change the filling to make this cake your own. Here are a few ideas:
– Different Nut Butters: Swap Nutella for almond butter or peanut butter. Each nut butter adds its own unique taste.
– Additional Fruits: Try adding strawberries, raspberries, or even mango slices. These fruits give your cake a fresh twist.
Dietary Adjustments
You can also make this cake to fit your diet. Here’s how:
– Gluten-Free Alternatives: Use gluten-free flour instead of all-purpose flour. This keeps the texture nice and light.
– Dairy-Free Options: Replace milk with almond milk or oat milk. You can also use a dairy-free butter for the crepes.
Serving for Different Occasions
You can easily adjust this cake for any event. Here are some tips:
– Modifying for Parties: Make a larger cake by stacking more crepes. You can also decorate it with fresh fruit or chocolate drizzle for a fun look.
– Creating Mini Versions: Use a smaller skillet to make mini crepes. Stack them for individual servings, perfect for kids or parties.
Storage Info
Storing Leftovers
To keep your Banana Nutella Crepe Cake fresh, store it properly. Place leftover slices in an airtight container. You can also wrap it tightly in plastic wrap. This helps keep the cake moist.
If you have a whole cake left, you can cover it in plastic wrap. It’s best to chill the cake in the fridge. This will help keep it fresh and tasty.
You can freeze the crepe cake, too. Just wrap it well in plastic wrap and then in foil. This prevents freezer burn. When you’re ready to eat it, let it thaw in the fridge overnight.
Reheating Instructions
To enjoy leftovers, you can serve them cold or warm. For a warm slice, use a microwave. Heat it for about 15-20 seconds. Check to see if it’s warm. You don’t want it too hot.
You can also reheat it in the oven. Preheat your oven to 350°F (175°C). Place the slice on a baking sheet. Warm it for about 10 minutes. This makes the crepe soft again.
Shelf Life
In the fridge, the Banana Nutella Crepe Cake lasts about 3-4 days. After this time, it may lose its flavor and texture. If you freeze it, it can last up to 2 months. Just remember to wrap it well. This keeps it fresh and tasty for later.
FAQs
How do I make the crepes thinner?
To make thinner crepes, use less batter. Pour only about ¼ cup into the skillet. Swirl the skillet to spread the batter evenly. This helps create a delicate texture. You can also try a larger skillet for more surface area.
Can I make the crepe batter ahead of time?
Yes, you can make the batter ahead. Whisk the ingredients and let it rest. Store it in the fridge for up to 24 hours. Just remember to stir it again before cooking. This will help keep everything mixed well.
What can I use if I don’t have Nutella?
If you don’t have Nutella, try chocolate spread or peanut butter. Almond butter or any nut butter works well too. You can also use fruit preserves for a different taste. Each option brings its own flavor twist.
How do I prevent my crepes from tearing?
To prevent tearing, make sure your skillet is at the right heat. Too hot can burn the crepes; too cold can make them stick. Also, let them cook until the edges lift easily before flipping.
Can I add chocolate to my crepe batter?
Absolutely! To add chocolate, mix in cocoa powder with the flour. You can also melt chocolate and whisk it into the batter. This gives a rich flavor and pairs well with the bananas and Nutella.
This article covered how to create a delicious Nutella and banana crepe cake. We discussed the ingredients, step-by-step instructions, tips, variations, storage, and FAQs. You now have the tools to impress at any event with this tasty treat. Don’t hesitate to experiment with flavors and styles. Enjoy your baking adventures and share this fun recipe with friends and famil
.png)


